How to Record on IG Without Holding: 5 Easy Methods (2026)
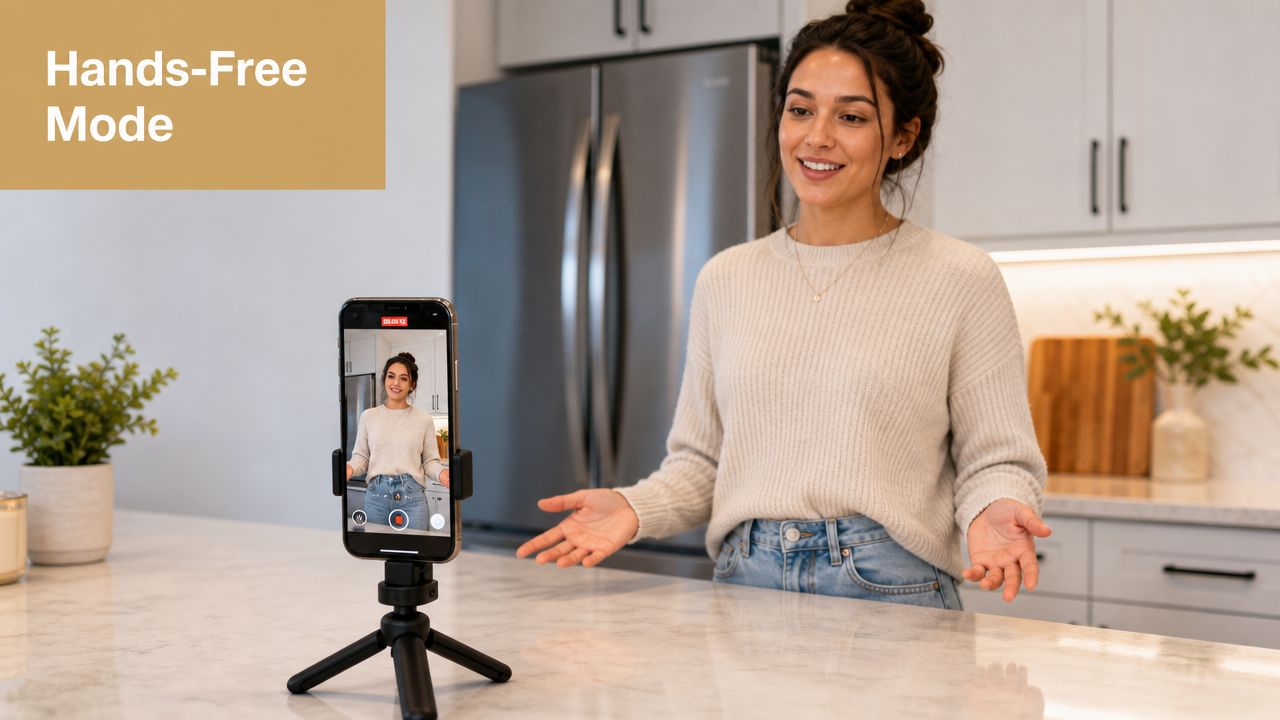
You set your phone against a mug, lean back to get in frame, hit record, and then realize you still need one finger glued to the screen. The result is usually the same. Awkward posture, shaky framing, and a clip that looks more like setup footage than something you'd post. That's why people search for how to record on IG without holding in the first place. Usually, they don't just want a trick. They want the right method for the moment. A quick Story from the car? A talking-head Reel in your office? A product demo where both hands need to stay visible? Those are different jobs, and they call for different tools. Some options are built into Instagram. Some are better handled by your phone's camera app. If you use an iPhone, a couple of accessibility features can give you more control than most creators realize. And if you're producing polished tutorials or software demos, a simple phone-only setup usually stops being enough.
Tired of One-Handed Instagram Videos?
If you've ever tried to film a mini tutorial, outfit clip, recipe step, or product unboxing while keeping a thumb on the record button, you already know the problem. You can either hold the phone and lose stability, or prop it up and keep walking back to the screen. That friction shows up in the final video. Your opening seconds get wasted reaching for the phone. Your framing drifts because you rushed setup. If you need both hands for the shot, the whole thing falls apart. The fix depends on the kind of content you're making.
- For quick Instagram Stories or simple solo clips: Instagram's built-in Hands-Free mode is the fastest option.
- For cleaner footage and more retakes: your phone's native camera app gives you more breathing room.
- For remote control on iPhone: accessibility settings can help you trigger recording without standing next to the device.
- For polished demos and business content: a tripod, remote, and screen recording workflow usually make more sense than forcing everything through the Instagram camera.
Practical rule: Pick the tool based on the shot, not based on habit. Convenience matters for Stories. Control matters for demos.
The biggest mistake is assuming there's one universal method. There isn't. There's a fast method, a flexible method, and a professional method. Once you know which is which, recording on Instagram without holding stops feeling like a workaround and starts feeling normal.
Using Instagram's Native Hands-Free Mode
If you want the shortest path from idea to post, start inside Instagram. The app's Hands-Free option is the native answer to how to record on IG without holding, and for many people it's enough.
When to use it
Use this when speed matters more than control. If you're filming a quick update, a casual behind-the-scenes clip, or a short piece to camera, it removes the most annoying part of handheld recording. Instagram's official help says Hands-Free lets you record a Story video without holding the button. You tap Hands-Free, tap once to start recording, and tap again to stop. It also notes that you can press and hold to trigger a countdown before recording starts through Instagram's Hands-Free help page. That last part matters more than is often realized. A countdown gives you a chance to step back, fix posture, and look ready when the clip starts.
How to turn it on
The workflow is simple:
- Open Instagram and go to the Story camera.
- Swipe through the camera modes until you find Hands-Free.
- Tap the record button once to start.
- Tap again when you want to stop. A practical guide to the feature notes that Instagram's native hands-free recording mode lets you start a Story or Reel with a single tap and keep recording until you tap again, and that one guide lists the recording limit for this mode as one minute in this hands-free Instagram walkthrough. That's enough for a lot of Story-style content. It's less comfortable for anything that needs multiple takes, tighter timing, or careful pacing. Here's a quick visual demo of the in-app workflow:
What trips people up
The usual problem isn't that Hands-Free is hard. It's that people miss the mode selector and assume a plain tap should start video. Without choosing Hands-Free, a normal tap can behave like a photo capture instead of starting a video. That's why this method works well for simple filming, but not for every scenario.
| Situation | Native Hands-Free fit |
| Quick Story update | Strong fit |
| Talking-head Reel with light setup | Good fit |
| Product demo using both hands | Sometimes |
| Multi-take tutorial | Weak fit |
| Screen recording or app demo | Not the right tool |
If you're filming alone and want the fastest no-extra-gear option, this is the default. If you need editing control, it starts to feel cramped fast.
Pre-Recording with Your Phone's Camera App
A lot of creators outgrow Instagram's camera before they realize they have. The app is convenient, but convenience isn't the same as control. If the clip matters, recording first in your phone's camera app is usually the cleaner move.
Why creators switch to the camera app
Your native camera app gives you space to work. You can frame once, do multiple takes, trim later, and upload only the version that's worth posting. That changes how you shoot. Instead of performing inside Instagram's interface, you focus on the footage first and the platform second. A simple workflow looks like this:
- Set the shot first: lock in your angle, lighting, and background before you hit record.
- Record more than you need: give yourself a few seconds at the start and end so editing feels easier.
- Trim before upload: cut dead air, bad starts, and awkward walk-ins.
- Export for vertical posting: if you're unsure how to prep footage on iPhone, this video workflow for iPhone creators is a useful reference.
When this workflow makes more sense than Instagram
This is the better choice when you're filming:
- Tutorials: because retakes are easier
- Product shots: because you can focus on hands, lighting, and detail
- Speaking clips: because you can redo your opening without reopening Instagram
- Anything with movement: because it's easier to monitor framing and stabilize the phone properly The trade-off is speed. Pre-recording adds a step. You have to upload afterward, and you lose the instant feel of filming directly in-app. But the gain is worth it if the content needs polish. You're no longer fighting the interface while trying to perform. For many creators, that alone improves the final result more than any hidden Instagram setting ever will.
Advanced Control with iPhone Accessibility Tricks
If you use an iPhone, the most underrated answers to how to record on IG without holding aren't inside Instagram at all. They're in Accessibility. These tools weren't built as creator features, but they can solve creator problems surprisingly well.
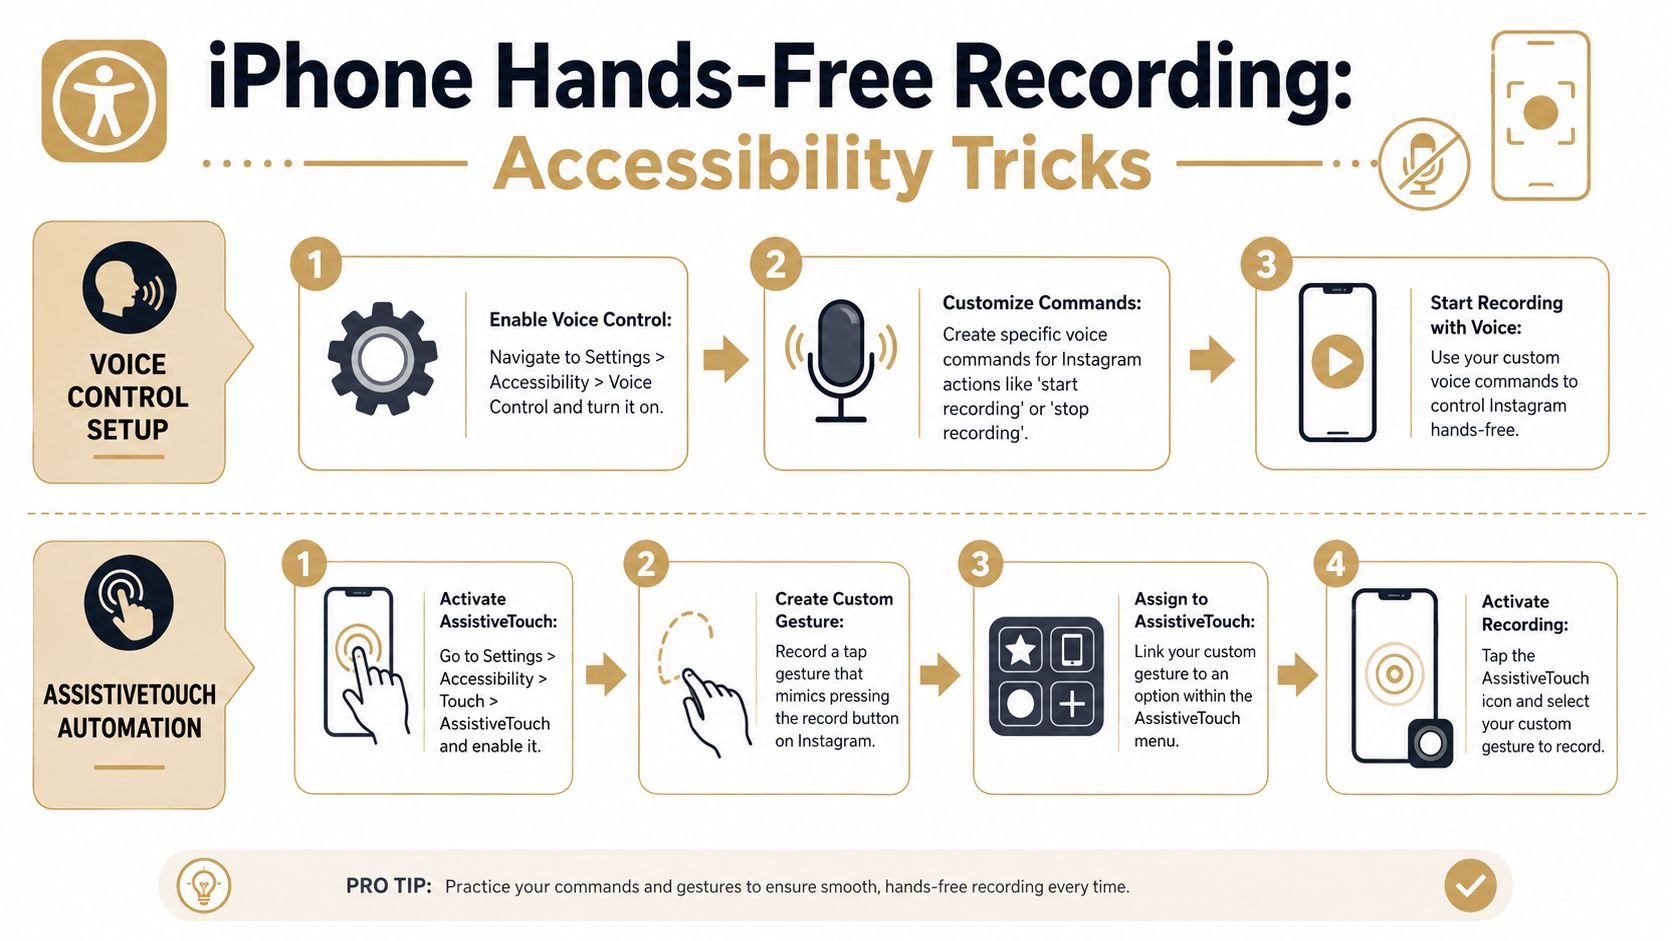
Voice Control for distance shooting
Voice Control is the more flexible option if you need to start recording while standing away from the phone. Think workout clips, cooking videos, or standing tutorials where walking back to the screen ruins the setup. The basic setup is straightforward:
- Open Settings.
- Go to Accessibility.
- Turn on Voice Control.
- Open Instagram and test simple spoken commands. You can use this for actions like opening apps and tapping items on screen. In practice, a significant advantage is distance. You can frame the shot, step into position, and trigger actions verbally instead of lunging back toward the device.
The setup takes a few minutes, but once it works, it feels less like a hack and more like a remote.
Voice Control isn't perfect. It works best in quiet rooms, with clear screen elements, and when your command phrasing is consistent. If the room is noisy or the app interface shifts, it can become finicky. If you want a related workflow for getting your phone display onto a larger screen while refining tutorials, this guide on sharing an iPhone screen on a PC can help with setup ideas.
AssistiveTouch for repeatable gestures
AssistiveTouch is better when you want repeatability instead of spoken control. You enable it in Settings > Accessibility > Touch > AssistiveTouch, then create a custom gesture that mimics the screen interaction you need.
For creators, that usually means simulating a press or tap sequence on the Instagram record area. What makes this useful is consistency. Once the gesture is saved, you can trigger the same action again without relying on voice recognition. That's handy for tabletop shooting, recipe videos, or overhead demos where the phone stays mounted and the framing doesn't change. A quick comparison makes the trade-off clear:
| Tool | Better for | Main drawback |
| Voice Control | Starting from across the room | Sensitive to noise |
| AssistiveTouch | Repeating the same on-screen action | Takes setup and testing |
Neither option is as instant as Instagram's native mode. Both are more technical. But if you shoot solo often, they can enable shots that are awkward or impossible with a finger-on-screen workflow.
The Ultimate Setup for Professional Content
At a certain point, “hands-free” stops being the main problem. Key problems become framing, stability, repeatability, and whether the footage looks deliberate. That's where a basic creator kit earns its place.
The hardware that fixes most problems
Typically, the first upgrade should be physical, not software. A small tripod fixes shaky framing. A phone clamp keeps the angle consistent between takes. A Bluetooth shutter remote lets you trigger the camera without touching the phone. That matters more than people expect, especially for product clips, recipe videos, desk tutorials, and before-and-after shots where even a small bump changes the composition. Here's the fast decision version:
- Use a tripod if your videos drift, tilt, or look improvised.
- Use a remote if tapping the screen shakes the shot or forces you to rush back into place.
- Use both if you record regularly and want your setup to feel repeatable. If you're building a more intentional filming environment, this guide for modern creators is a useful look at how space and setup affect the final shot.
Field note: Most “my Instagram videos look amateur” problems come from camera placement, not from the app.
When screen-based content needs a different tool
Phone-based hands-free methods work for face-to-camera clips. They don't solve software demos, onboarding snippets, or app walkthroughs. For those, screen recording is the actual job.
 If you're turning product education into Reels or Stories, a dedicated screen tool makes more sense than pointing a phone at a monitor. Smooth Capture records Mac or connected iPhone screens, lets you edit on a timeline, and supports vertical exports, device frames, cursor effects, subtitles, and webcam overlays. That's useful for SaaS marketers, educators, support teams, and founders who need polished software clips for social.
This setup isn't for every creator. If you're filming casual Stories, it's overkill. If you're posting feature walkthroughs, app teasers, or onboarding cut-downs, it fits the job much better than Instagram's camera ever will.
The pattern is simple. Native tools are fine for spontaneous content. Hardware and screen tools take over when consistency matters.
If you're turning product education into Reels or Stories, a dedicated screen tool makes more sense than pointing a phone at a monitor. Smooth Capture records Mac or connected iPhone screens, lets you edit on a timeline, and supports vertical exports, device frames, cursor effects, subtitles, and webcam overlays. That's useful for SaaS marketers, educators, support teams, and founders who need polished software clips for social.
This setup isn't for every creator. If you're filming casual Stories, it's overkill. If you're posting feature walkthroughs, app teasers, or onboarding cut-downs, it fits the job much better than Instagram's camera ever will.
The pattern is simple. Native tools are fine for spontaneous content. Hardware and screen tools take over when consistency matters.
Best Practices for Framing Audio and Uploading
Once you've picked your recording method, the quality comes down to execution. Hands-free shooting gives you freedom, but it also exposes every weak choice. Bad framing looks more obvious. Distant audio sounds more careless. Weak lighting makes the whole clip feel accidental.
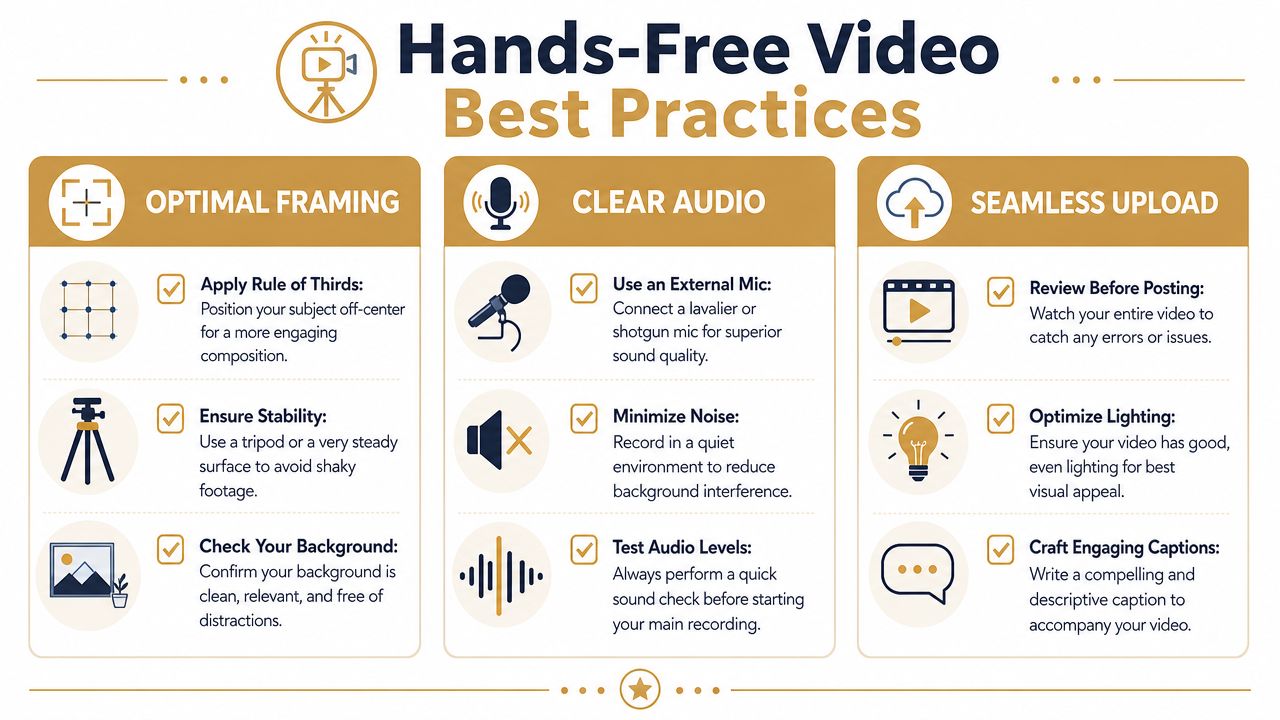
Framing that survives hands-free shooting
When you aren't holding the phone, composition matters more because you can't keep adjusting mid-shot. A few practical habits help:
- Leave headroom carefully: too much empty space makes the subject look small.
- Use the background on purpose: clean walls, desks, shelves, or kitchen counters work better than random clutter.
- Check the edges of frame: hands, products, and props often drift out of view during demonstrations. If you're filming vertical content, make sure the subject still reads clearly in a tall crop. A demo that looks fine on your phone can feel cramped once captions, stickers, and interface elements sit on top of it.
Audio that doesn't sound accidental
Viewers will tolerate average video faster than they'll tolerate muddy sound. If you can't use an external microphone, get physically closer to the phone. That one decision usually helps more than trying to “fix” bad sound later.
- Choose a quieter room: soft surfaces help reduce echo.
- Test one short clip first: listen back before filming the full take.
- Watch for appliance noise: fans, AC, and kitchen hum are common offenders. For creators who edit before uploading, this walkthrough on how to sync audio with video is useful when your sound and visuals come from separate sources.
Uploading without sabotaging your footage
Before you post, watch the full clip once. Not just the first few seconds. Look for framing slips, awkward pauses, and anything in the background that pulls attention away from the point. Use a simple pre-upload checklist:
| Check | Why it matters |
| Vertical framing | Reels and Stories need to feel native |
| Legible subject placement | Captions and UI overlays take up space |
| Clean first seconds | Weak openings hurt retention |
| Final audio review | Small issues feel bigger after upload |
Clean footage starts before the upload button. Most fixes are easier to make during setup than after posting.
If your version of hands-free content includes product walkthroughs, onboarding clips, or app demos, Smooth Capture is built for that workflow. It records screens, supports vertical social exports, and gives you editing controls that make software content easier to turn into Instagram-ready video.
Ready to create stunning app demos?
SmoothCapture makes it easy to record your screen with 3D device frames, cinematic cursor effects, and professional editing tools.