Share iPhone Screen on PC Instantly
You need to show an iPhone app, workflow, or bug to a room full of Windows users. Or you need to record a clean mobile demo on a PC because that's where your editing, conferencing, or capture workflow already lives. That's a normal setup. It's also where people waste a lot of time looking for a built-in Windows toggle that doesn't exist.
The core issue is simple. iPhone screen mirroring to Windows isn't native. Apple supports AirPlay inside its own ecosystem, but if you want to share iphone screen on pc, you usually need a third-party receiver app or a dedicated mirroring tool on the Windows machine, as reflected in Apple community guidance on iPhone mirroring to Windows. That's why the process can feel more technical than it should.
Once you accept that, the choices get clearer. You're not hunting for a hidden feature anymore. You're deciding between wireless convenience, wired stability, or a quick workaround when you just need the screen visible for a meeting.
Table of Contents
- Introduction Bridging the Apple and Windows Divide
- Wireless Mirroring via AirPlay Receiver Apps
- Wired Connections for Professional Reliability
- Using Conferencing Apps as a Quick Workaround
- Troubleshooting Common iPhone to PC Mirroring Issues
- Conclusion Choosing the Right Method for Your Goal
Introduction Bridging the Apple and Windows Divide
You are five minutes from a client demo, the iPhone is ready, the Windows laptop is on the conference table, and the screen still is not showing up where you need it. That is the core problem behind "share iphone screen on pc." The goal usually is not just to make a connection. It is to get a stable picture you can present, record, or capture without delays, drops, or ugly compression.
iPhone to PC mirroring gets messy because Apple built the cleanest version of this workflow for Macs and Apple TV. On Windows, you usually need extra software, a different capture path, or a workaround that fits the network and security rules in front of you. In home setups, that often is fine. In offices, schools, event venues, and client environments, firewall rules, isolated guest Wi-Fi, and blocked device discovery can break the easy method fast.
For production work, the first question is not "Can I mirror it?" It is "How reliable does this need to be?"
A quick live share during an internal meeting can tolerate a little latency. A product walkthrough, support tutorial, training recording, or sales demo usually cannot. If you are capturing footage for editing, or feeding the phone screen into a professional recording workflow, it helps to start with a tool built for iPhone and iPad screen recording on desktop rather than treating mirroring and recording as two separate problems.
What this means in practice
Wireless methods are convenient, but convenience is not the same thing as consistency. They work best when you control the Wi-Fi, both devices can see each other on the same network, and a short delay will not hurt the session.
Wired methods take a little more setup, but they are the safer choice for polished demos and repeatable recordings. USB reduces the usual trouble spots, especially network congestion, discovery failures, and surprise disconnects halfway through a take.
That trade-off is the whole article. Choose wireless for speed. Choose wired when the screen has to stay up, look clean, and record properly on the first pass.
Wireless Mirroring via AirPlay Receiver Apps
Wireless mirroring is still the fastest way to get an iPhone onto a Windows display when everything is under your control. No cable across the desk. No adapter shuffle. No special capture hardware.
The trick is that the PC has to act like an AirPlay receiver. Since Windows doesn't do that by default, you install a receiver app, launch it, and then connect from iPhone Control Center. TechRadar's guide to mirroring iPhone to PC describes this common flow, including the need for both devices to be on the same Wi-Fi network.
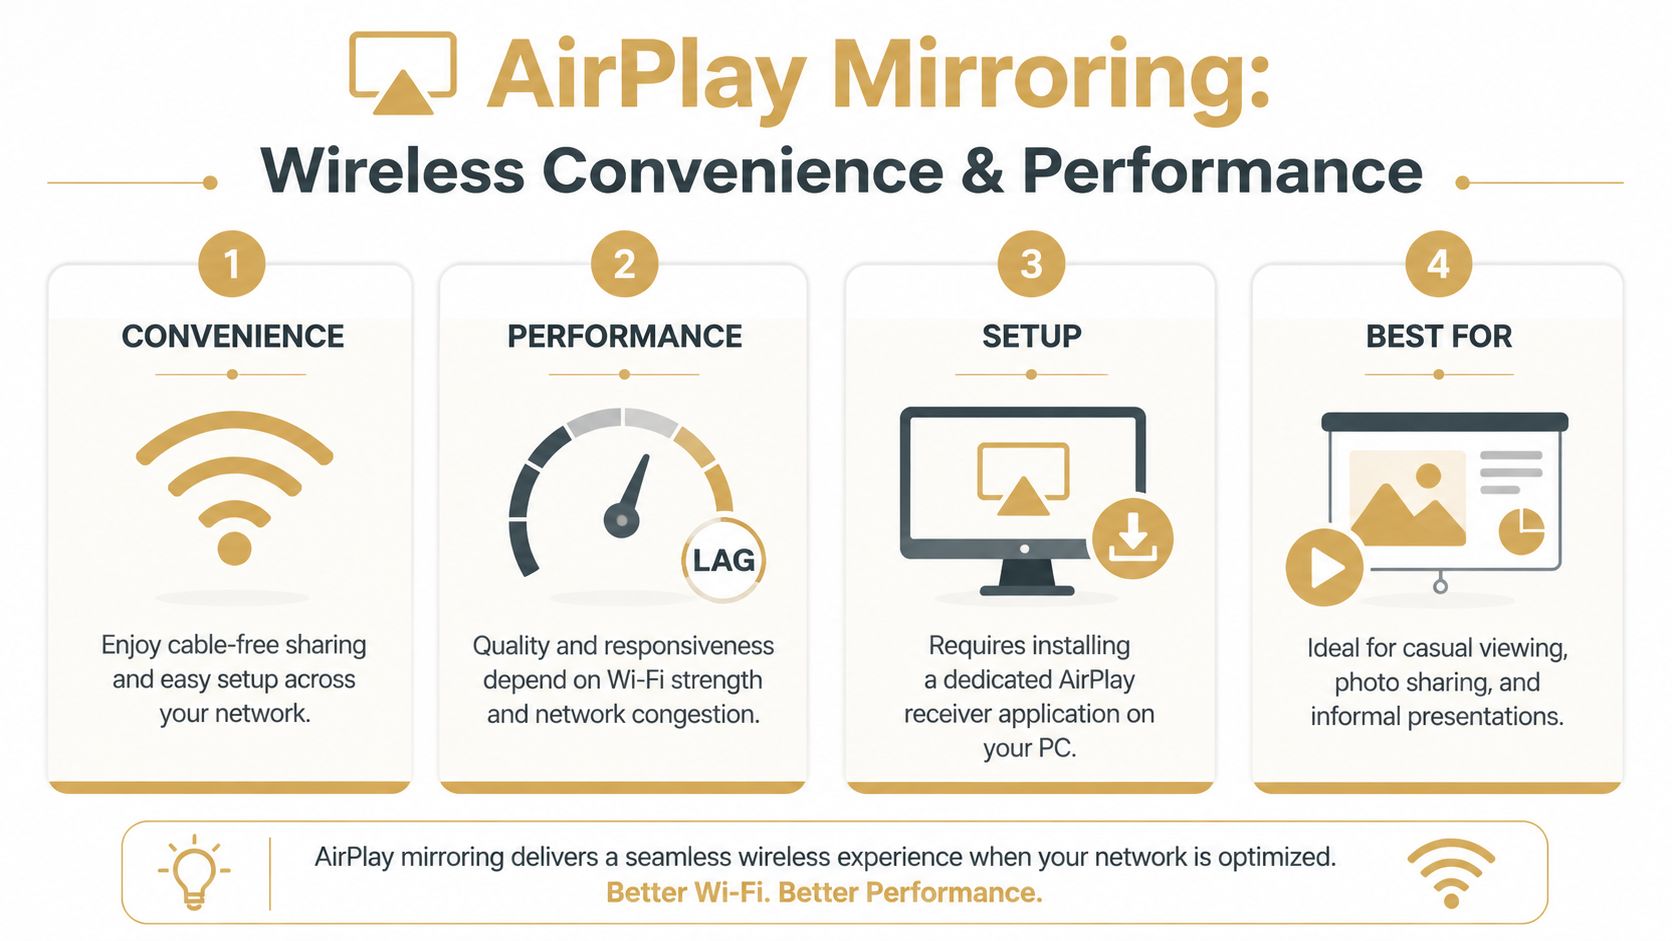
How the wireless workflow actually works
The sequence is usually the same across tools:
- Install the receiver app on the PC. Common names include Reflector, 5KPlayer, and LonelyScreen.
- Put the iPhone and PC on the same Wi-Fi. If they aren't, the PC often won't appear in the mirroring list.
- Launch the receiver app first. Don't wait until after opening Control Center.
- Open iPhone Control Center and tap Screen Mirroring.
- Select the PC from the list.
When the setup is clean, it feels easy. That's why this method stays popular.
The wireless method is best when you need to get on-screen quickly and can tolerate a little latency.
Which receiver apps make sense
You'll see the same few apps mentioned over and over, but they aren't interchangeable in real use.
| Tool | Best fit | What to expect |
|---|---|---|
| Reflector | Presentations and training | Usually feels more polished on the PC side and is often chosen when appearance matters |
| 5KPlayer | Budget-conscious casual mirroring | Commonly used as a free or lower-friction option, but the experience can feel less focused on pro capture workflows |
| LonelyScreen | Basic AirPlay receiving | Simple concept, useful when all you need is to make the PC visible as a target |
The right pick depends less on branding and more on your job. If you only need to show an app in a team meeting, almost any working receiver is fine. If you need to record, crop, rehearse, and run the same workflow repeatedly, the weaknesses become obvious fast.
Where wireless works well and where it doesn't
Wireless mirroring is a good fit for:
- Internal walkthroughs: You're showing a build to a small team in the same office.
- Support calls: You need a quick live view of the issue from the phone.
- Informal presentations: Small lag won't ruin the outcome.
It's a weaker choice for:
- Long-form recordings: Wi-Fi conditions can drift mid-session.
- Gameplay or gesture-heavy demos: Touch response and motion clarity matter more here.
- Busy office networks: Shared wireless environments can make a good app look bad.
If the point is to share iphone screen on pc without much setup, this is the easiest path. If the point is consistent output, wireless should be treated as the convenience option, not the gold standard.
Wired Connections for Professional Reliability
For serious demo work, I'd take a cable over Wi-Fi almost every time. Wireless is attractive because it's clean. Wired wins because it removes a whole category of failures.
Current guidance increasingly treats USB mirroring as the better fit for professional workflows, especially when you're recording tutorials or running demos where lag and dropped frames matter. One recent guide frames USB as the direct option, and another highlights how much session quality depends on the connection path rather than the iPhone itself, as noted in this discussion of USB mirroring for reliability and recording.
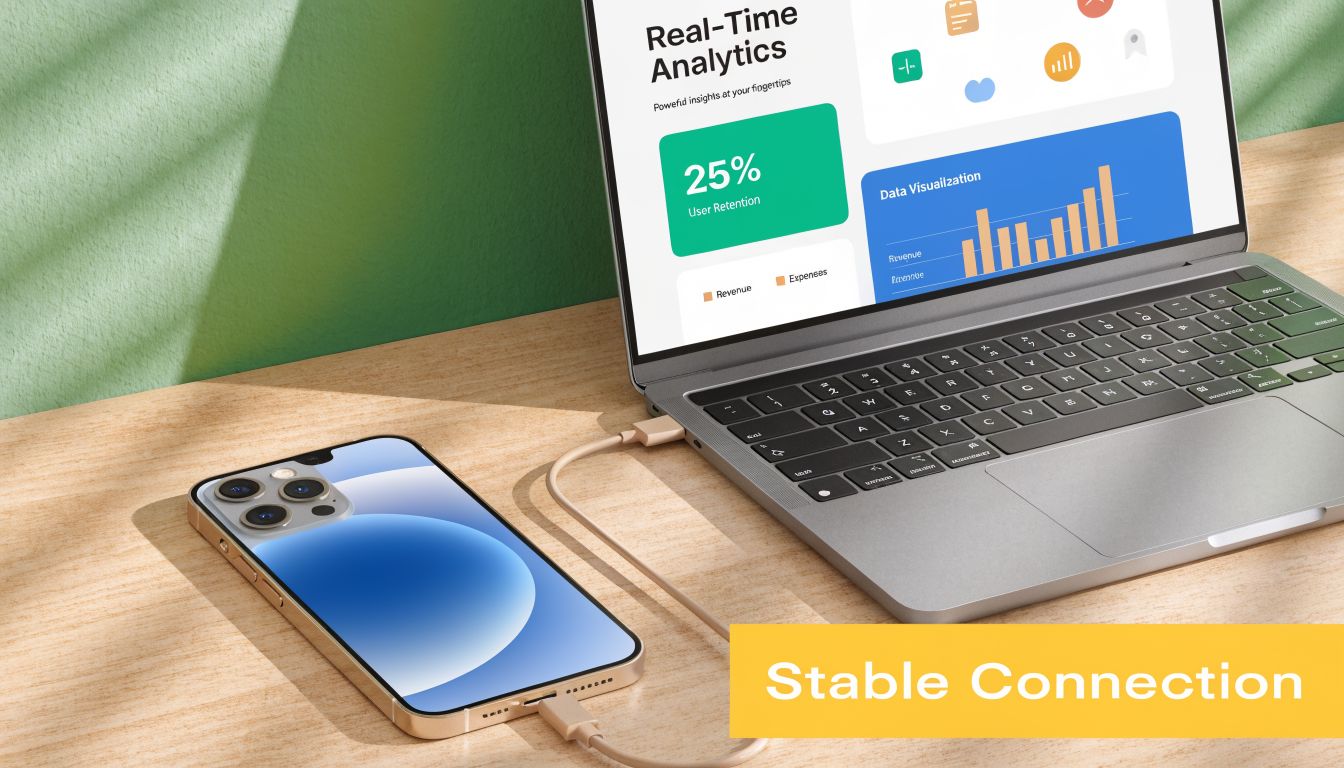
Why USB wins for production work
Wi-Fi mirroring has more moving parts than people admit. Receiver discovery. Network quality. Interference. Firewall prompts. Office roaming. Guest SSIDs. Any one of those can turn a stable session into a flaky one.
USB cuts most of that out.
Once the phone is connected by cable and trusted, the setup is more predictable. That makes a difference when you're:
- Recording app walkthroughs for launch or onboarding
- Capturing repeat takes where framing and timing need to stay consistent
- Running live demos where a stalled connection would break the flow
- Working in restricted environments where network settings are out of your hands
The practical gain isn't magic image quality. It's consistency. Your session depends less on the room and more on the hardware in front of you.
Where wired setups fit best
Wired mirroring is the better call when the phone is part of a content pipeline, not just a one-off share.
A clean workflow often looks like this:
- Connect the iPhone by cable
- Accept the trust prompt on the phone
- Open the mirroring or capture software on the PC
- Confirm the live feed before recording
- Run the demo without depending on local Wi-Fi
If your work includes product launches, support libraries, customer education, or polished demos, a wired setup is easier to standardize across a team. That's also why workflows built around iPhone and iPad recording over USB tend to hold up better for recurring production work than ad hoc wireless mirroring.
If you only get one chance to record a clean flow, don't let the office network decide whether the take succeeds.
There's also a more advanced path for higher-end setups. Some teams use dedicated capture hardware and an HDMI-based signal path for broadcast-style workflows. That's more gear and more setup, so it's not where beginners should start. But it tells you something important about the hierarchy here. The closer you get to professional output, the less people rely on casual wireless mirroring.
Using Conferencing Apps as a Quick Workaround
Sometimes you don't need a proper mirroring rig. You just need the phone visible on the PC in the next few minutes, using tools everyone already has. That's where Zoom or Microsoft Teams can save you.
This method is a workaround, not a production setup. It's useful because it avoids installing a dedicated receiver app in the moment.
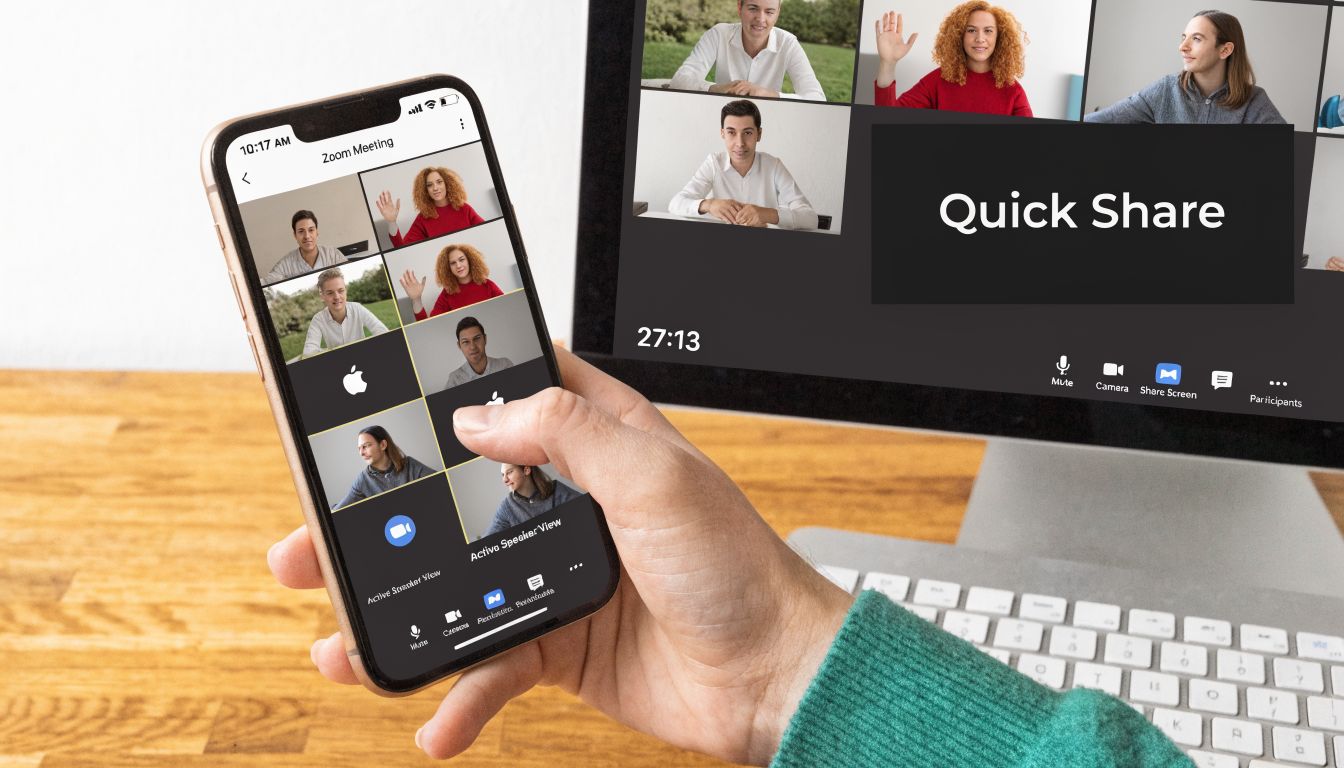
The fastest no-new-tool method
The simplest version goes like this:
- Start a meeting with yourself: Open Zoom or Teams on the PC and create a private meeting.
- Join from the iPhone too: Use the same meeting from the phone.
- Share the iPhone screen: In the mobile app, choose screen sharing and broadcast the screen into the call.
- Watch from the PC: The desktop client becomes the viewing window.
This is handy when you already use conferencing tools daily. If you need a refresher on meeting setup basics, Premier Broadband's conference call setup guide is a useful reference for getting the meeting side organized quickly.
For async sharing, some teams compare this kind of live workaround with simple recording tools before deciding what to send. If that's your use case, it's worth looking at this practical breakdown of using a Loom-style workflow.
Where this workaround breaks down
Conferencing platforms are designed to deliver meetings, not high-fidelity phone capture. That means the image is usually compressed, motion may feel softer, and the result isn't ideal for polished tutorials or launch assets.
Use it when:
- you need temporary visibility
- the audience is already in Zoom or Teams
- quality is good enough, not critical
Skip it when:
- you need clean recordings for editing
- motion responsiveness matters
- the session has to look like a finished deliverable
The strength of this method is convenience. Its weakness is that you're pushing a phone screen through a meeting platform that's optimized for communication, not capture.
Troubleshooting Common iPhone to PC Mirroring Issues
Troubleshooting gets easier once you stop treating mirroring as a single feature. For demos, training, or recording, the signal path has multiple failure points: discovery, permissions, network behavior, audio routing, and receiver stability. A session can fail at any one of them.
On Windows, the usual trouble spots are receiver compatibility, network visibility, and session stability. Microsoft community guidance points to the same patterns: receiving features not enabled, devices not on the same subnet, and firewall rules blocking discovery in this Windows 11 mirroring discussion.
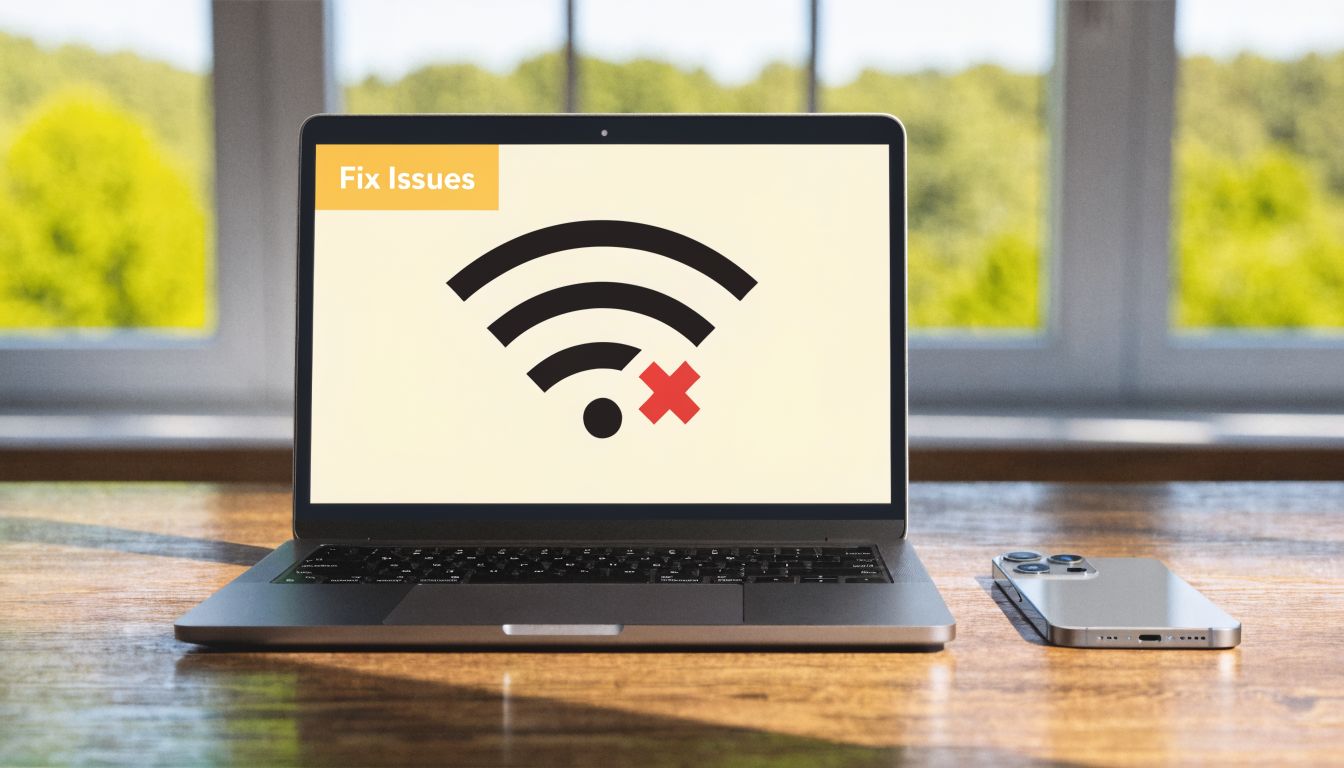
The PC doesn't appear on the iPhone
Start on the PC, not the phone. In practice, discovery failures usually come from the Windows side.
Check these first:
- Open the receiver app before you swipe into Screen Mirroring. If the receiver is closed or hung in the background, the iPhone has nothing to find.
- Verify both devices are on the same network segment. Matching Wi-Fi names are not enough on guest networks, mesh systems, or office VLANs.
- Confirm Windows can receive the stream. Some systems need Wireless Display or related receiving features enabled.
- Review firewall and security prompts. If the app was denied local network access on first launch, it may never appear as an available target.
- Watch for managed IT policies. Corporate laptops often block discovery traffic, local streaming, or third-party receiver apps without making the reason obvious.
This is a common problem in offices and schools. The iPhone is ready, but the PC is invisible because the network is segmented or the machine is locked down.
The picture is choppy or delayed
For live demos, lag matters more than people expect. A small delay feels tolerable during casual viewing, but it makes app walkthroughs, tap indicators, and narrated recordings look sloppy.
If the image appears but responds poorly, the bottleneck is often the connection path rather than the app itself.
Try this order:
- Reduce Wi-Fi congestion. Move closer to the access point, avoid guest Wi-Fi, and pause large uploads or downloads on the same network.
- Free up the PC. Cloud sync, browser tabs, video calls, and background updates can all compete with the receiver.
- Lower the stakes for wireless. Wireless is fine for quick visibility. For anything client-facing or recordable, use USB instead of trying to tune around unstable Wi-Fi.
- Test motion, not just a static screen. Scrolling, typing, and app transitions reveal problems that a home screen will hide.
Field note: When someone tells me “the mirroring app is laggy,” I check the network before I blame the app.
If video is stable but your capture is missing narration, app audio, or both, the problem may be the recording path rather than the mirror itself. This guide on whether screen recording records audio helps sort out where the sound is getting lost.
A quick visual walkthrough can help if you want to compare your setup against a working example:
The session keeps disconnecting
Random disconnects are rarely random. They usually trace back to power settings, network handoffs, or receiver apps that are fine for short previews but weak in longer sessions.
Work through the chain:
- Receiver app reliability: Some apps hold a stream for minutes, then start dropping frames or disconnecting during longer rehearsals.
- Wi-Fi roaming: If the phone or PC shifts between access points, discovery can break and the session can collapse.
- Permission conflicts: A dismissed security prompt or revoked local network permission can interrupt later sessions.
- Sleep settings: Aggressive power saving on the PC can pause the receiver or kill the session in the background.
- VPNs and security tools: These often interfere with local device discovery, especially on work machines.
For any demo that matters, do a full-length test. Let the mirror run, interact with the app the way you will during the session, and confirm it stays connected long enough to trust. That extra check saves more time than trying to recover mid-presentation.
Conclusion Choosing the Right Method for Your Goal
The best way to share iphone screen on pc depends on what “best” means for the job in front of you.
If you need speed and convenience, use a wireless AirPlay receiver app. It's the quickest route when both devices are on the same network and you just need the screen visible for a demo, support call, or internal walkthrough.
If you need dependable output, use USB. That's the better fit for recordings, product demos, onboarding videos, and any workflow where a dropped connection or visible lag would ruin the result. The extra cable is a small price to pay for a session that behaves the same way every time.
The quick conferencing workaround sits in the middle. It's useful when you're already inside Zoom or Teams and need a temporary screen share without extra setup. It just shouldn't be mistaken for a professional capture path.
There's one more filter that basic guides often skip. Restricted environments change the answer. On locked-down work laptops or corporate networks, you may not be able to install receiver software, open ports, or adjust firewall settings. In those cases, USB may be the only practical option, which is also the gap highlighted in this discussion of mirroring in managed environments.
Choose based on the outcome, not the novelty of the method. For casual sharing, wireless is fine. For work that has to look good and hold up under pressure, wired is the safer call.
If your team regularly turns iPhone, iPad, and desktop captures into polished demos, tutorials, and launch assets, Smooth Capture is built for that workflow. It gives you a fast way to record, edit, frame, subtitle, and export clean videos without stitching together a messy toolchain.
Ready to create stunning app demos?
SmoothCapture makes it easy to record your screen with 3D device frames, cinematic cursor effects, and professional editing tools.