How to Sync Audio with Video: A Practical Guide for 2026
You've got a clean take. The voiceover sounds good. The screen recording looks sharp. Then you hit play and the presenter's lips move a fraction before the words land, or the click lands after the cursor action. That tiny mismatch is enough to make the whole edit feel off. Two common approaches are typically learned for this problem. These involve either dragging clips around manually until they look close enough, or clicking an auto-sync command and hoping the software gets it right. Real work usually sits between those extremes. If you're editing demos, onboarding videos, webinars, interviews, or launch assets, you need a workflow that starts simple, scales up to multi-track editing, and gives you a way to fix drift when sync falls apart halfway through a long recording.
Why Perfect Audio Sync Is Non-Negotiable
A sync problem doesn't need to be dramatic to hurt a video. In product demos, it often shows up when a cursor click lands late. In tutorials, it happens when the explanation gets ahead of the screen action. In talking-head footage, the mouth shape and the spoken word no longer arrive together, and viewers notice fast. That's why experienced editors don't treat sync as a cosmetic fix. They treat it as part of credibility. If the sound and image don't agree, the viewer starts questioning everything else too. The pacing feels wrong, the edit feels cheaper than it is, and even a strong script loses force. Professional standards have reflected that sensitivity for a long time. The European Broadcasting Union recommends end-to-end audio and video sync stay within +40 ms and -60 ms, while film lip sync is often cited as acceptable only within 22 milliseconds in either direction, according to this overview of audio-to-video synchronization standards. That's the useful mindset shift. Sync quality is measured in milliseconds, not by saying a clip is “close.”
Why viewers judge sync before they judge quality
People will forgive a lot in a business video. They'll tolerate a plain background, a simple cut, even a webcam shot if the message is clear. They won't forgive dialogue or actions that feel detached from each other.
Practical rule: If viewers notice sync at all, it's already too loose.
This matters even more in commercial work. Teams producing launch spots, explainers, or product campaigns often focus on scripting, branding, and motion polish first. But strong post-production basics still carry the piece. If your team also handles paid or promotional content, good video advertisement services can help show how much production value depends on clean execution, not just creative direction.
What perfect sync really means in editing
Perfect sync isn't only about lips. It includes:
- Speech timing: The spoken word lands with the visible mouth movement.
- Action timing: Clicks, taps, door closes, keyboard sounds, and product interactions happen when the viewer sees them.
- Timeline integrity: The relationship holds from the first second to the last, not just at the opening frame. That last point is where a lot of beginner guides fall short. Getting the start aligned is one task. Keeping the whole recording aligned is another.
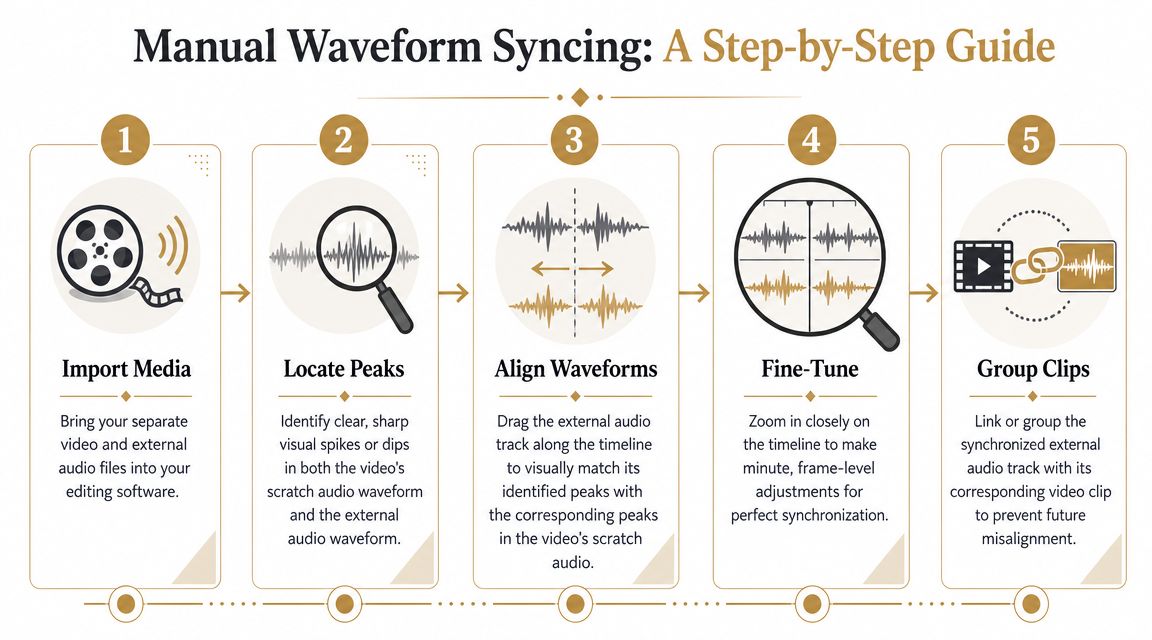
The Foundational Method Manual Waveform Syncing
Manual syncing is still the skill to learn first. Even if you use Premiere Pro, Final Cut Pro, DaVinci Resolve, or another editor with automatic tools, you need to know what “correct” looks like on the timeline. Otherwise you won't know when the software missed. A reliable workflow is to record a deliberate sync cue, then align the clips by waveform. TechSmith's guidance is practical: scrub frame by frame, zoom in fully, and match the visible clap spike in the audio waveform to the hand-clap frame in the video using their walkthrough on syncing audio and video sources.
Create a sync point before you edit
The easiest sync job starts before you press record. You need one clear event that both devices capture. Use one of these:
- A hand clap on camera: Simple and effective. You get a visual closing motion and a sharp audio transient.
- A clapperboard: Better when you're recording many takes and need an obvious marker.
- A hard tap on the desk or device: Useful in a screen-demo setup if your webcam sees the motion.
The cue needs two qualities. It should be visible and sharp in the waveform. A vague gesture won't help. Neither will a soft sound with no clear peak.
 If you're recording tutorials or demos and need to avoid missing audio inputs in the first place, it helps to understand how capture apps handle sources like mic and system sound. Smooth Capture's article on whether screen recording records audio is a useful preflight check before you start a session.
Match the spike to the frame
Once your clips are in the editor, don't start by listening. Start by looking.
- Put the camera clip with its scratch audio on the timeline.
- Place the external audio below it.
- Expand both audio tracks so the waveform is easy to inspect.
- Find the clap or transient on each track.
- Zoom in until you can move at frame-level precision.
- Drag the external audio until the transient lines up with the video's scratch waveform and the visual clap frame. Then play around the sync point several times. Use normal speed first. Then scrub through the exact moment. If the hands meet before the peak, the audio is late. If the peak lands before the hands close, the audio is early.
Don't trust a broad timeline view. Zoom until a one-frame nudge makes a visible difference.
A lot of editors stop too soon here. They align roughly, mute the scratch track, and move on. That works until the subject says a plosive consonant or clicks a mouse on screen. Those hard transients expose tiny errors immediately.
What manual syncing teaches you
Manual syncing is slow compared with auto-sync, but it gives you three things automation doesn't teach well:
| What you learn | Why it matters |
| **Transient recognition** | You get faster at spotting the exact moment a sound starts |
| **Frame-level judgment** | You stop settling for “close enough” |
| **Timeline discipline** | You link or group clips so later edits don't break sync |
After you've aligned the clips, link them or group them. Otherwise one slip edit, ripple trim, or accidental drag can undo the whole job. Manual waveform syncing also prepares you for harder situations. If one clip has noisy audio, if the room echo confuses the sync point, or if you need to sync visually with weak scratch audio, this method gives you a fallback that works in almost any NLE.
Automated Syncing for Faster Workflows
You feel the cost of bad sync fastest on busy edits. One interview is manageable by hand. A shoot with ten takes, two cameras, and separate recorder audio is where automation starts paying for itself.
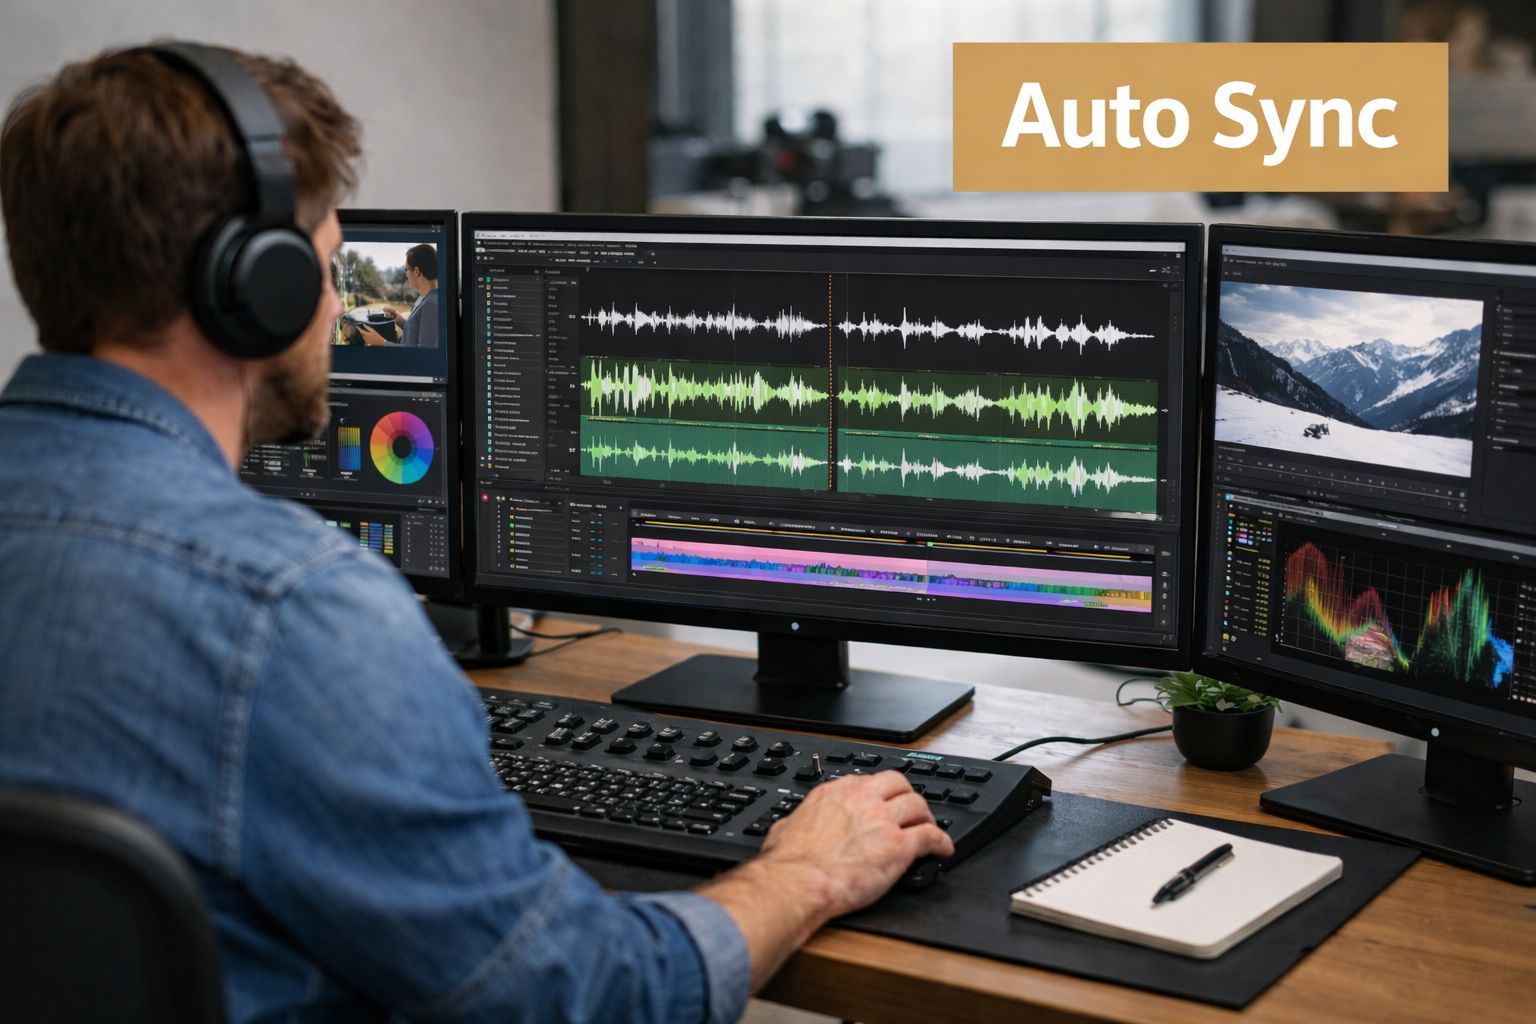 Auto-sync is not one feature. It is two different methods, and choosing the right one matters more than the button you click.
Waveform sync versus timecode
Waveform sync compares the audio patterns inside each clip. Editors use it to match camera scratch audio with cleaner external audio, or to align multiple angles that all heard the same event. Use waveform sync when:
- Your camera captured usable scratch audio
- The clips share the same spoken lines or clear transients
- You need quick syncing for short interviews, tutorials, or live takes
- You want a fast first pass before checking sync by ear and by frame Timecode sync matches clips by recorded metadata instead of by sound. It works best when cameras and audio recorders were jam-synced on set and kept in step during the shoot. Use timecode when:
- You're syncing several cameras
- You have external audio recorders
- You need clips to stay organized across a longer shoot
- You want predictable alignment without hunting for sync points clip by clip The trade-off is simple. Waveform sync is forgiving and available in many everyday shoots. Timecode is faster at scale and cleaner in multi-device productions, but only if production recorded it properly. If the crew skipped that setup, post cannot invent it later. Smooth Capture fits well on the waveform side of this workflow because it gives you cleaner source material and more consistent recordings to match against. That reduces the usual failure points before the clips even reach the timeline.
Where auto-sync earns its keep
Auto-sync saves the most time when the repetitive part of the job is the problem, not the judgment. Batch syncing selects likely matches far faster than a human dragging every clip into place. That matters on podcasts, training videos, interviews, event coverage, and any edit where the camera file is mostly there to guide you to the primary audio. It also makes review easier. Once clips come in pre-aligned, you can spend your attention on choosing takes, trimming pacing, and checking problem spots instead of doing the same sync move fifty times.
When automation misses
Auto-sync usually fails for ordinary technical reasons. The scratch track may be distant or distorted. One camera may hear more room reflection than direct voice. The shared audio may not start until several seconds into the clip. Sometimes the software picks the right region but the wrong transient inside it. Use a hybrid workflow in those cases. Run auto-sync first. Then verify around a hard consonant, clap, key press, or any visible action with a sharp onset. That approach is faster than full manual syncing, but more trustworthy than accepting the first automated match. For editors who hit that problem often, this guide on fixing audio sync drift is a helpful companion because it focuses on what to check after initial sync appears correct. A quick visual demo helps if you're training a team or showing a colleague how auto-sync tools behave in practice.
Auto-sync saves time only if you verify the result before you start cutting.
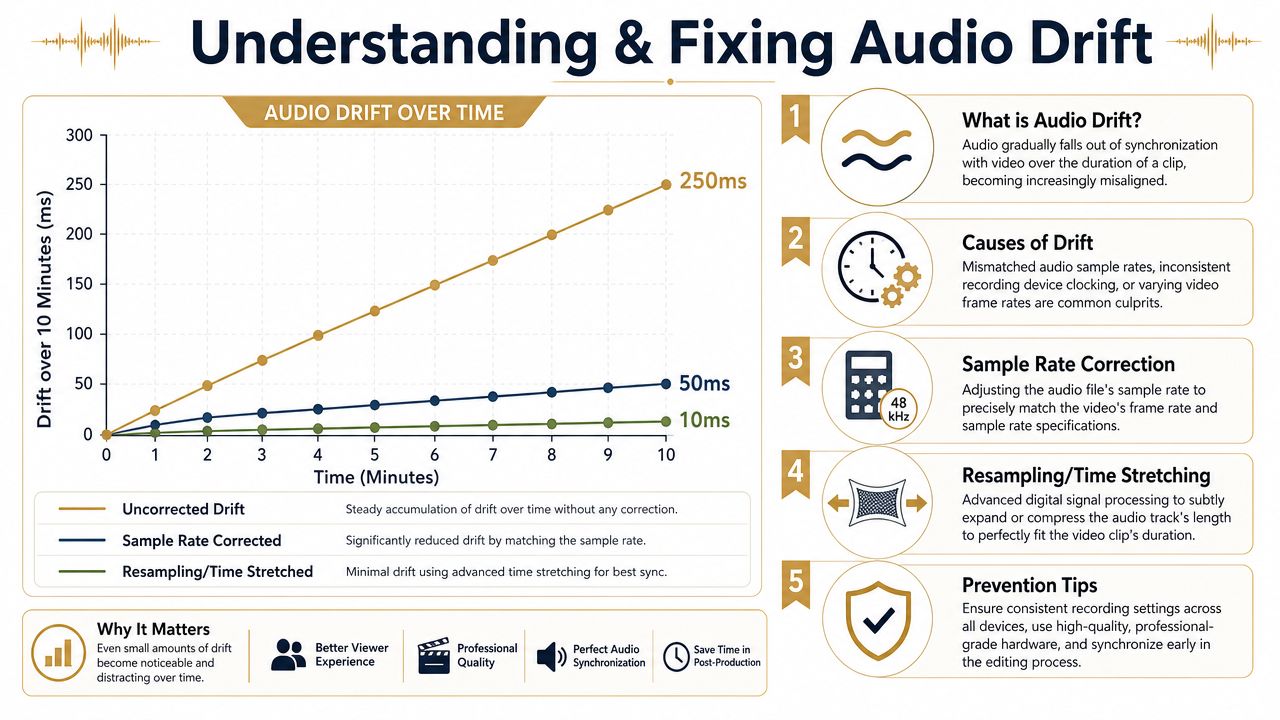
Solving the Dreaded Audio Drift Problem
You line up the first word, scrub a few seconds, and everything looks clean. Ten minutes later, the mouth closes before the sentence does. That is drift, and it wastes more time than a simple bad sync point because the clip can look correct until you are already halfway through the edit. Drift means the audio and video are not running at the same speed over the full duration. The starting sync can be perfect. The duration is what is wrong.
How drift actually shows up
In edit work, drift usually comes from timing mismatches in the source, not from one careless move on the timeline. Common causes include:
- Variable frame rate video, especially from phones, screen recorders, webcams, and browser-based tools
- Sample rate mismatches between the recorder, imported audio file, and project settings
- Long takes recorded on separate devices that were never clocked to the same timing reference
- Files interpreted incorrectly on import, so the editor plays one source slightly faster or slower than intended
That is why drift tends to show up in the exact projects beginner guides skip past. Tutorials. Remote interviews. Screen recordings. Multi-device captures.
A practical diagnosis sequence
Random cuts and nudges make drift harder to diagnose. Check it in order.
- Sync the start preciselyUse a hard consonant, clap, mouse click, or any clear transient. If the opening is loose, every later check is misleading.
- Jump to the middle and the endIf the offset grows over time, you are dealing with duration mismatch, not a bad initial placement.
- Identify the weak link in the chainAsk which file is more likely to be unstable. In practice, that is often the phone clip, screen capture, webcam file, or conferencing export rather than the externally recorded WAV.
- Check clip properties before you start repairingLook at frame rate behavior, audio sample rate, and any interpretation settings in the NLE. A wrong assumption at import can create a drift problem that did not exist in the recording. Once you confirm drift, the fix usually falls into one of three buckets:
- Transcode variable frame rate video to constant frame rate before editing
- Resample or conform the audio correctly if the file or project settings do not match
- Apply a small percentage time stretch to the external audio after the beginning is locked in place The rule is simple. If the start is right and the end is wrong, adjust duration.
Choosing the right fix
Transcoding is usually the cleanest repair for phone footage and screen recordings. It gives the editor a stable video file to reference, which removes one moving target from the timeline. Time-stretching audio is faster, but only when the drift is consistent from start to finish. I use it for long spoken clips where the external audio is clean and the picture source is otherwise usable. It is the wrong fix if the drift speeds up, slows down, or changes at random points. That pattern usually points to unstable source video. For Mac-based recording workflows, prevention starts before the edit. A reliable setup for capturing computer sound on Mac without timing mismatches reduces the chance that screen audio and narration arrive as separate problems to repair later.
Why timecode matters on longer or more complex shoots
Timecode solves a different class of sync problem. It gives each frame and recording point a shared timing reference, which matters more as shoots get longer and track counts go up. In single-camera tutorials, you can often work without it. In multi-camera interviews, live demos, or long-form productions, it saves real repair time because the devices agree on timing from the start. That is the gap a lot of sync guides miss. Manual syncing gets clips lined up. Automated syncing gets there faster. Drift forces you to think like an editor and a technician at the same time. You are no longer matching a moment. You are correcting how the files run across time. Modern tools help by keeping related tracks aligned from capture through edit, which cuts down on avoidable drift cases. Even then, the habit that matters is simple. Check sync at the start, middle, and end before you trust a long clip.
An Integrated Workflow in Smooth Capture
A lot of sync pain comes from patching together tools that weren't built to stay organized in the same recording workflow. You capture the screen in one app, the mic in another, maybe webcam footage somewhere else, then try to assemble everything later.
That's why integrated recording setups are easier to trust. When the app records system audio, microphone audio, and video as separate tracks that stay aligned in the same edit environment, you spend less time rebuilding relationships in post.
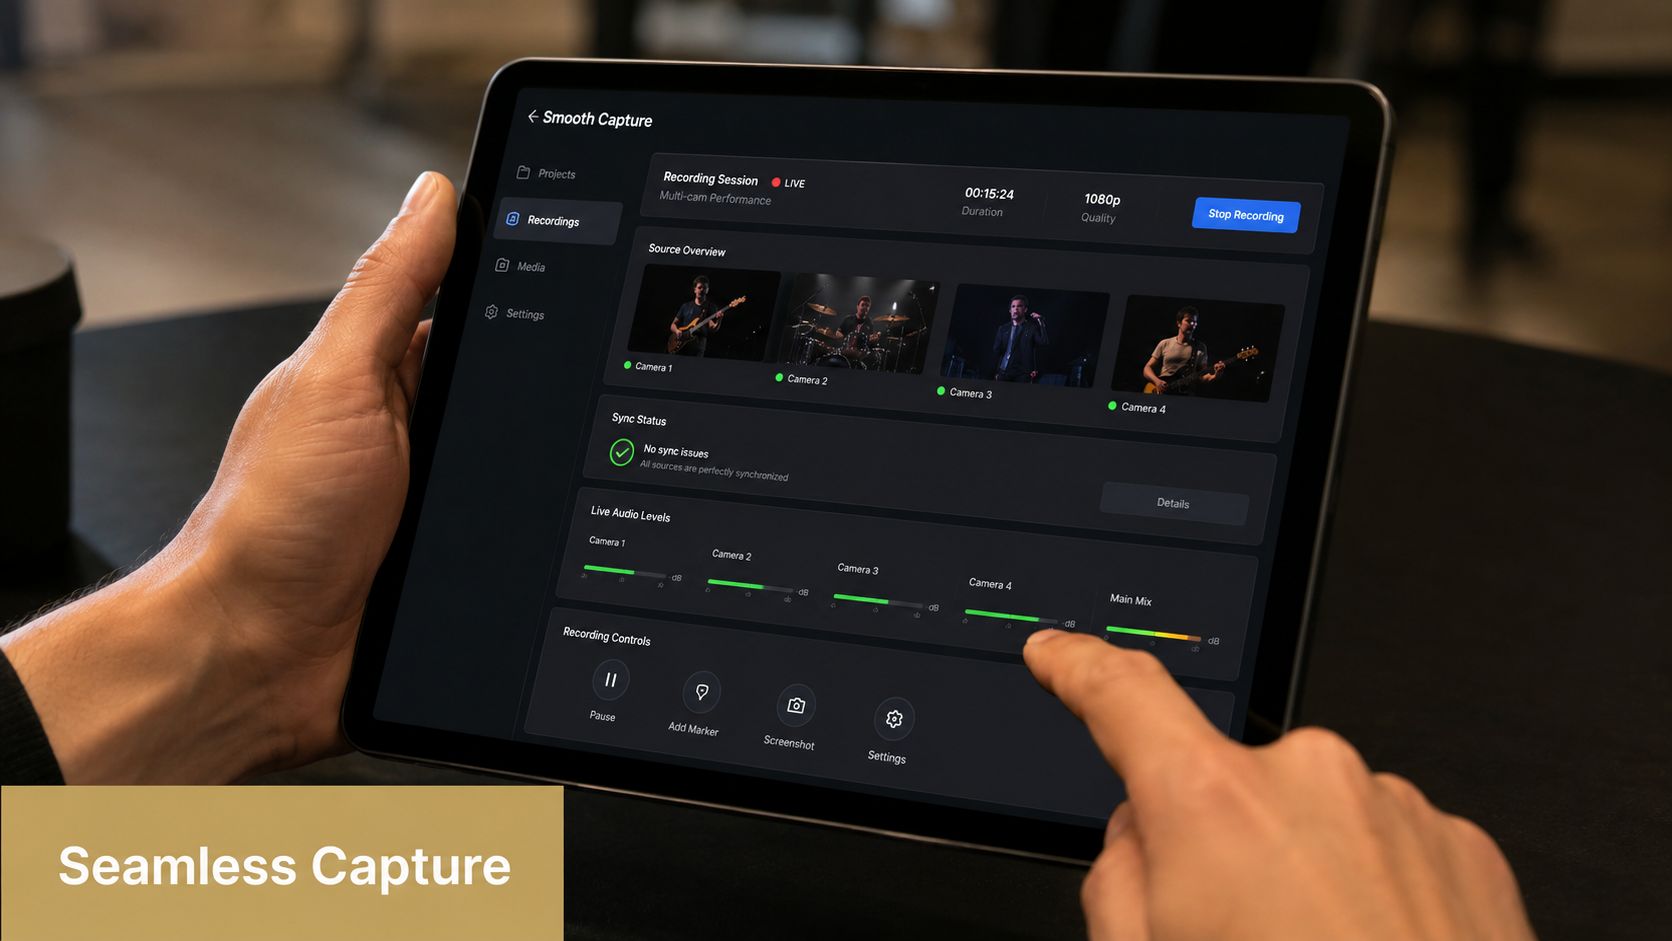
Record in a way that reduces repair work
For demos and tutorials, the cleaner workflow is:
- Capture the screen and narration together: That removes one common source of file mismatch.
- Keep audio sources on separate tracks: You can still adjust mic and system sound independently without losing alignment.
- Edit in a timeline that preserves those relationships: Trim, split, and rearrange without rebuilding sync from scratch. If your recordings depend on computer sound as much as voiceover, it helps to confirm the capture setup beforehand. Smooth Capture's guide on capturing sound from a computer on Mac covers the kind of setup details that prevent missing or mismatched tracks later.
A practical demo workflow
For a product walkthrough, record the app interaction, the presenter mic, and any system playback in one session. Then trim dead space first. Balance the mic against system audio second. Only after that should you cut for pacing. That sequence matters because sync mistakes often creep in when editors start shuffling sections before they've stabilized the core tracks. A multi-track editor helps because you can keep one source clean while adjusting another. Smooth Capture fits this kind of job as one option for macOS teams because it records and edits across multiple audio tracks in the same workflow, which reduces the need for separate post-capture sync passes on routine demos and tutorials. The practical win isn't magic automation. It's fewer opportunities to break alignment in the first place.
Troubleshooting Common Sync Scenarios
The awkward sync jobs are the ones people remember. You forgot to clap. One camera recorded terrible audio. The webinar platform compressed everything into mush. Or the only reliable marker is a mouse click with no visible finger movement. A lot of mainstream tutorials skip these cases, especially multi-angle work. That gap is real. Editors regularly ask how to sync multiple camera angles when simple waveform matching falls apart, and that issue is underexplained in ordinary how-to material, as reflected in this discussion of multi-angle sync problems in real editing scenarios.
No clap no slate no obvious marker
You can still recover sync if the footage contains a visible and audible event later in the clip. Look for:
- A hard consonant in speech: Words with a clear mouth closure can work surprisingly well.
- A keyboard strike or mouse click: Useful in screen demos if the action is visible.
- A gesture with contact: A hand hitting a desk, a door closing, a device being set down. If there's no perfect marker, use several smaller cues. Align speech visually, then verify with a click or gesture later.
Multiple cameras with uneven audio
The usual “just match the waveforms” advice breaks down. The best approach is to choose one reference source first, usually the cleanest external audio or the camera with the most usable scratch track. Then:
- Sync camera A to the master audio
- Sync camera B visually or by weaker waveform clues against camera A
- Check every camera on the same spoken word or action
- Build a multicam sequence only after each angle is verified Don't trust one auto-sync pass across all media if only some clips have good audio. In mixed-quality shoots, staged verification is faster than fixing a broken multicam edit later.
When audio is unusable
Sometimes you need visual-only sync. Use visual markers like:
- A flash or screen change: Handy in demos and presentations.
- A hand clap even if the audio clipped badly: The frame of contact may still be enough.
- Body movement tied to speech: Jaw openings and plosive mouth shapes can help in talking-head footage. If your recording problem is more basic and one source captured no useful sound at all, start by fixing the capture setup before the next session. Smooth Capture's article on fixing screen recordings with no audio is useful for that preflight check. The bigger lesson is that syncing isn't one trick. It's a chain of decisions. Good capture habits, a deliberate sync cue, careful verification, and a clear response to drift will solve most of the jobs you get. If your team makes demos, walkthroughs, onboarding videos, or launch assets regularly, Smooth Capture gives you a native macOS workflow for recording screen, webcam, system audio, and mic tracks, then editing them on a fast multi-track timeline without leaving the same environment. That won't replace basic sync discipline, but it does remove a lot of the avoidable friction that causes sync problems in the first place.
Ready to create stunning app demos?
SmoothCapture makes it easy to record your screen with 3D device frames, cinematic cursor effects, and professional editing tools.