How to Make Social Media Videos: A Step-by-Step Guide
You're probably in one of two modes right now. Either you need a social video out this week and the raw footage is still sitting in a folder called “final-final-use-this,” or you've already made a few decent videos and realized the hard part isn't creativity. It's doing it again next week, and the week after that, without wasting half the team's time. That's the core problem behind most searches for how to make social media videos. The internet is full of advice about hooks, trends, captions, and camera angles. Some of it is useful. Most of it breaks down the second you need a repeatable process for product demos, onboarding clips, feature launches, support walkthroughs, or weekly social cut-downs. Business video production works better when you treat it like an operating system, not a burst of inspiration. The teams that publish consistently usually aren't the most cinematic. They're the ones with a clear workflow, simple standards, and a production setup that survives deadlines, revisions, and platform changes.
Why a Video Workflow Is Your Secret Weapon
Organizations often don't struggle because they lack ideas. They struggle because video work expands to fill every available hour. A quick feature announcement turns into a new script, a new recording setup, three rounds of edits, last-minute subtitle fixes, and platform-specific exports that nobody planned for. That's a bad way to produce content in a format that now dominates how people consume information online. Social videos are shared 1,200% more than the combined total of text and image posts, and 78% of people watch videos online weekly, according to this social video statistics roundup. That isn't just proof that video matters. It means you need a system that lets you make it repeatedly.
Practical rule: If your process only works when one talented person has extra time, you don't have a process. You have a bottleneck.
A workflow changes the economics of video. It reduces reshoots because the message is set before recording. It shortens editing because the footage was captured with the final format in mind. It also makes reviews faster because stakeholders react to a structure they recognize instead of a brand-new approach every time. This is also where smart tool selection matters. If you're sorting through automation, generators, and editing assistants, an Expert comparison of AI video tools can help you separate novelty features from tools that reduce production friction. The strongest teams don't ask, “How do we make one great clip?” They ask, “How do we make launch videos, tutorials, and product updates without rebuilding the process every single time?” That's the difference between occasional output and a pipeline.
The Pre-Production Blueprint for Flawless Videos
Bad editing usually starts with weak planning. When teams say a video “took forever in post,” what they usually mean is they started recording before they decided what the video needed to do.
That's why most generic advice falls short. The primary challenge for teams is not making one good video, but building a reliable pipeline. A major gap in most advice is that it focuses on creative tips but fails to address the operational question of how to produce polished videos repeatedly without blowing up editing time, as noted in this analysis of the workflow gap in social video advice.
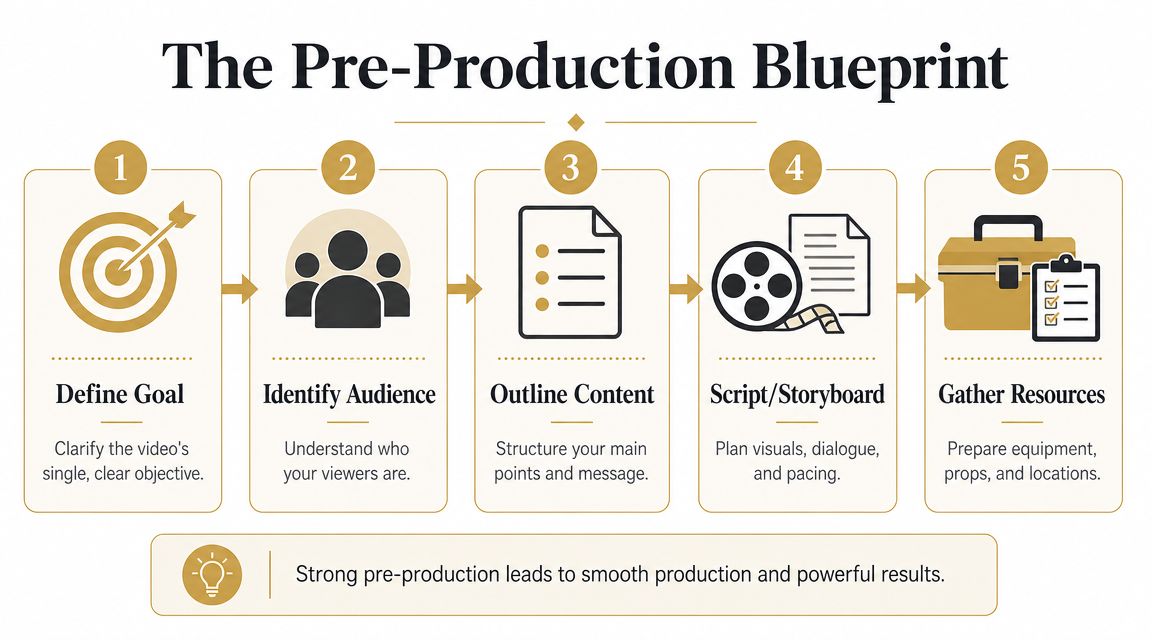
Start with one job for the video
Every social video needs a single job. Not three. A product marketer might want a feature launch clip to announce the release, explain the problem, show the workflow, and drive signups. That's too much for one short social asset. Pick the primary outcome first, then let everything else support it. A simple pre-production brief usually needs only these fields:
- Audience: Who is this for right now? New users, evaluators, existing customers, or internal champions.
- Outcome: What should they understand or do after watching?
- Format: Is this a talking-head explainer, a screen-recorded demo, a narrated walkthrough, or a cut-down from a longer asset?
- Distribution: Where will it live first? Reels, TikTok, Shorts, LinkedIn, or a product page social embed.
- Constraint: What can't go wrong? Brand accuracy, readability, legal review, or launch timing. If your team can't answer those questions in a few lines, don't record yet.
Script for speed, not for applause
Most business videos don't need a formal script in paragraph form. They need a spoken outline that keeps the message tight and the footage recordable. Use a structure that sounds natural when read out loud:
- Hook
State the problem or outcome immediately. - Context
Give the viewer enough background to care. - Core steps or feature reveal
Show the action in order. - Close
End with one takeaway or next step. For demos and tutorials, I prefer writing screen direction directly into the script. Instead of “Show dashboard,” write “Open dashboard, click Reports, highlight export button.” That turns the script into a recording guide and cuts down on missed shots.
The script should make recording easier, not make the narrator sound impressive.
If you're wondering how to make social media videos without bloated edit time, this is the hinge point. Every unclear line becomes an awkward take. Every missing transition becomes a patch job in post.
Build a lightweight shot plan
Storyboarding sounds heavy, but for business video it can be fast. You don't need illustrated frames. You need a sequence. A simple shot plan might look like this:
| Segment | Visual | Audio | Note |
| Hook | Tight talking-head intro | Direct-to-camera | Keep first line short |
| Problem | Screen of old workflow | Voice-over | Show friction clearly |
| Solution | Product interaction | Voice-over | Capture full cursor path |
| Proof | Before/after screen or result | Voice-over | Keep text readable |
| Close | Return to speaker or branded end card | Direct-to-camera | One CTA only |
Gather assets before recording starts. Logos, UI states, screenshots, background music options, product copy, and final terminology should be locked early. If the feature name changes after the footage is recorded, the team pays for that change several times. Pre-production feels slower only to people who haven't paid the cost of skipping it.
Recording Polished Footage and Crystal-Clear Audio
Polished video starts before the record button. If the footage is soft, the room echoes, or the screen capture feels jumpy, editing can only hide so much.
For camera-based footage, there's a reliable baseline. Record at 30 fps or 24 fps, use a shutter speed about double the frame rate, and place a key light at roughly a 45° angle according to this social video shooting guide. Those settings aren't about looking fancy. They create footage that feels stable and readable.
Get the camera basics right before you touch edit
You can shoot useful social video with a phone, webcam, or mirrorless camera. The difference isn't the logo on the device. It's whether the setup supports clarity. Use this checklist before every recording session:
- Frame the subject cleanly: Medium shots work well for most social delivery because they keep faces readable on small screens.
- Control the background: Remove visual clutter before adding more gear.
- Prioritize audio: Viewers will forgive a simple shot faster than they'll forgive muddy sound.
- Light the face first: A basic key light setup beats overhead room lighting almost every time.
- Match recording conditions: Don't mix one bright, crisp take with another that sounds and looks like it came from a different day unless you intend that contrast. For product teams, this matters even more in founder-led and expert-led videos. When a PM, support lead, or solutions consultant appears on camera, visual consistency subtly signals competence.
Record demos so viewers never wonder where to look
Screen recordings fail when the creator knows the product too well. The cursor moves too quickly. Menus open before the viewer understands the previous step. Important interface changes happen in peripheral corners. That's why good product videos are less about spectacle and more about guided attention. Use device framing, cursor emphasis, and controlled zoom to give the viewer context without making the screen feel busy. If you're capturing iPhone footage or want a cleaner mobile workflow, this guide on making a video on iPhone is useful for tightening the capture process. A few recording habits help immediately:
- Narrate the action order: Say what the viewer is about to see before the click happens.
- Move the cursor deliberately: Fast pointer movement reads as hesitation on playback.
- Pause after key actions: Let interface changes register.
- Capture alternate takes of critical flows: Login, setup, import, export, and settings paths often need options in the edit.
For demos, the viewer should never have to hunt for the important click.
This is also where screen recording tools earn their keep. Device frames can make a mobile demo feel grounded. Cursor effects and smooth motion can make a software walkthrough easier to follow. Automatic zoom is useful when it's tied to a real focal point, not used as decoration.
Use the opening seconds to orient the viewer fast
The first moments decide whether the rest of the video gets a chance. The same shooting guidance notes that a strong hook in the first 3 seconds matters because attention drops quickly if the opening is vague or slow. For business videos, a strong hook usually does one of three things:
- Names the pain: “Still exporting these reports manually?”
- Promises the outcome: “Here's the fastest way to onboard a new user.”
- Shows the payoff first: Open with the most satisfying visual moment, then explain it. A short example helps.
If your intro needs a logo animation, a title card, and a scene-setting paragraph before the viewer learns anything, it's too slow for social.
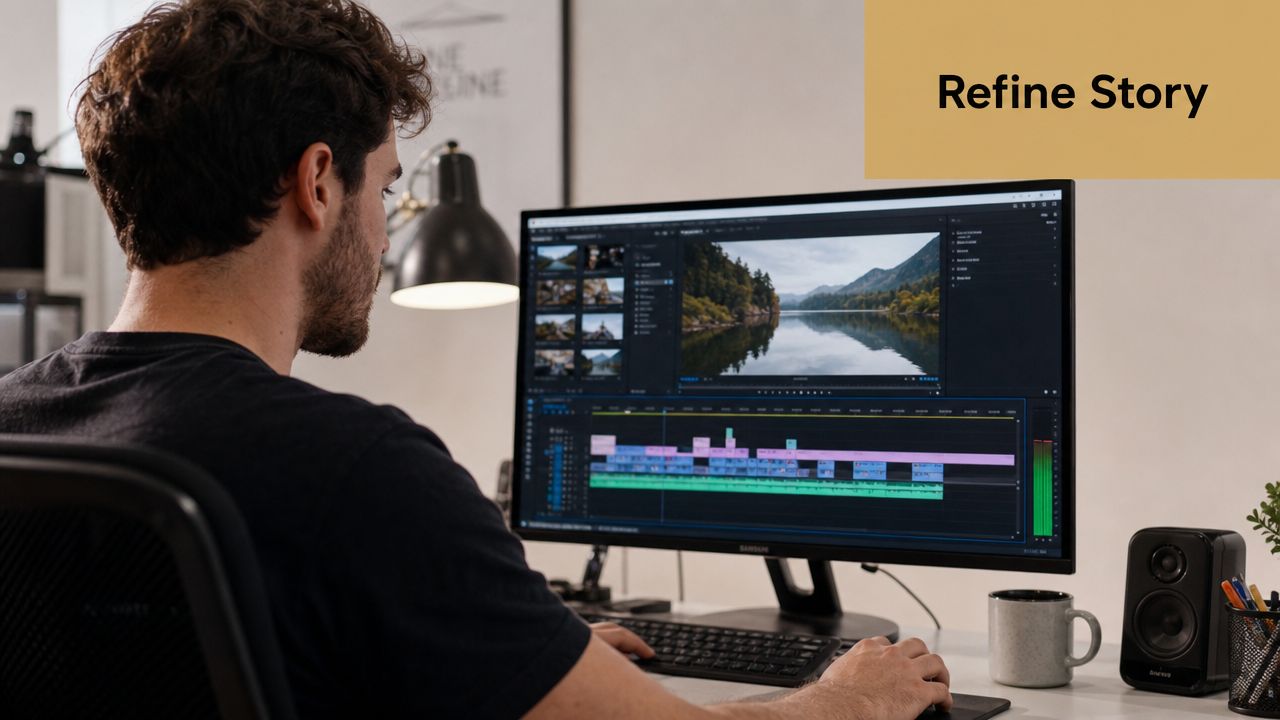
Editing for Pace Clarity and Viewer Retention
Editing gets framed as the place where creativity happens. In business video, editing is where decisions become visible. It's where the team proves whether it understands what the viewer needs to see, in what order, and for how long.
That's why clarity may outperform cinematic complexity for instructional or product-led content. As discussed in this perspective on camera angles and comprehension, the better-performing video is often the one that makes interface actions and on-screen steps easiest to follow.
Cut for comprehension first
When editors chase style before structure, the timeline gets flashy and the message gets weaker. For product demos, tutorials, and support content, ask a simpler question on every cut: does this help the viewer understand the action faster? That leads to practical editing choices:
- Remove dead setup time: Don't keep the mouse travel, menu hunt, or speaker reset if the moment doesn't add meaning.
- Compress repeated actions: If a process repeats, show one complete pass and shorten the rest.
- Use zoom to resolve ambiguity: If a small UI element matters, isolate it.
- Trim spoken filler aggressively: “So,” “basically,” and “what you want to do is” cost more attention than many creators realize. A lot of people trying to learn how to make social media videos assume better editing means more effects. For business content, better editing usually means less hesitation.
Build an editing sequence your team can reuse
A reusable edit sequence is one of the best shortcuts in a high-velocity pipeline. It turns every new project from a blank timeline into a variation of a known template. A strong sequence often follows this order:
- Assembly cut
Put clips in message order. Don't worry about polish yet. - Pacing pass
Remove pauses, duplicate ideas, and weak transitions. - Focus pass
Add zooms, crops, cursor emphasis, or cutaways where viewers need help. - Audio pass
Level voice, remove distractions, and align voice-over cleanly. If your narration and visuals drift, a guide on how to sync audio with video can save a frustrating cleanup cycle. - Text pass
Add titles, subtitles, callouts, and on-screen labels. - Platform pass
Adapt framing, safe areas, and final duration for the target channel.
Edit in passes. Teams lose time when they try to solve pacing, graphics, and sound at the same moment.
This approach also makes reviews cleaner. Stakeholders can comment on message flow before they start debating motion design.
Subtitles, zooms, and audio cleanup are not polish layers
These are comprehension tools. Subtitles help when people watch with sound off, but they also reinforce terminology, product names, and step order. Zooms aren't just visual energy. They tell viewers where to focus. Audio cleanup isn't cosmetic. It reduces the cognitive effort required to follow a narrator through a sequence. If you need a rule for deciding whether an edit stays, use this one: keep the change if it reduces confusion or increases recall. Drop it if it only advertises that an editor touched the file. That standard keeps teams from overproducing simple videos and underexplaining complex ones.
Optimizing and Publishing for Each Platform
A strong edit still needs a platform-aware finish. Social distribution punishes lazy exports. Cropped captions, unreadable text, weak thumbnails, and platform-mismatched pacing can make a good video look careless. There are a few practical benchmarks worth following. For TikTok and Instagram Reels, guidance recommends cutting roughly every 2 to 3 seconds, exporting at 1080p, and checking a draft upload in-feed to verify caption readability and audio balance, according to this social media video production guide.
Platform differences that actually matter
The most common publishing mistake is treating every channel as identical. They aren't. TikTok and Reels usually reward immediacy. The video needs to explain itself quickly, text needs to be legible on mobile, and pacing can't drift. YouTube Shorts can handle slightly more complete explanations if the opening earns attention. LinkedIn usually benefits from a more direct, professional framing, especially for B2B launches, product updates, or customer education clips. Captions deserve their own workflow. If your team needs a practical walkthrough, this complete guide for content creators is worth bookmarking. For hands-on production, a separate resource on adding subtitles to videos is helpful when you want captions that stay readable across social crops.
Social media video specs at a glance 2026
Use this as a working reference for your export checklist.
| Platform | Aspect Ratio | Max Length | Recommended Resolution |
| Instagram Reels | Vertical | Varies by format and account context | 1080p |
| TikTok | Vertical | Varies by post type | 1080p |
| YouTube Shorts | Vertical | Platform-specific | 1080p or 4K depending on audience and bandwidth constraints |
| LinkedIn video post | Horizontal or vertical depending on creative | Varies by placement | Export based on chosen format and readability needs |
If your team wants one master file, create it from the highest-quality approved edit and then derive platform versions from that source. Don't keep re-exporting re-exported files.
Final checks before you hit publish
A clean publishing checklist beats heroics.
- Read captions in-feed: Don't trust the editing canvas alone.
- Check safe zones: Interface buttons and platform UI can cover text.
- Listen on phone speakers: Audio that sounds fine on studio headphones can fall apart on mobile.
- Review thumbnail logic: Pick a frame that makes sense without motion.
- Match the post copy to the asset: Tutorials need clarity, launches need context, and teasers need curiosity. Publishing is where many teams undo good production work. Slow down for the last five minutes.
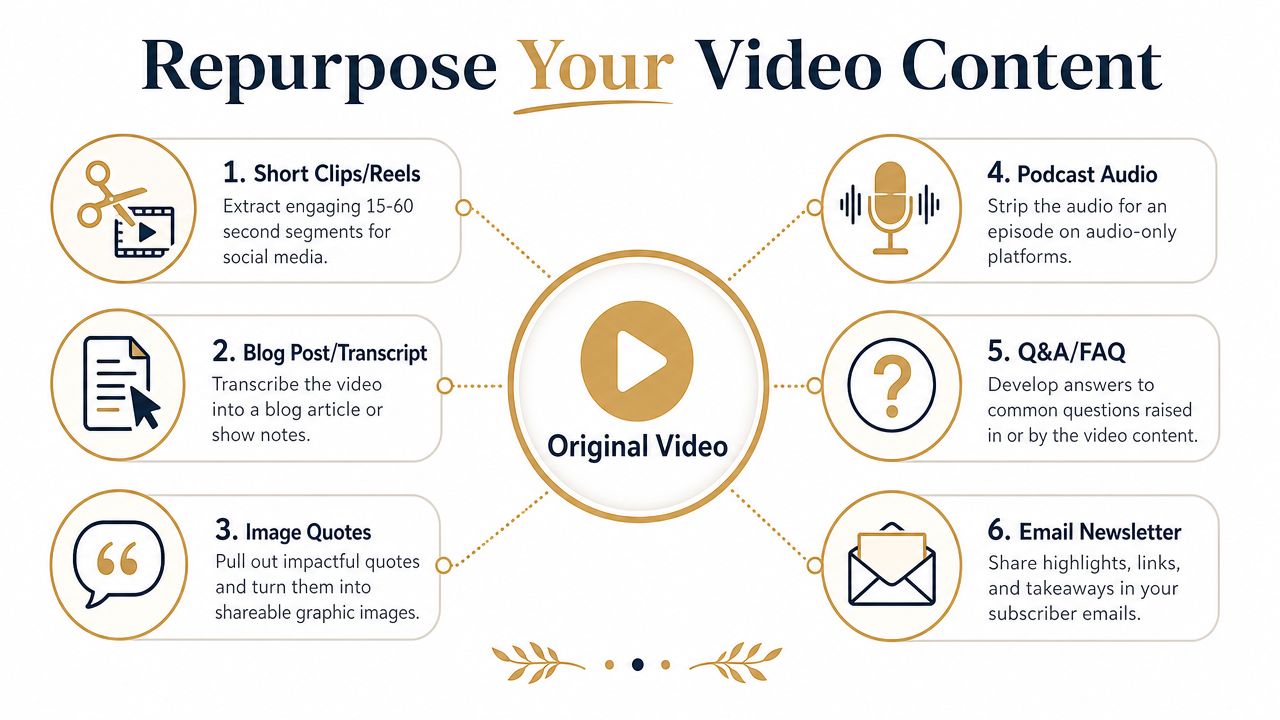
How to Repurpose One Video into a Week of Content
The fastest way to burn out a video team is to treat every post like a new project. That's manageable for one-off campaigns. It fails for product marketing, support, onboarding, and education teams that need steady output.
A better model is to build one solid core asset and turn it into multiple lighter assets. That could be a full demo, a narrated workflow, a founder explanation, or a feature walkthrough. The original video becomes raw material for the rest of the week.
Treat the original recording as a source file, not a finished asset
This mindset changes everything. When recording, capture slightly more than the main edit needs. Leave room for alternate openings. Record a clean version of the strongest explanation. Save isolated product shots, clean UI sequences, and short reaction lines that can stand alone later. Those extra pieces become:
- Short clips for Reels or Shorts
- Support snippets for a help center or FAQ
- LinkedIn-native cut-downs with a different intro
- Email embeds
- Transcript-driven blog content
- Sales enablement snippets
One recording session should feed multiple channels with different levels of detail.
Repurposing doesn't mean dumping the same clip everywhere. It means adapting the same core message for different attention spans and contexts.
A simple weekly repurposing map
Here's a practical version for a product demo:
| Day | Asset | Purpose |
| Monday | Full feature demo | Primary announcement or walkthrough |
| Tuesday | Short problem-solution clip | Social reach |
| Wednesday | Captioned UI snippet | Product education |
| Thursday | Quote or insight pulled from narration | LinkedIn or email support |
| Friday | FAQ cut-down | Objection handling or support |
The trick is to identify the reusable moments during the first edit. Mark sections where a problem is stated cleanly, where the product action is visually satisfying, and where the explanation stands alone without extra context.
Build the library while you publish
Repurposing works best when the team stores assets in a way that supports future use. Organize by:
- Theme: onboarding, reporting, collaboration, setup, integrations
- Asset type: hero video, cut-down, testimonial-style clip, FAQ, silent demo
- Format: vertical, square, horizontal
- Lifecycle stage: awareness, evaluation, activation, retention The operational payoff is simple. Your next “new” video often isn't fully new. It's a recombination of approved, searchable pieces your team already owns. That's the scalable answer to how to make social media videos. Not more hustle. Better reuse, clearer systems, and fewer decisions from scratch. If your team produces demos, onboarding videos, launch assets, or social cut-downs on a regular schedule, Smooth Capture is built for that workflow. It combines recording and editing in a native macOS app, with tools for screen capture, device frames, cursor effects, automatic zoom, subtitles, and fast exports that help teams ship polished business video without turning every project into a full production cycle.
Ready to create stunning app demos?
SmoothCapture makes it easy to record your screen with 3D device frames, cinematic cursor effects, and professional editing tools.