Adding Subtitles to Videos: Best Methods Guide
You’ve finished the edit. The cuts are clean, the pacing works, the voiceover lands. Then the delay starts: adding subtitles to videos in a way that doesn’t look rushed, doesn’t drift out of sync, and doesn’t create three extra rounds of review.
That’s where time is often lost. Not on recording. Not on messaging. On the last mile, where subtitles become a mix of accessibility requirement, platform requirement, and brand presentation problem.
The fastest teams treat subtitles as part of production, not cleanup. They decide early whether they need burned-in captions for social, sidecar files for YouTube, multilingual delivery, or accessible captions with speaker labels and sound cues. That choice changes the whole workflow.
Table of Contents
- Why Every Video Needs Subtitles in 2026
- Choosing Your Subtitling Method
- The Modern Workflow with SmoothCapture
- Timing and Formatting Best Practices
- Exporting Subtitles for Key Platforms
- Advanced Considerations and Troubleshooting
Why Every Video Needs Subtitles in 2026
The common mistake is treating subtitles like decoration. Teams finish the visual edit first, then tack on captions because a platform expects them or legal review asks for them. That mindset creates rework and usually produces subtitles that are technically present but hard to read.
Subtitles do more than satisfy accessibility requirements. They directly affect whether people understand the video at all in silent autoplay environments. According to Rev’s roundup of closed-caption statistics, 80% of viewers are more likely to watch a video to completion if subtitles are available, captioned YouTube videos can see a view increase of up to 40%, and 85% of Facebook videos are watched with the sound off.
Subtitles affect reach before they affect polish
For product marketing teams, that changes the conversation. If the viewer sees your launch clip in a feed with audio muted, subtitles aren’t an enhancement. They are the message delivery layer.
That’s especially true for demos, walkthroughs, and feature reveals. Product videos often rely on exact wording: button names, setup steps, warnings, and benefit statements. If those details only live in voiceover, part of the audience misses them.
Practical rule: If the video still needs to communicate when the audio is off, subtitles belong in the first production brief, not the last export checklist.
There’s another operational angle. Once teams accept that subtitles are part of the deliverable, they start making better recording decisions. Cleaner voiceovers, fewer interruptions, and clearer system audio all make subtitle generation easier. If you’re capturing tutorials or product walkthroughs on macOS, a reliable Mac internal audio recorder workflow helps upstream because accurate audio gives you cleaner transcripts downstream.
This started as accessibility and became standard workflow
Subtitles became mainstream for good reasons, not just because platforms normalized them. A historical marker matters here. As documented in the National Institutes of Health PMC review on captioning, closed captions were first used at scale on U.S. television in 1972, when the National Captioning Institute began captioning broadcasts. The same review states that more than 100 empirical studies documented that captioning improves comprehension, attention, and memory across children, adolescents, college students, and adults.
That matters for marketing teams because product videos often teach while they persuade. When a video has to explain a setup flow, a dashboard change, or a new feature path, captions help viewers track the information more reliably.
A subtitle workflow should therefore optimize for three things at once:
- Comprehension: People need to follow the meaning without replaying every sentence.
- Distribution: Social viewers often watch without sound, and platform behavior rewards videos that hold attention.
- Accessibility: Viewers who are deaf or hard of hearing, and viewers in non-native language settings, need more than a raw transcript.
If subtitles are handled late, you usually get only one of those. If they’re planned early, you can get all three.
Choosing Your Subtitling Method
Teams often don’t need more subtitle features. They need the right method for the job. The wrong method wastes time in two directions: either you overbuild captions for a throwaway social cut, or you underbuild them for a product asset that will live for months.
The three workflows that matter
There are three practical approaches.
The first is automatic generation, either through an on-device tool or a cloud service. This is usually the fastest route from spoken audio to editable text. It works well for short-form content, internal tutorials, and first-pass captioning when speed matters more than perfect wording on the first try.
The second is manual creation. This means typing and timing captions yourself inside the editor. It gives the most control, but it’s slow. I only recommend it when the script is short, the phrasing is highly sensitive, or the audio is too messy for automation to produce a usable draft.
The third is importing a timed subtitle file, usually an SRT. This is the closest thing to a professional default. Adobe’s documented workflow recommends importing an SRT into Premiere, dragging it into the sequence, creating a caption track, and refining timing against the waveform in the Captions workspace, as explained in Adobe’s guide to adding subtitles in Premiere. That matters because the transcript and the timing are different tasks. Good text still needs precise alignment.
Subtitle Method Comparison
| Method | Best For | Speed | Accuracy | Typical Cost |
|---|---|---|---|---|
| Auto generation on device or in the cloud | Social clips, demos, first drafts, recurring content | Fast | Good after review | Varies by tool and workflow |
| Manual transcription and timing | Short scripts, legal review, exact phrasing, difficult audio | Slow | High if carefully edited | Team time |
| Importing a timed SRT file | YouTube, Vimeo, polished product videos, multilingual workflows | Moderate | High when source file is clean | Varies by who creates the file |
What works for different video types
A short social clip usually doesn’t justify a heavy subtitle process. Burned-in captions generated automatically and cleaned up in a quick pass are often enough.
A product demo is different. UI terms have to match the interface. Timing needs to respect pauses while the viewer watches the screen. If the subtitles jump too quickly, viewers stop reading and start choosing between the UI and the text.
Use this decision logic:
- Choose auto generation first when turnaround is tight and the speaker audio is clean.
- Choose manual entry when the copy must match approved messaging exactly and the script is short enough that hand-timing won’t become a bottleneck.
- Choose SRT import when the video will be distributed across multiple platforms, localized later, or revised by more than one editor.
A subtitle workflow fails when it’s optimized only for transcription speed. The real bottleneck is usually correction, timing, and reuse across formats.
The biggest trade-off is control versus iteration speed. Cloud tools can be convenient when teams collaborate remotely, but they add an upload step and may create formatting work later. On-device tools reduce transfer friction and are useful when privacy or turnaround matters. Manual methods still win when the source material is inconsistent or the wording is too important to trust to an automated first pass.
The Modern Workflow with SmoothCapture
A modern subtitle workflow should keep the editor close to the footage, the transcript, and the timing controls. When those steps are spread across separate tools, teams lose time to exports, uploads, and version confusion.

A practical on-device workflow
For Mac-based production, one workable approach is to record, generate subtitles, edit timing, and export from the same environment. SmoothCapture is one example of that model. It uses on-device speech recognition through Apple’s Speech framework, lets editors generate subtitles inside the app, and supports karaoke-style highlighting rather than only static caption blocks.
That workflow changes how teams handle first drafts. Instead of exporting a video, uploading it elsewhere, waiting for processing, then re-importing a subtitle file, you can generate an initial caption layer where the edit is already happening. That matters most for recurring assets like onboarding clips, release videos, and customer education updates.
The basic sequence is straightforward:
- Record the cleanest source possible. Good subtitle output starts with clean voiceover and clear system audio.
- Generate a subtitle draft immediately after capture. This creates a working text layer while the edit context is still fresh.
- Correct names, product terms, and feature labels first. Those are the errors reviewers catch fastest.
- Adjust timing at sentence boundaries. By adjusting timing at sentence boundaries, subtitles start feeling professional instead of merely present.
- Decide whether to use standard blocks or highlighted text. Karaoke-style emphasis can help direct attention in dense tutorial moments.
Where this approach saves time
On-device generation is most useful when privacy, speed, or iteration count matters. Teams working on pre-release products often don’t want to move every recording through an external captioning pipeline. It also helps when marketers and editors are producing many small variants from one recording session.
There’s a quality benefit too. Editors can fix caption issues while reviewing cuts instead of treating subtitles as a separate approval stream. That tends to catch practical problems earlier, such as:
- Terminology mismatch: The subtitle says one thing while the UI shows another.
- Late caption entry: The viewer reads the line after the click already happened.
- Overlong blocks: The text covers too much screen space during a key product interaction.
When subtitles live on the same timeline as the rest of the edit, correction becomes part of normal review instead of a separate production step.
Karaoke-style highlighting is useful in product videos with procedural steps or technical narration. It doesn’t fit every brand style, and I wouldn’t use it on every social asset. But in tutorials, it can guide the eye through phrases that matter without forcing the viewer to choose between reading the whole line and watching the cursor movement.
What doesn’t work is assuming automation removes editorial judgment. It doesn’t. The efficient setup is automatic generation plus targeted human correction. That’s where most of the time savings are realized.
Timing and Formatting Best Practices
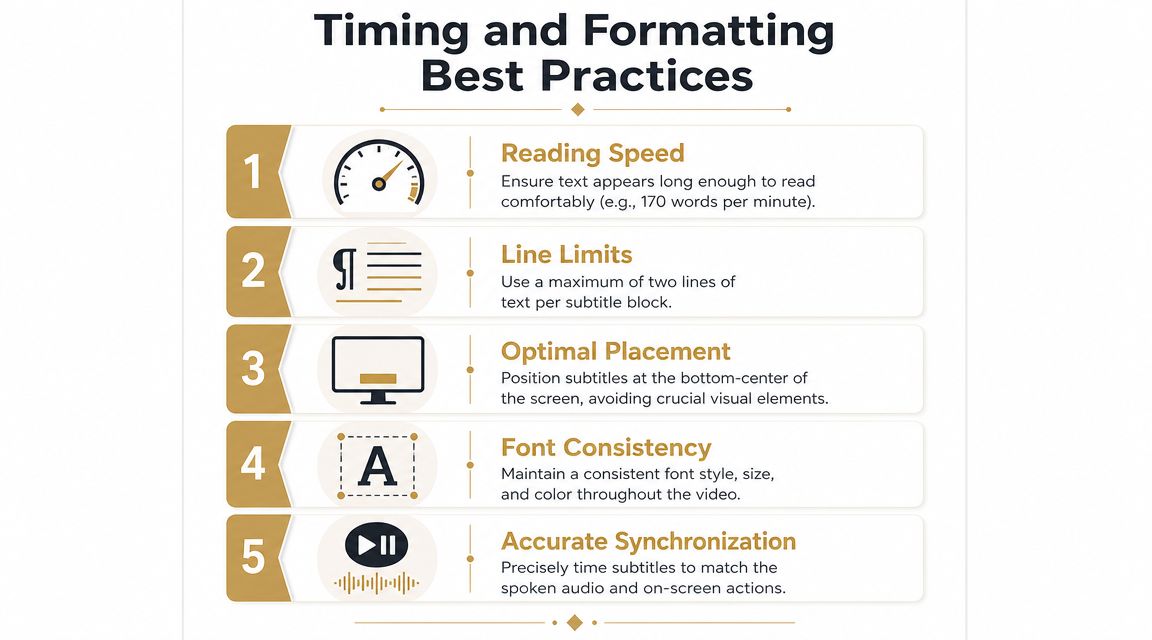
Readable subtitles are edited, not merely generated. Teams usually focus on whether the words are correct and overlook whether the viewer can process them at the same time they’re watching the product.
Readable beats literal
The biggest formatting mistake is trying to preserve every spoken word exactly as delivered. Spoken language includes fillers, restarts, and fragments. Good subtitles respect meaning first, cadence second, and verbatim transcription third.
Accessibility guidance from YouTube’s captioning and subtitle recommendations is useful here. Professional captions should include non-speech cues like [applause] and speaker identifiers when clarity requires them. The same guidance stresses high-contrast text and short, well-paced lines.
That last point matters more than many teams expect. A subtitle that is technically accurate but visually dense creates friction. The viewer ends up reading instead of understanding.
A practical formatting checklist
Use this as a review pass before export:
- Keep blocks short: Two lines are easier to scan than dense multi-line stacks. If a line feels crowded, rewrite for readability rather than shrinking the font.
- Break lines by meaning: Split at natural phrase boundaries. Don’t separate articles from nouns or verbs from their objects if you can avoid it.
- Match the subtitle to the action: If the speaker says “Click Export,” that caption should appear before or during the click, not after.
- Protect the frame: Place text where it won’t cover buttons, lower-thirds, or product UI details.
- Style for legibility: High contrast wins over decorative styling almost every time.
- Add non-speech information selectively: Use labels like [music], [applause], or speaker names when they help understanding, not as clutter.
If your team edits on Windows and needs broader timeline and export context before tackling subtitles, this guide to video editing on Windows 10 is a useful companion because subtitle polish depends on understanding the whole edit environment.
For Mac users doing lighter edits before subtitle cleanup, a simple QuickTime video editing workflow can be enough for trims and rough sequencing, but it won’t replace a subtitle-focused review pass.
Short, high-contrast captions with clean timing usually outperform stylish captions that force the viewer to work.
One more trade-off is worth calling out. Burned-in subtitles give you complete visual control, but they lock in every timing and wording decision. Sidecar files are more flexible, but they can render differently by platform. That’s why formatting should be conservative. Fancy treatment often breaks first.
Exporting Subtitles for Key Platforms
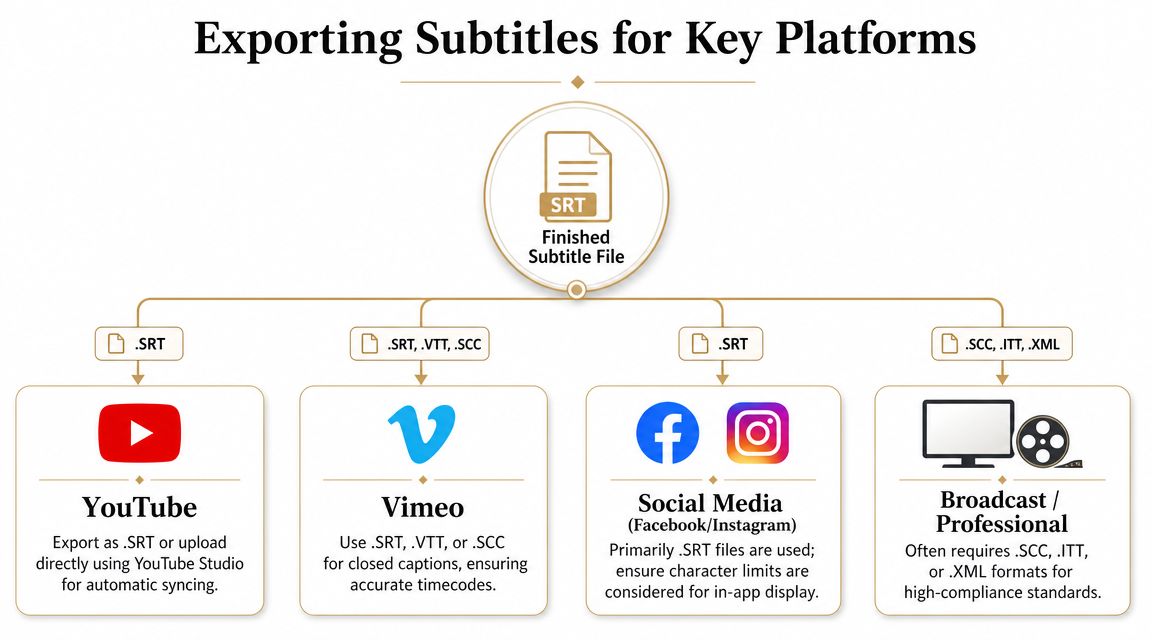
Export is where subtitle strategy becomes distribution strategy. The same caption file shouldn’t be used the same way everywhere. The first decision is simple: do you want the text permanently visible in the video, or do you want the platform to handle it?
Choose open captions or sidecar files first
Open captions are burned into the video. Use them when you need absolute consistency in appearance or when the platform experience is heavily mute-first. This is common for social clips, ad variants, and app promo content where you don’t want to depend on a platform subtitle toggle.
Closed captions or sidecar files such as SRT are better when the platform supports them well and when you want flexibility. They let viewers turn captions on or off, support accessibility settings more cleanly, and are easier to revise later.
As a rule, use open captions for silent-first distribution and sidecar files for library content, search-driven content, and videos that may be localized later.
Platform by platform export decisions
Different destinations reward different choices.
- YouTube: Upload a polished SRT when possible. This keeps the text editable and gives you a base for additional languages.
- Vimeo and similar hosts: Sidecar files usually make sense because they preserve accessibility options and can be updated without re-exporting video.
- Instagram, TikTok, LinkedIn, and other social feeds: Burned-in captions often work better because the visual result is predictable during autoplay.
- App previews and product promo assets: Decide based on screen real estate. If the interface is already dense, sidecar support may not be available, so open captions need careful placement.
If you’re also tuning final render settings, this creator’s guide to DaVinci Resolve export is worth keeping nearby because subtitle delivery problems often start with broader export decisions, not the caption file itself.
Use one master file for localization
For YouTube, the efficient workflow is to perfect one English subtitle track first. YouTube supports a process where you establish the base timing, upload the file with timing, and then use Auto-Translate for additional languages. In the workflow shown in this YouTube subtitle tutorial, that scaling model supports over 150 languages.
That doesn’t remove the need for review in important markets, but it does give teams an operational starting point. Timing every language manually is where localization projects slow down. Reusing one accurate source file is much more practical.
A few export habits help avoid pain later:
- Lock the edit before final subtitle export: Even small trims can throw off a finished caption file.
- Keep a master subtitle file separate from the project file: You’ll need it again for revisions or alternate outputs.
- Publish after metadata is correct on YouTube: If the video language isn’t set, subtitle controls can be unavailable.
- Plan file size with delivery in mind: If you’re shipping multiple platform variants, a solid video compression workflow on Mac helps keep exports manageable without turning subtitle text soft or muddy.
What doesn’t work is exporting subtitles as an afterthought from whatever platform happened to generate them first. Treat the master subtitle file like any other master asset. It’s reusable production data, not disposable text.
Advanced Considerations and Troubleshooting
Subtitle issues usually show up after the first round of feedback, not before. The transcript looks fine in review, then someone trims the intro, swaps a sentence, or exports for a different platform and the captions suddenly feel broken.
Fix sync drift at the source
Sync drift often starts with edit changes after caption timing is already done. If a clip is shortened, moved, or retimed, subtitles can remain technically attached while becoming perceptually wrong.
The cleanest fix is not to patch individual lines one by one. Go back to the timed source, then realign in the editor against the waveform. That’s faster and more reliable than nudging scattered blocks after multiple revisions.
Common causes of subtitle trouble include:
- Late-stage recuts: Even minor changes can shift timing across the rest of the timeline.
- Mixed frame rate assets: Captions may feel slightly off even when they aren’t obviously broken.
- Overedited AI transcripts: Heavy rewriting without timing review makes readable captions appear at awkward moments.
- Platform rendering differences: What looks balanced in the editor may wrap differently after upload.
If more than a few subtitle blocks feel off, stop patching and rebuild timing from the nearest clean source version.
Know when you need captions, subtitles, or SDH
Teams often use these terms interchangeably, but the distinction matters in real production.
Subtitles often focus on dialogue, especially for translation.
Captions generally represent spoken content for viewers who can’t hear the audio.
SDH or subtitles for the deaf and hard of hearing go further by including speaker identification and relevant sound cues.
That means a translated subtitle track and an accessibility-ready caption track are not always the same deliverable. If the video contains meaningful sounds, multiple off-screen speakers, or instructional audio cues, a plain dialogue transcript is not enough.
For long videos, correction strategy matters too. Don’t review every line with equal energy. Check product names, feature labels, calls to action, and all moments tied to on-screen interaction first. Those are the places where subtitle errors create business problems, not just technical ones.
Subtitles work best when they’re planned, generated efficiently, and reviewed with the same care as the voiceover script. That’s what turns them from a production chore into a repeatable workflow.
If your team produces product demos, onboarding videos, or launch assets regularly, SmoothCapture is worth evaluating as a Mac-based option for recording, editing, and generating on-device subtitles in one workflow. It’s particularly relevant when you want to avoid extra cloud steps, keep caption edits close to the timeline, and ship polished video more consistently.
Ready to create stunning app demos?
SmoothCapture makes it easy to record your screen with 3D device frames, cinematic cursor effects, and professional editing tools.