A Guide on How to Improve AVI Quality
If you want to improve your AVI video quality, the first place to look isn’t your editing software—it’s the original file. Before you even think about re-encoding or editing, you need to play detective with your source recording.
A lot of common problems, like pixelation or audio that’s slightly off, are baked in from the start. If you’ve got your initial capture settings—like resolution, bitrate, and frame rate—dialed in correctly, you’ve already won half the battle. Fixing these things at the source is always better than trying to clean up a mess later.
Table of Contents
- Diagnosing Your AVI Quality Issues at the Source
- Mastering Your AVI Encoding Settings
- Adding Visual Polish with Post-Processing
- Choosing an Export Strategy: Lossless vs. Re-encoding
- Building Repeatable Quality with Standardized Workflows
- Frequently Asked Questions About AVI Quality
Diagnosing Your AVI Quality Issues at the Source
It’s a familiar frustration: you’ve got a blurry or pixelated AVI file and no amount of editing seems to help. That’s because re-encoding a low-quality video is a losing game; you’re just compressing an already flawed file, which almost always makes it look worse. The secret is to start thinking about quality long before you hit the export button.
I’ve found that borrowing a concept from the world of data quality management works wonders here. The pros in that field define their standards, check everything at the source, and build a process to avoid repeating mistakes. We can do the same with video. Get your recording settings right from the get-go and check your files for obvious problems before they get locked into your project. For those curious about the nitty-gritty of this approach, you can see how it’s applied in data-heavy fields by reading about improving data quality with systematic checks.
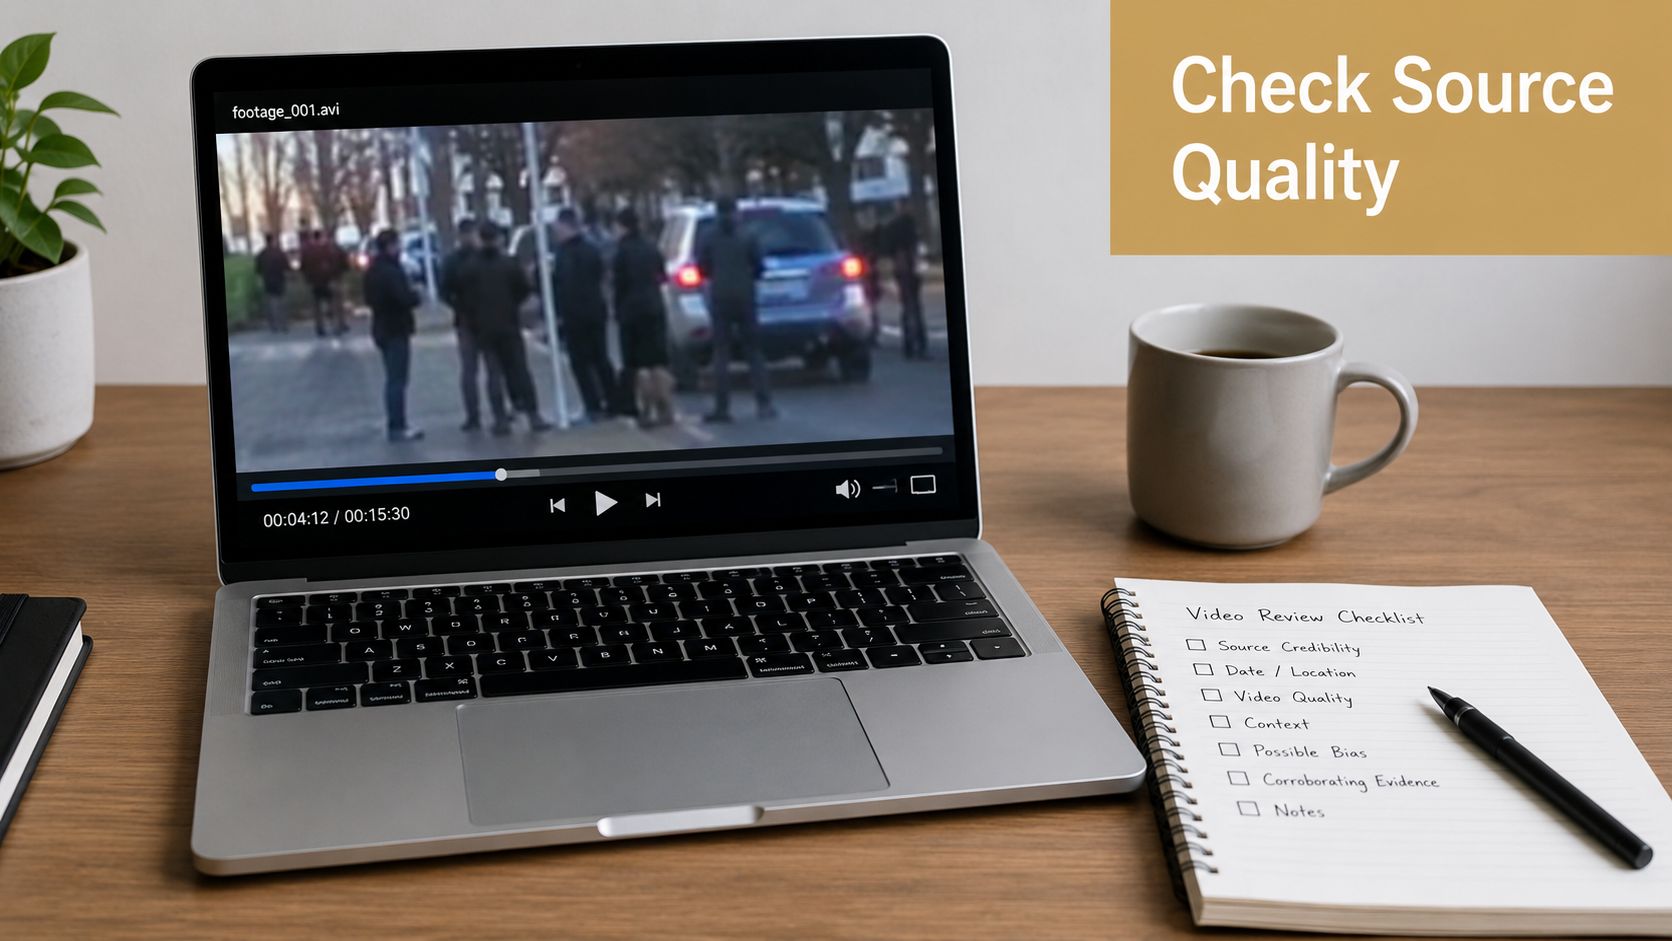
Analyze Your Source File First
Okay, before you even dream of opening your video editor, just play the raw AVI file. Watch it closely. Do you see those blocky, chunky artifacts when the action gets fast? Is the sound a little ahead or behind the video? These are classic signs that your source file has issues.
And of course, the gear you use matters. A great camera or screen capture tool sets the foundation for everything that follows. If you’re in the market for gear, you can find great advice in professional guides that explain what to look for when you find ideal wedding video cameras.
This infographic breaks down a simple three-step diagnostic you can run on any video to standardize your quality from the very beginning.
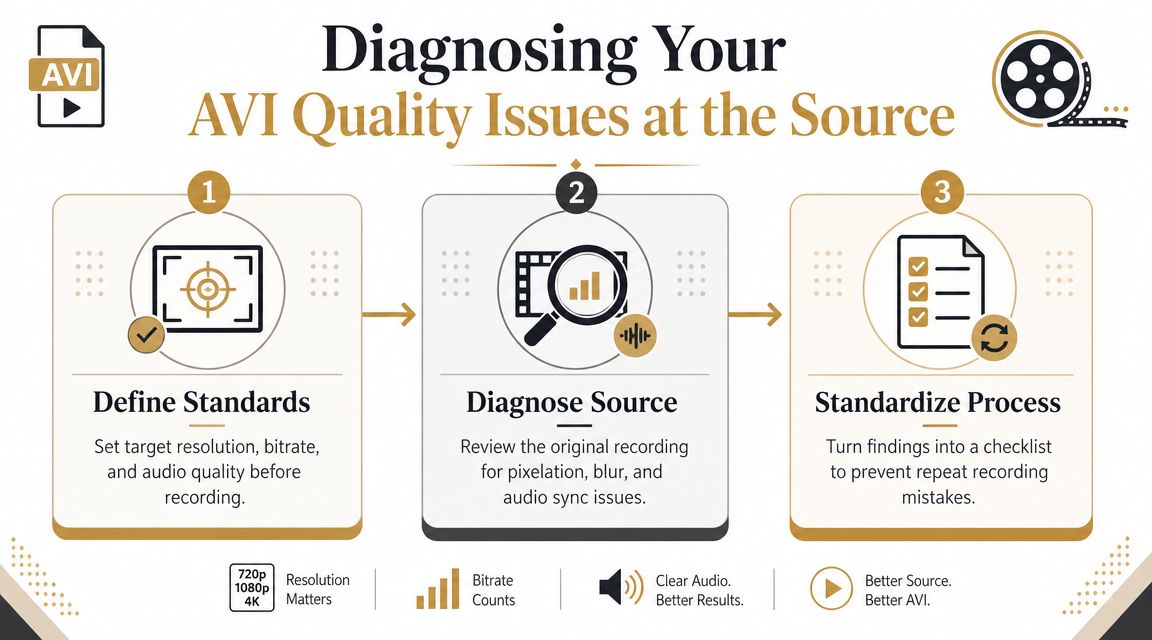
A Quick Diagnostic Checklist
Here’s a quick table you can use to check your own AVI files. Running through this checklist before you start a project can save you a world of headaches down the line.
AVI Quality Diagnostic Checklist
| Quality Factor | What to Check For | Quick Fix |
|---|---|---|
| Pixelation/Blockiness | Watch for square artifacts, especially during scenes with fast motion or complex textures. | Increase the bitrate on your next recording. This gives the video more data to work with. |
| Blurriness | The video looks soft or out of focus, even when the subject is still. | Check camera focus. For screen recordings, ensure you’re capturing at the native resolution of your display. |
| Audio Sync | Dialogue or sounds don’t match the on-screen action. | Use a media player like VLC to check the file. If it’s out of sync, this often points to a variable frame rate issue during recording. |
| Stuttering/Dropped Frames | The video playback is jerky or skips, not playing smoothly. | This is usually a sign that the recording device couldn’t keep up. Lower the resolution or frame rate during capture. |
| Washed-Out Colors | Colors look faded, dull, or not true to life. | Check your recording software’s color space settings (e.g., Rec. 709). This can sometimes be corrected in post, but getting it right at the source is better. |
Ultimately, a proactive mindset is the key. Defining your quality standards, diagnosing each file at the source, and standardizing your workflow will always be more effective than trying to salvage a bad recording later. This approach is a massive time-saver, especially for teams creating a lot of demos or tutorials.
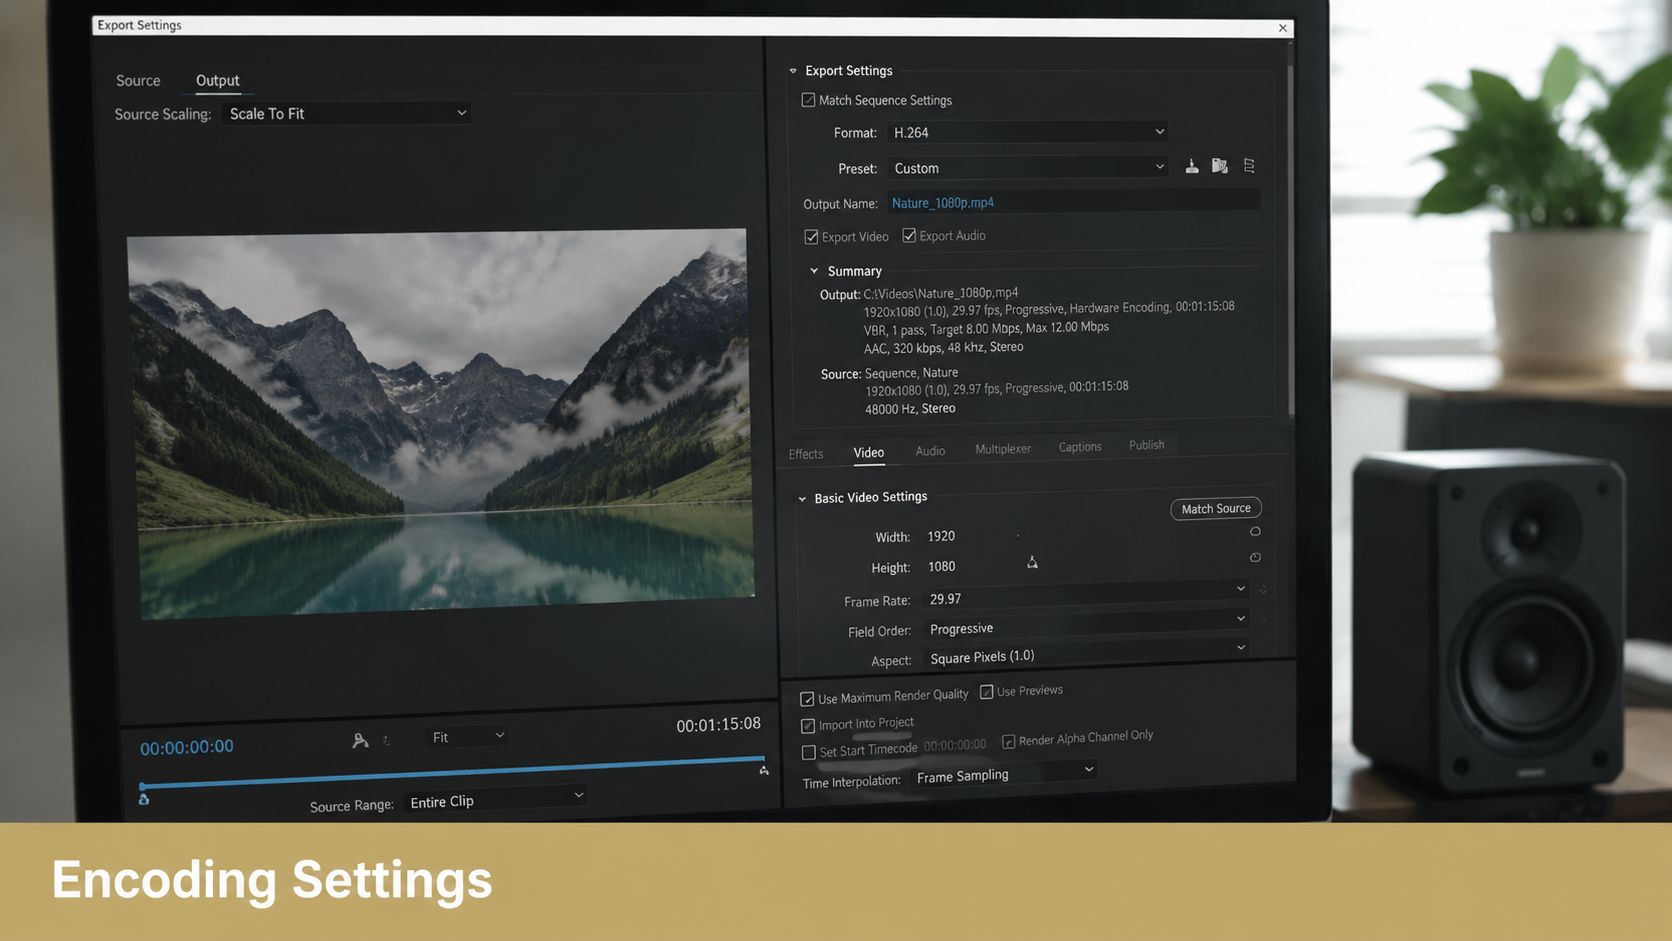
Mastering Your AVI Encoding Settings
If you want to know how to improve AVI quality, the answer almost always lies in your encoding settings. These are the technical knobs and dials that directly control the trade-off between a sharp, clear picture and a manageable file size. Get them right, and you’re golden. Get them wrong, and you’ll end up with a blurry mess or a file so huge it’s unusable.
Think of bitrate, resolution, and frame rate as the three core ingredients for your video. The final result—good or bad—comes down to getting the balance just right.
Let’s dig into how to set each of these for common uses like screen recordings and product demos.
Finding the Sweet Spot for Bitrate
Bitrate is simply the amount of data dedicated to each second of your video. More data means more detail and less compression, but it also means a bigger file. If your bitrate is too low, you’ll see those ugly, blocky artifacts, especially in scenes with a lot of movement.
- For Software Tutorials: When you’re recording something like a software tutorial at 1080p, the on-screen action is pretty minimal. You can usually get a crystal-clear result with a bitrate between 2,500 and 4,000 kbps.
- For High-Motion Gameplay: Fast-paced action requires way more data to look good. For smooth 1080p video at 60 fps, you should aim for a much higher bitrate—somewhere between 8,000 and 12,000 kbps—to keep compression artifacts at bay.
If you want to get really precise, you can learn more about how to calculate the perfect streaming video bitrate for any kind of project.
Match Your Resolution to the Source
Resolution defines your video’s dimensions in pixels (e.g., 1920x1080) and is the foundation of its sharpness. For screen recordings, the rule is simple: always record at your display’s native resolution.
Capturing at a lower resolution and then trying to scale it up later is a recipe for disaster. It creates a blurry, unprofessional video because the editing software is forced to invent pixels that weren’t there to begin with, and it rarely guesses right.
For example, if you record your 4K monitor at 1080p, you’ve just thrown away 75% of the pixel information before you’ve even started editing.
Choosing the Right Frame Rate for Smooth Motion
Frame rate, measured in frames per second (fps), controls how fluid the motion in your video looks. A higher frame rate gives you a smoother viewing experience, which is non-negotiable for certain types of content.
- 30 fps: This is your go-to for most general recordings. Think presentations, webinars, or basic software walkthroughs. It provides perfectly acceptable motion without bloating your file size.
- 60 fps: This is essential for anything with fast-paced action. If you’re recording video games, detailed UI animations, or anything with quick movements, 60 fps will capture it all with a buttery smoothness that prevents a choppy, jarring look.
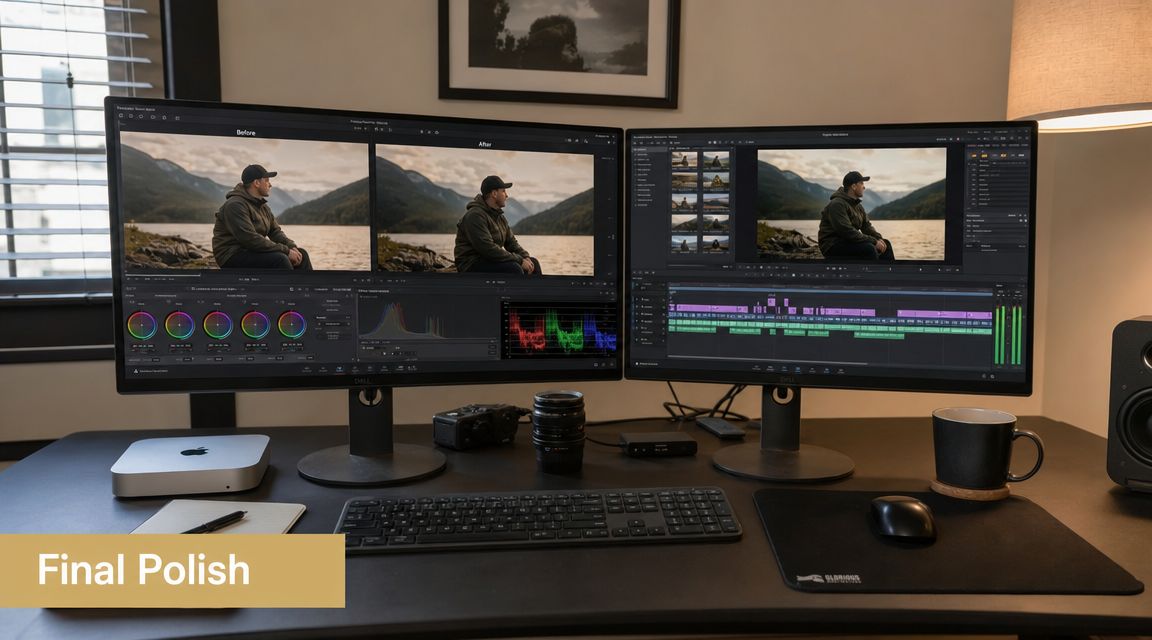
Adding Visual Polish with Post-Processing
Once you’ve nailed the technical settings, it’s time for the final touches that separate a raw recording from a truly professional video. This is where post-processing comes in, letting you clean up common visual issues and polish the look and feel of your AVI file.
You’d be surprised how much of a difference a few small tweaks can make. This isn’t just about fixing mistakes; it’s about making deliberate creative choices that guide your viewer’s eye and make your content shine.
Eliminate Distracting Video Artifacts
Let’s tackle the biggest offenders first. One of the most common problems, especially with older footage or certain capture hardware, is interlacing. This shows up as nasty horizontal lines during any kind of motion, an effect often called “combing.”
Luckily, this is usually an easy fix. Almost any modern video editor has a deinterlacing filter. Just applying this can blend those fields together and give you a much cleaner, smoother image. It’s often a one-click improvement that makes a huge impact.
Grainy footage, or “noise,” is another frequent headache, particularly in videos recorded in low light. A good noise reduction filter can work wonders here.
A word of caution: Go easy on noise reduction and sharpening filters. Over-processing is a classic rookie mistake. Too much noise reduction can leave faces looking waxy and plastic, while cranking up the sharpness creates ugly “halos” around objects. The goal is subtle enhancement, not a digital facelift.
Enhance Color and Bring Out Detail
Color correction is another powerful tool in your arsenal. If you’ve ever pieced together clips from different recordings, you’ve probably noticed slight shifts in color or brightness.
- Boost Vibrancy: A simple “saturation” or “vibrance” tweak can make dull colors pop. This is great for making a product UI or presentation slides more engaging.
- Correct White Balance: Does your video look too blue (cool) or too yellow (warm)? A white balance tool can neutralize the color cast for a more natural, accurate look.
- Increase Contrast: Adjusting the contrast makes the darks darker and the lights lighter. This simple step can dramatically improve readability for on-screen text and other elements.
Getting a polished look often comes down to mastering these post-production techniques. For bigger projects, digging into resources like Carlos Alba Media’s video production expertise can show you what goes into high-end workflows.
And if you want to guide your audience’s focus, you can learn to use dynamic effects. Our guide on how to zoom in on videos walks you through the steps for creating smooth, professional focus effects.
Choosing an Export Strategy: Lossless vs. Re-encoding
You’ve done all the hard work—the recording, the editing, the fine-tuning. Now you’re at the finish line: exporting. This is the one step where it’s surprisingly easy to undo all your careful work, so picking the right export strategy is absolutely critical to improving AVI quality for good.
You have two main paths: sticking with a lossless workflow or performing a high-quality re-encode.
Think of it like this: every time you re-save a video using a lossy codec like H.264, you’re making a photocopy of a photocopy. Each new version introduces tiny artifacts and imperfections, slowly but surely degrading the image. This is what we call generational quality loss.
It’s precisely why professional workflows rely on intermediate codecs—they act as a buffer to prevent this damage during the editing process.
When to Use a Lossless Workflow
A lossless or “visually lossless” workflow is your secret weapon for any intermediate editing steps. If you need to bounce a video clip between different applications—say, from your video editor to a motion graphics app and back again—exporting to a lossless format is non-negotiable.
- Lossless Codecs: Formats like FFV1 or HuffYUV are the purists. They preserve every last pixel of data, but the tradeoff is absolutely massive file sizes.
- Visually Lossless Codecs: This is where most pros live. Codecs like Apple ProRes or Avid DNxHD offer a brilliant compromise. They use very light compression that’s imperceptible to the human eye, giving you much smaller files than true lossless without any visible drop in quality.
Use a visually lossless codec for any clip that will be repeatedly edited, color-graded, or have effects applied. This ensures you’re always working from a pristine master copy, stopping the compounding damage of repeated compression dead in its tracks.
When Re-encoding Is the Right Choice
While lossless is king during editing, it’s a terrible choice for final delivery. Nobody wants to download your 50 GB tutorial video. This is where a smart, final re-encode is the only way to go. Your goal is to create a file that perfectly balances quality with a manageable size, optimized for wherever it’s headed.
For those of us using screen capture tools, this often means creating a few different export presets.
- Archival Master: This is your “digital negative.” Think a high-bitrate file using H.265/HEVC that you’ll store safely.
- Training Library: An optimized MP4 file (H.264) is perfect here—great for internal streaming and easy storage.
- Social Media Clip: A smaller, more compressed version tailored specifically for platforms like LinkedIn or Twitter.
Ultimately, the best approach is a hybrid one. Use lossless formats during your creative process to protect every pixel, then perform a single, high-quality re-encode for your final delivery files. And if you’re juggling different video formats along the way, understanding container types is a lifesaver. This guide on how to convert MKV files to MP4 is a great place to start.
Building Repeatable Quality with Standardized Workflows
Fixing AVI quality isn’t about finding a single magic button. The real secret is building a repeatable process that gives you consistent, high-quality video every single time. One-off tweaks are a recipe for frustration, especially when multiple people are creating videos. A standardized workflow is the only way to make great quality a scalable habit.
Think of it like enterprise data management. No serious company leaves data integrity to chance; they build documented standards and run automated checks. When you apply that same discipline to video production, quality stops being a matter of personal opinion and becomes a measurable, team-wide standard. It’s the difference between hoping for a good result and guaranteeing one.
Establishing Your Quality Baseline
First things first: you need to define what “good” actually looks like for your team. This means creating a simple, documented standard that anyone can pick up and follow. It takes the guesswork out of recording and stops quality from bouncing all over the place.
Your standard should lay out specific, measurable targets for every project. A solid starting point would include:
- Bitrate: Define a target range based on the content. For example, use 2,500-4,000 kbps for most tutorials, but bump it up to 8,000-12,000 kbps for action-heavy product demos with lots of on-screen motion.
- Resolution: Always record at the native screen resolution. This simple rule prevents the blurry mess that comes from upscaling a lower-resolution recording.
- Audio Levels: Set a clear target peak audio level, like -6dB, to make sure your audio is loud and clear without clipping or distorting.
- Export Settings: Create and share presets for your most common delivery formats, whether it’s for an internal archive or a social media post.
We see this work in other industries all the time. Quality improves when it’s measured and standardized, not when it’s left to individual taste. For instance, data quality experts have long known that you need quantifiable checks and feedback loops to get and keep data clean. By applying this same idea to your AVI workflow, your team can finally stop relying on one person’s “good eye” for quality. To dig deeper into these principles, check out this excellent guide on how to improve data quality from Collibra.
The core lesson is that improvements only last when they are documented, monitored, and enforced through process. For video, this means creating a shared workflow, auditing the results, and using the same settings for similar content.
This process-driven approach is a lifesaver for teams that produce a lot of content, like onboarding tutorials or client walkthroughs. It makes your video quality predictable and scalable, and it will save you hundreds of hours in rework down the line.
Frequently Asked Questions About AVI Quality
Still wrestling with AVI quality issues? You’re not alone. It’s a common container format, but it comes with its own set of quirks. Let’s clear up some of the most persistent questions I hear from creators.
Is AVI a Bad Format for Quality?
Not at all—but it’s probably the most misunderstood. The key thing to remember is that AVI is just a container, not a format itself. Think of it like a ZIP file; the quality of what’s inside depends entirely on what you put in it.
An AVI file can hold anything from a beautiful, uncompressed master file to a blocky, heavily compressed mess. The quality is determined by the codec (like DivX, Xvid, or a lossless one) used to encode the video. The problem isn’t AVI; it’s almost always a poor choice of codec or settings.
Can I Improve the Quality of an Existing Low-Quality AVI?
Honestly, you can’t magically restore detail that’s already gone. If your source video is a blurry, pixelated mess, re-encoding it is like trying to un-bake a cake. The original ingredients (the video data) are fundamentally changed.
What you can do is apply some post-processing polish. Things like noise reduction can clean up graininess, and a touch of sharpening can create the illusion of more detail. AI upscaling tools can also work wonders, but they’re essentially making educated guesses to invent pixels that weren’t there to begin with.
Your best bet is always to start with a high-quality source recording. You can always polish a great video, but you can’t truly rescue a bad one.
Why Does My AVI File Look Pixelated During Motion?
This is a classic bitrate problem. If you see ugly, blocky artifacts whenever there’s fast action on screen, it means the codec is being starved of data. It doesn’t have a high enough bitrate to accurately describe the changes between frames.
The fix is simple: increase the bitrate in your recording software before you hit record again. More data per second lets the codec preserve detail and smooth motion, even in complex scenes. For a crisp 1080p screen recording, I’d aim for a bitrate of at least 4,000 to 8,000 kbps as a starting point.
Ready to create consistently high-quality screen recordings with a workflow built for speed? Smooth Capture gives you the tools to record, edit, and export stunning product demos and tutorials with professional polish, right on your Mac. Download the free trial of Smooth Capture today.
Ready to create stunning app demos?
SmoothCapture makes it easy to record your screen with 3D device frames, cinematic cursor effects, and professional editing tools.