How to Zoom In on Videos: A Step-by-Step Guide (2026)
You recorded a clean product demo. The script is tight, the clicks are deliberate, and the feature flow makes sense. Then you watch the export on a laptop or phone and encounter a common problem: the important part of the screen is too small. That’s usually where people start searching for how to zoom in on videos. Not because they want flashy motion, but because viewers keep missing the one interaction that matters. A small dropdown, a subtle toggle, a pricing change, a cursor moving across a crowded interface. If the audience has to hunt for the action, the video already feels harder to follow than it should. For SaaS teams, zooming isn’t a cosmetic effect. It’s a clarity tool. The fastest workflow depends on what you’re making, who needs to review it, and whether the same recording also needs to become a vertical social cut-down later. The wrong zoom method slows the whole team down. The right one makes demos look intentional, easier to understand, and much faster to ship.
Why a Simple Zoom Can Make or Break Your Video
A viewer pauses your onboarding video, leans closer, and still can’t tell which button you clicked. That’s the moment a decent screen recording starts feeling amateur.
A static capture asks the viewer to do your directing for you. They have to scan the screen, guess what changed, and hope they’re looking in the right place at the right time. In product demos, that’s a bad trade.

Zoom directs attention
A good zoom tells the audience where to look before confusion starts. It turns a busy interface into a guided sequence. That matters even more in software videos because the important moment is often tiny. A tooltip. A cursor state change. A field validation message. Without framing, viewers miss it.
Practical rule: If the action matters to the story, it should fill more of the frame when it happens.
The difference between movement and intent
Not every zoom helps. Random punch-ins feel nervous. Slow, deliberate zooms tied to a real interaction feel intentional. That distinction is what separates polished demos from rushed edits. The best zooms don’t call attention to themselves. They make the video feel easier to understand. A useful way to judge your edit is simple:
| What the viewer sees | What it feels like |
| Full screen the whole time | Dense, harder to track |
| Zoom only when a key action happens | Clear and guided |
| Constant zooming in and out | Distracting and overproduced |
Why product teams should care
Product marketing, customer education, and support all run into the same problem. They need one recording to work in several contexts: onboarding, feature launches, sales follow-ups, and social clips. A strategic zoom gives that recording more range. It highlights what matters, adds polish, and reduces the chance that someone rewatches a segment just to figure out what happened. When a video feels easy to follow, viewers trust it more. That trust matters in demos. If your product looks confusing on screen, people often assume the product itself is confusing.
The Quickest Method Zooming While You Record
If speed is the only goal, live zooming wins. You zoom during capture, the motion is already in the file, and there’s almost nothing to do afterward.
That convenience comes with a cost. Whatever you did in the moment is baked in. If you zoomed too early, too far, or onto the wrong area, you’re fixing it with a retake, not an edit.
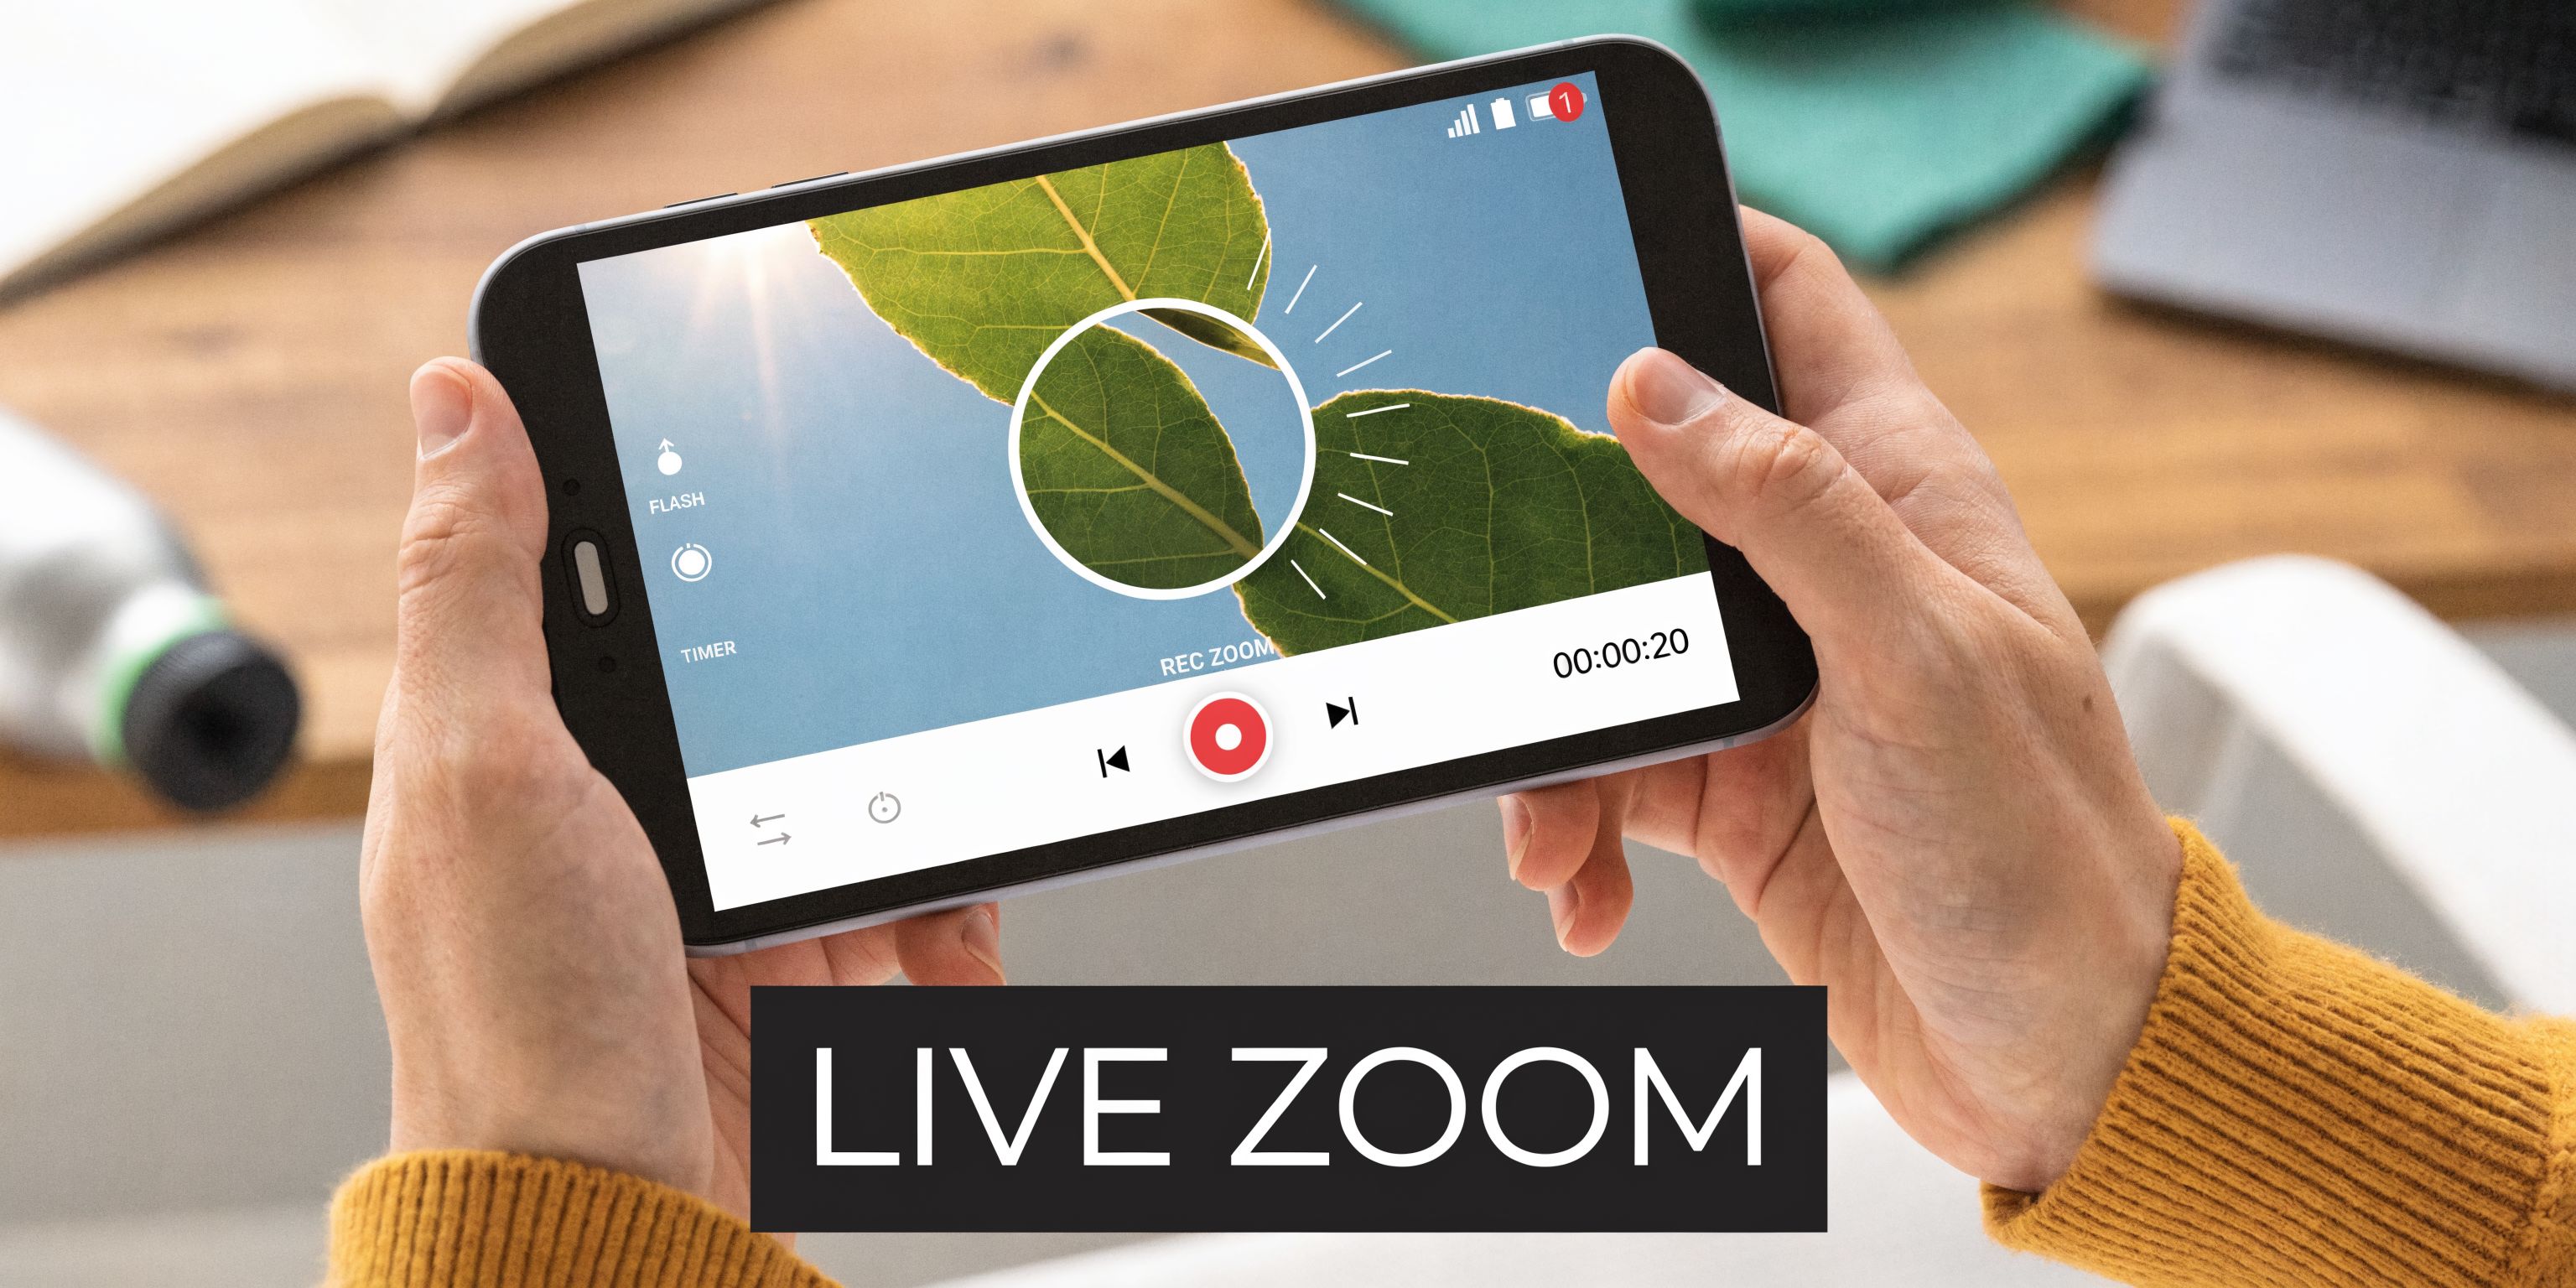
When live zooming works
Live zooming makes sense when the video is disposable or low-risk. Use it for:
- Internal updates: Quick async explanations for your team.
- One-off support replies: Personalized walkthroughs where speed matters more than polish.
- Informal social clips: Fast content with a short shelf life. It’s less suited to launch videos, onboarding libraries, or anything that needs stakeholder review. Those videos usually need changes after feedback, and baked-in zooms are hard to revise cleanly.
Optical zoom and digital zoom aren’t the same
If you’re recording with a camera or phone, optical zoom changes the image through the lens and preserves quality better. Digital zoom crops into the frame and can soften the image. For screen recordings, nearly all zooming behaves more like digital zoom. You’re enlarging part of the captured frame, so your starting resolution matters a lot. If the source is too small, the punch-in looks rough.
Live zooming is fast because it removes decisions later. It’s risky for the same reason.
The trade-off in workflow terms
Here’s the side-by-side view many teams adopt:
| Method | Speed | Flexibility | Best for |
| Zoom while recording | Fastest | Lowest | Internal and low-stakes videos |
| Edit zooms later | Slower upfront | Highest | Product demos and tutorials |
If you’re recording on Mac and want a cleaner source file before editing, this guide on how to record screen on Mac is a useful starting point.
What usually goes wrong
Teams often overestimate how precise they’ll be during recording. In practice, live zooms fail in a few predictable ways:
- Timing slips: You zoom after the action instead of before it.
- Framing drifts: The point of interest isn’t centered well enough.
- Narration and motion fight each other: You’re talking, clicking, and zooming at once.
- Revisions become painful: A small script change can force a full re-record. For polished demos, the biggest issue isn’t quality alone. It’s reviewability. Product, marketing, and support teams almost always want changes. Live zooming leaves very little room for that.
Mastering Post-Production Zoom with Keyframes
If you want control, use keyframes. This is still the most reliable way to create smooth, precise zooms in product videos.
Think of keyframes as markers that tell the editor where a clip starts and where it should end up. You set one state at the beginning, another later on the timeline, and the software animates the movement between them.
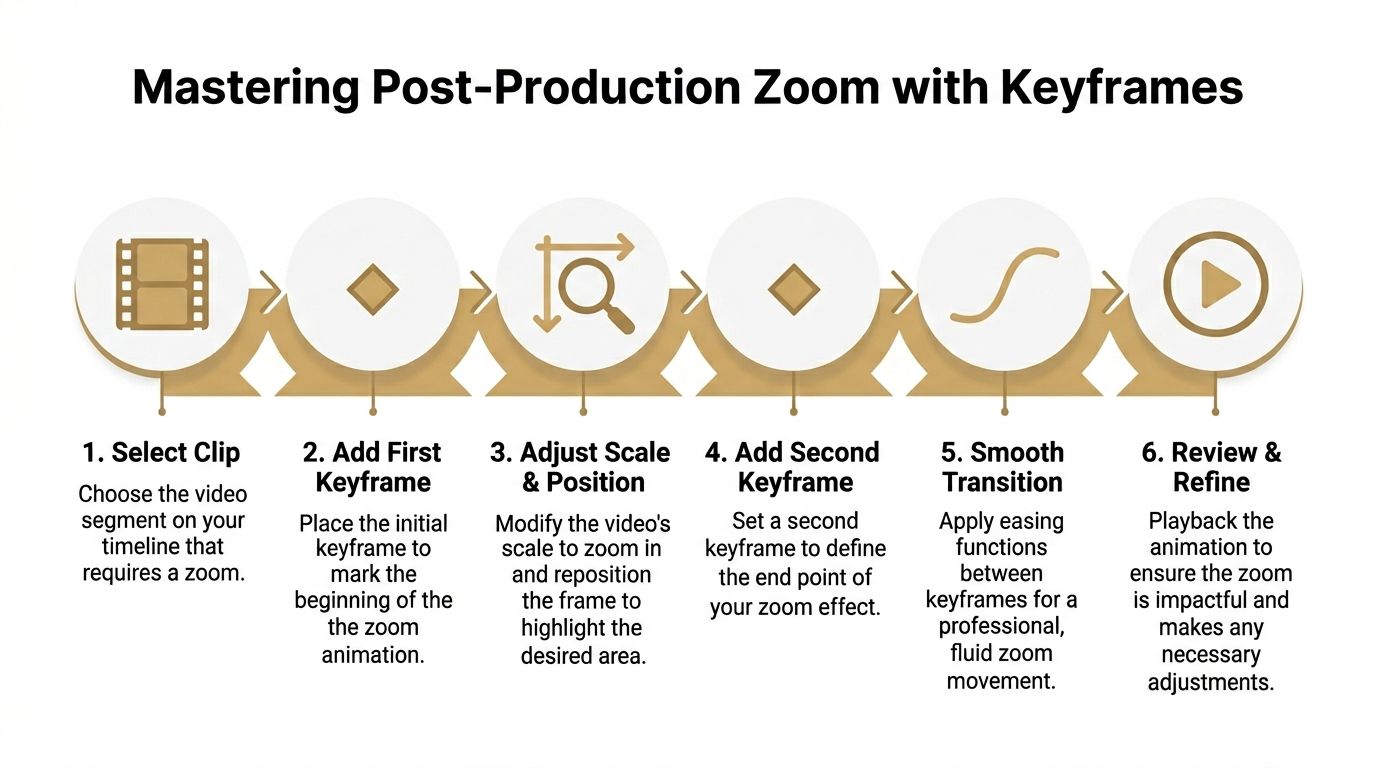
The core move
The basic method is consistent across Premiere Pro, Final Cut Pro, Camtasia, and similar tools. According to this tutorial on keyframed zooming, the method is to set an initial keyframe at 100% scale, move the playhead forward 2 to 5 seconds, and set a second keyframe at 150% to 200% scale. The same source notes that 85% of tutorial viewers report higher comprehension with animated zooms, while zooming beyond 200% on HD footage introduces pixelation in 70% of cases without 4K source material (tutorial.ai on how to zoom in video).
A practical step-by-step workflow
- Pick the exact moment the viewer should start paying attention.
Don’t start the zoom when the click happens. Start just before it. - Set the first keyframe.
This is your baseline frame. Keep scale at 100% unless you’re already working from a cropped composition. - Move down the timeline.
For most product demos, a short move feels best. You want the motion to guide attention, not announce itself. - Set the second keyframe and increase scale.
Adjust both scale and position. Scale without repositioning often zooms into the wrong area. - Refine the motion curve.
Linear motion feels mechanical. Ease-in and ease-out usually look more natural. - Play it back in context.
A zoom that feels fine in isolation can feel late once narration, cursor movement, and UI changes are all happening together. A short visual walkthrough helps if you want to see the rhythm before building it yourself:
What separates clean zooms from clumsy ones
The difference is rarely the software. It’s timing and framing. A good zoom lands on the area of interest and settles before the viewer needs to read or interpret anything. A bad zoom arrives late, overshoots the target, or keeps moving while the audience is trying to process a detail.
Don’t animate the whole clip just because you can. Animate the moment that needs emphasis.
Where editors differ
Major editors can do this. Key distinctions lie in speed, timeline comfort, and how easy it is to reuse your settings. If you’re comparing tools before standardizing a team workflow, this breakdown of professional video editing software is worth skimming. If your shortlist includes screen-recording-first workflows, this Camtasia comparison is also relevant.
Common mistakes in demo editing
- Zooming too far: Past a certain point, UI stops looking crisp and starts looking stretched.
- Ignoring the anchor point: You enlarged the frame, but not the important part.
- Using identical timing everywhere: Every feature interaction doesn’t need the same motion.
- Skipping playback at export size: A move that looks good in the editor may feel too aggressive once exported. Keyframes take longer than live zooming. They also survive revisions, review rounds, and last-minute script changes much better. For product demos that need polish, that’s usually the better bargain.
Using Automatic Zoom and Magnifier Effects
Manual keyframing is excellent. It’s also slow when you’re editing a long tutorial with dozens of interactions.
That’s where automatic zoom systems and magnifier effects earn their place. They reduce repetitive timeline work and help teams reserve manual edits for the moments that need judgment.
Automatic zoom is best for repetitive clarity work
If your video has lots of cursor-driven steps, automatic focus detection can do the first pass well. The software follows the main area of activity so you’re not placing every zoom by hand. For business videos, that efficiency matters. A verified source notes that zoom-ins on interactions increase click-through rates by 28% in client walkthroughs, and AI-driven focus detection can save 30 to 60 minutes of manual keyframing per 5-minute tutorial (YouTube reference on zoom workflows). That doesn’t mean automation should replace judgment. It means it should remove the boring part.
Magnifier effects solve a different problem
A full-frame zoom changes the composition. A magnifier lens highlights one area while leaving the rest of the screen stable. That works especially well when:
- The interface is dense: You need to call out a small icon or setting.
- The overall layout matters: You don’t want the viewer to lose context.
- You’re editing short promos: Quick emphasis matters more than cinematic movement.
What to automate and what to keep manual
A strong workflow usually mixes both.
| Use case | Better choice |
| Long tutorial with repeated cursor actions | Automatic zoom |
| Hero moment in a launch video | Manual keyframes |
| Tiny UI details inside a larger screen | Magnifier effect |
| Fast revision cycle with many review rounds | More automation, fewer bespoke animations |
Automation should handle repetition. Editors should handle emphasis.
If you want a broader overview of where this kind of tooling is heading, Sovran’s complete guide to automatic video editing is a good companion read.
A significant trade-off
Automation saves time, but it can flatten your style if you rely on defaults for everything. Every zoom starts to feel the same. Every movement has the same personality. The fix is simple. Let automatic tools handle the routine parts of the cut, then manually adjust the moments tied to story, persuasion, or product differentiation. That gives you speed without ending up with a generic-looking demo.
Maintaining Quality and Exporting Your Zoomed Video
Most bad zooms don’t fail because of animation. They fail because the source footage doesn’t have enough detail to support the crop. When you zoom into video, you’re asking a smaller part of the frame to fill more of the screen. If the source resolution is tight from the start, softness shows up quickly.
Start with extra pixels
The safest habit is to record at a higher resolution than your final export needs. That gives you room to punch in without stressing the image. The practical reason is simple:
- More source detail: You can crop in further before text softens.
- Cleaner reframes: You can shift composition without breaking sharpness.
- More output options: One capture can support multiple deliverables. If you know a clip may need social edits later, record with that in mind before you ever touch the timeline.
Vertical cut-downs are where quality breaks first
Many teams lose time here. They recorded a nice horizontal demo, then someone asks for a Reel, Short, or vertical ad version. A verified source states that a 2025 report noted 55% growth in vertical video views, while 40% of creators report losing quality when zooming and reframing content. The same source points to two fixes: start with high-resolution footage and use tools that support smooth aspect ratio switching, because over-reliance on simple keyframes can introduce jitter and pixelation (Lemon8 reference on vertical reframing).
What preserves quality
Here’s the short checklist teams should follow before export:
- Record larger than you think you need: Especially for UI-heavy demos.
- Check text at final delivery size: Don’t judge sharpness only from the editor preview.
- Reframe for vertical intentionally: Don’t just center-crop and hope.
- Limit aggressive punch-ins on weak source footage: If the recording is already marginal, more scale won’t save it.
- Preview motion in the target aspect ratio: A smooth horizontal zoom can feel cramped in 9:16.
Export decisions that help
Different outputs need different priorities.
| Output type | What matters most |
| Product demo on site | Readable UI and steady framing |
| Sales walkthrough | Clear interactions and cursor visibility |
| Vertical social cut-down | Tight composition and preserved legibility |
The biggest mistake is treating export as an afterthought. It isn’t. The best zoom workflow starts at capture, survives editing, and ends with an export that matches the screen where people will watch.
Workflow Tips for Polished Product Demos
Most tutorials stop at mechanics. Teams usually need something else: a repeatable way to make every demo feel like it belongs to the same brand system. That presents the core challenge once you know how to zoom in on videos. Not whether you can do it, but whether multiple people can do it consistently without rebuilding the process each time.
Build a zoom language your team can repeat
Your team should decide what each zoom means. For example:
- Slow zoom-in: Introduce a new area of the product.
- Quick punch-in: Emphasize a click or state change.
- Magnifier only: Call out a tiny control without losing context. When editors make those choices ad hoc, the library starts feeling uneven. One video is restrained. The next one is full of aggressive motion. Viewers notice, even if they can’t name the problem.
Save decisions, not just files
A scalable workflow depends on reusable defaults. That usually means:
- Preset motion styles: Save your preferred zoom timing and easing.
- Shortcut conventions: Reduce repetitive clicks for common edits.
- Review rules: Define when a zoom is required and when it isn’t.
- Narrative alignment: Tie zooms to the script, not just to random cursor movement. A verified source notes that 65% of questions about screen recording zooms on macOS for team projects go unanswered in forum queries from 2025, which tracks with what many teams run into in practice. The same source highlights the need for automatic focus detection and customizable shortcuts, and says these workflows can reduce post-production time by 50% for teams shipping polished assets (CapCut resource on zoom gaps for teams).
Review zooms like a producer, not just an editor
A zoom can be technically correct and still wrong for the story. Use this quick review filter:
- Did it help the viewer find the action faster?
- Did it arrive before the important interaction?
- Did it preserve enough context to understand what changed?
- Would the same motion still work in a cut-down version?
The cleanest demo edits aren’t the ones with the most movement. They’re the ones where every movement has a job.
Make one recording do more work
Good teams don’t edit every output from scratch. They capture once, then adapt with intention. That means planning for:
- onboarding clips that need slower pacing
- launch videos that need stronger emphasis
- customer success walkthroughs that need clarity over style
- social versions that need tighter framing If your team is formalizing that process, this guide on how to create a demo video for software is a useful companion. The strongest demo workflows treat zoom as part of visual storytelling, not as a patch for weak recording. Once your team standardizes where zooms belong, how far to push them, and how to adapt them for different outputs, the whole pipeline gets faster and the videos look more consistent. If your team produces demos, onboarding videos, client walkthroughs, or launch assets on Mac, Smooth Capture is built for that repeatable workflow. It combines screen recording, timeline editing, cursor effects, magnifying lenses, automatic zoom with focus detection, subtitles, and horizontal-to-vertical output in one native macOS app, which makes it a practical choice when you need polished videos without stitching together a stack of separate tools. *Generated with *Outrank app
Ready to create stunning app demos?
SmoothCapture makes it easy to record your screen with 3D device frames, cinematic cursor effects, and professional editing tools.