Streaming Video Bitrate Calculator: A Practical Guide
You’re probably staring at an export panel right now, looking at bitrate settings that feel far more technical than they should. You know the video needs to look sharp. You know it can’t buffer, choke an upload, or turn into mush after a platform re-encodes it. What’s less obvious is why one bitrate works for a product walkthrough and another falls apart on a motion-heavy demo.
Want the number right now? Use our free interactive video bitrate calculator — pick resolution, frame rate, and motion level, and get the recommended bitrate, file size, and upload speed instantly. Already have a file? Check its bitrate here.
That’s where a streaming video bitrate calculator becomes useful. Not as a magic preset machine, but as a way to think clearly about trade-offs. If you understand what the number is doing, you can stop guessing and start choosing settings that fit the footage, the platform, and the network you have.
Table of Contents
- Understanding Video Bitrate Fundamentals
- How to Calculate Your Video Bitrate
- Recommended Bitrates for Major Streaming Platforms
- Advanced Encoder Settings for Pro-Level Quality
- Applying Your Bitrate Settings in Smooth Capture
- Troubleshooting Common Streaming Quality Issues
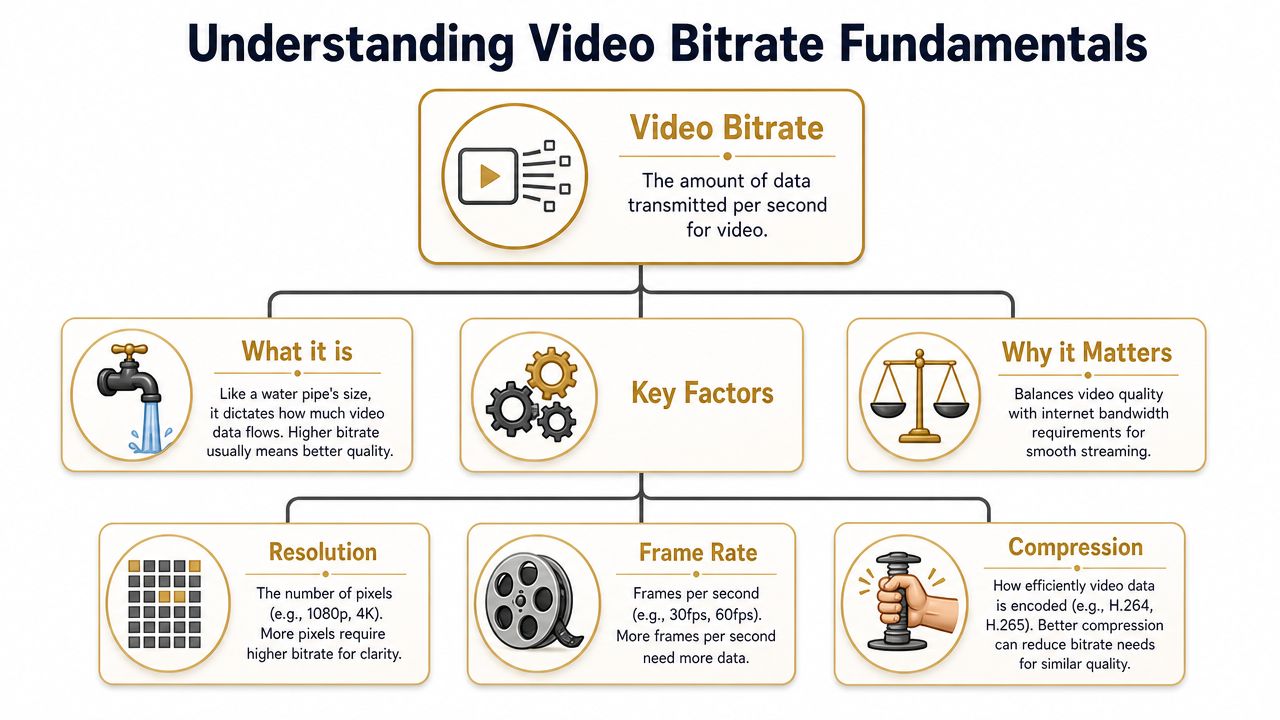
Understanding Video Bitrate Fundamentals
Bitrate is your data budget
Bitrate is the amount of data transmitted per second. You’ll usually see it expressed in kbps or Mbps. The simplest way to think about it is a pipe. A wider pipe carries more water. A higher bitrate carries more image information.
That matters because video is always a balancing act between quality and delivery. More bitrate usually gives the encoder more room to preserve detail. It also increases bandwidth demand and file size, which is exactly why teams have to think about bitrate before they publish a launch video, webinar replay, or onboarding tutorial.
Even outside video, the principle is straightforward. The University of Kentucky gives a clean audio example: 16-bit audio at 44.1 kHz with 2 channels equals 1,411,200 bps, or about 1.41 Mbps in its explanation of video bitrate and resolution basics. Video is more complex, but the core idea is the same. More information per second requires more data per second.
Practical rule: Treat bitrate as a budget, not a badge of quality. If the budget is too small, the image breaks apart. If it’s too large for the network, the stream struggles.
If your team also cares about viewer bandwidth, bitrate planning matters beyond the encoder. It’s part of how you avoid data overages remotely when people watch or review video away from the office.
The three inputs that change the answer
Bitrate is often viewed as a single isolated number. In practice, it’s tied to three decisions.
- Resolution decides how many pixels you need to describe. A 1080p frame contains more visual information than a smaller frame, so it generally needs more bitrate to stay clean.
- Frame rate changes how many images you’re delivering every second. A smoother motion setting usually means the encoder has more work to do.
- Compression determines how efficiently the codec packs that data. Better compression can preserve quality with fewer bits, but codec choice and scene complexity both matter.
This is why generic presets often disappoint. A talking-head explainer, a static UI tutorial, and a fast scrolling product demo can all share the same resolution and still need very different bitrate decisions.
Here’s the part product marketers often notice first in real exports:
| Situation | What you usually see |
|---|---|
| Bitrate too low | Soft text, blocky motion, smeared gradients |
| Bitrate too high for the uplink | Buffering, unstable live output, dropped quality |
| Bitrate matched to content | Clean detail without wasting bandwidth |
The number in your export window isn’t random. It’s a response to the kind of image you’re asking the encoder to preserve.
How to Calculate Your Video Bitrate
The formula most calculators use
A good streaming video bitrate calculator usually starts with bits per pixel, or BPP. This is a planning shortcut that ties bitrate to image size, frame rate, and content complexity.
The common formula is:
bitrate = (width × height × fps × bpp) / 1000
That returns the result in kbps.
Wowza notes that BPP commonly falls between 0.05 and 0.15, depending on motion complexity, and gives a worked example where 1280 × 720 × 30 × 0.1 / 1000 = 2,764.8 kbps, or about 2.76 Mbps, in its guide to video bitrate and bitrate selection.
A practical way to use BPP
The useful part isn’t the math itself. It’s what BPP lets you do. You can look at the footage first, then pick a starting point that reflects the content instead of blindly accepting a default preset.
A low-motion screen recording often tolerates a lower BPP than fast camera movement, gameplay, or animated UI transitions. That’s why one “best bitrate” chart never tells the whole story.
Try the workflow like this:
- Start with the output format. Pick the resolution and frame rate you need for the destination.
- Choose a BPP anchor. For many planning cases, 0.1 is a useful midpoint.
- Run the formula. That gives you a starting bitrate, not a final verdict.
- Check the footage type. If the content is static, you may be able to trim down. If it’s motion-heavy, expect to push upward within your safe limits.
- Test a short export. Fine details like cursor movement, gradients, and text edges will tell you quickly if you’ve gone too low.
A calculator gives you a rational first setting. Your eyes make the final call.
A lot of teams want a worked 1080p tutorial example, but the safer approach is to use the formula and then judge based on the actual footage. That’s because content complexity changes the answer more than is typically assumed. A simple interface walkthrough and a dynamic app demo might share the same frame size but need very different bitrate choices.
One more point matters in live work. A bitrate calculator is useful only if you compare the result against real upload headroom. A mathematically reasonable bitrate can still fail in practice if the network can’t sustain it.
Recommended Bitrates for Major Streaming Platforms
Quick reference table
Platforms don’t just care about quality. They care about delivery stability, re-encoding, and how well the stream performs across lots of devices and networks. That’s why bitrate choices that look fine in a local export can become a problem once you publish.
Below is a practical comparison table for planning. Use it as a decision aid, not a universal preset sheet.
| Resolution | Framerate | YouTube Bitrate (kbps) | Twitch Bitrate (kbps) | Recommended Audio (kbps) |
|---|---|---|---|---|
| 720p | 30 fps | often set with more headroom than Twitch | commonly kept within Twitch platform limits | set audio conservatively to preserve bandwidth budget |
| 1080p | 30 fps | often suitable for standard HD delivery | often constrained by Twitch limits more than YouTube | choose audio to match spoken content and music needs |
| 1080p | 60 fps | often needs more bitrate than 30 fps because motion is denser | can run into platform caps quickly | keep audio stable while prioritizing video bandwidth |
| 4K | 30 fps | can accept much higher bitrates | generally not a practical fit for most Twitch workflows | audio remains a smaller share of the total budget |
If you’re also producing short-form product assets, this guide to App Store preview video requirements and workflow is useful because platform delivery constraints often shape bitrate decisions long before export.
Why platform recommendations clash
The biggest real-world conflict is multi-platform publishing. A setting that’s comfortable for one destination can be a bad fit for another.
The clearest example is Twitch versus YouTube. Platform guidance summarized by Hexeum notes that Twitch recommends a maximum bitrate of 6,000 Kbps for most streams, while YouTube can accept much higher bitrates for 4K content, which creates a practical conflict for anyone targeting both destinations with one stream profile in its bitrate calculator overview.
That’s why a cross-platform-safe bitrate often wins over a platform-maximized one. If you’re simulcasting, the best setting usually isn’t the highest number your encoder allows. It’s the one that survives the strictest platform and the weakest likely network path without visibly collapsing.
A simple way to think about it:
- Publishing only to YouTube gives you more room to prioritize visual quality.
- Publishing to Twitch and YouTube together pushes you toward a safer middle ground.
- Publishing educational or product content usually rewards clarity and stability over aggressive bitrate targets.
The best bitrate for a platform isn’t always the best bitrate for your audience mix.
For product marketers, that usually means favoring consistency. A clean HD stream that stays stable does more work than a theoretically better stream that buffers, gets re-encoded harshly, or exceeds a platform’s comfort zone.
Advanced Encoder Settings for Pro-Level Quality
Choose the bitrate mode for the job
The bitrate number matters. The way the encoder spends that number matters just as much.
For live streaming, CBR is usually the safer choice because it sends data at a steady rate. That predictability helps when the platform expects a stable incoming stream.
For recorded uploads, VBR is usually the better tool because it can spend more data on difficult moments and less on easy ones. A static title card doesn’t need the same budget as a fast product interaction sequence.
That leads to a practical split:
- Use CBR for live events when stability matters more than squeezing every bit of efficiency from the file.
- Use VBR for exported assets when you want cleaner quality at a more reasonable file size.
- Use test exports for edge cases like animated demos with a mix of static UI and sudden fast transitions.
Settings that quietly affect quality
Other encoder controls affect how usable your chosen bitrate is.
- Keyframe interval controls how often the encoder inserts full reference frames. This affects seek behavior, compatibility, and stream stability.
- Audio bitrate consumes part of the overall bandwidth budget. It’s smaller than video, but it still counts.
- Protocol overhead reduces how much of your uplink is truly available for the stream itself.
- Platform limits can override what looks sensible on paper.
A practical bandwidth rule from Omni Calculator is to use only about 80% of your available upload bandwidth for the stream, leaving room for fluctuations, and it also warns that exceeding 6000 kbps can cause broadcast issues on Twitch in its guide to streaming bitrate planning.
That one rule prevents a lot of bad live setups. Teams often test on a quiet network, set bitrate near the top of their measured upload speed, and then wonder why the stream becomes unstable once normal traffic resumes.
If you’re also preparing distribution copies after recording, this walkthrough on compressing video on Mac is a good companion because export optimization doesn’t stop at the encoder’s bitrate field.
A clean setup usually looks like this in practice:
| Scenario | Better choice | Why |
|---|---|---|
| Live webinar | CBR | Stable outbound rate is easier for platforms to ingest |
| Recorded demo for upload | VBR | More efficient use of bits across simple and complex scenes |
| Tight uplink | Lower target bitrate | Preserves headroom and avoids instability |
| Twitch-first stream | Respect the platform ceiling | Prevents avoidable broadcast issues |
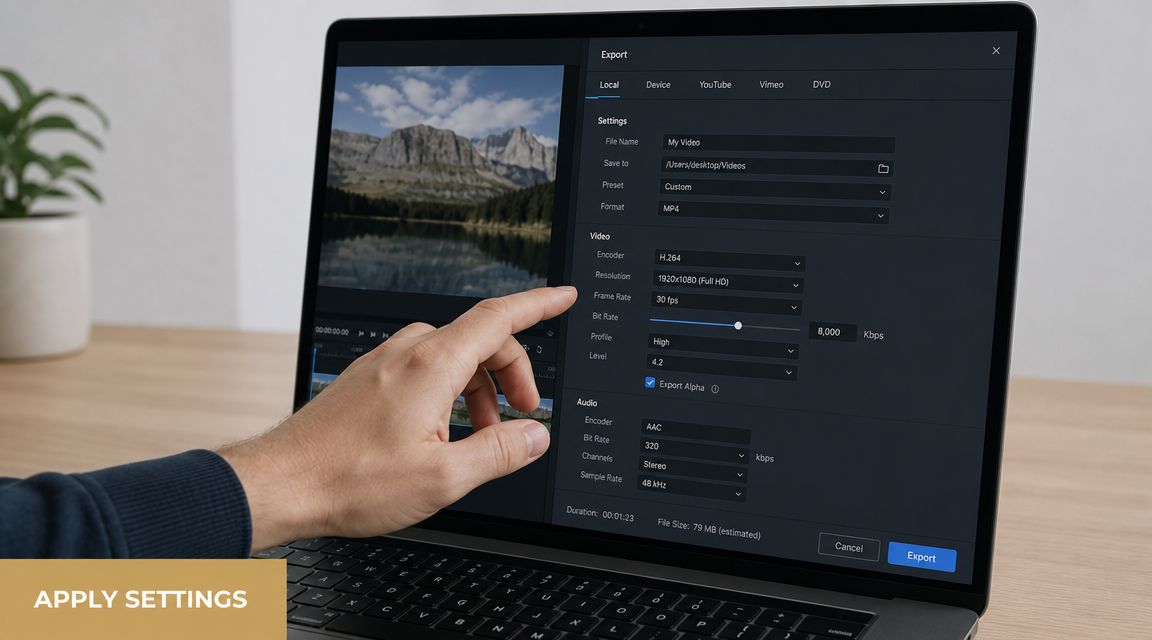
Applying Your Bitrate Settings in Smooth Capture
Where to set bitrate in the export flow
When you’re in Smooth Capture’s export panel, bitrate decisions become concrete. In this panel, the theory finally turns into a checkbox, a dropdown, and a number field.
Start by choosing the output size and frame rate that match the destination. If the video is for a product page, a feature announcement, or a support walkthrough, don’t assume the highest possible setting is the right one. Match the export to how people will watch it.
In practical use, the bitrate field should reflect the footage type first, then the platform second. That’s especially true for screen recordings. As StreamShark points out in its discussion of BPP and live stream bitrate, a static screencast and a high-motion gaming video at the same 1080p resolution can need very different bitrates for similar perceived quality.
That’s why product videos often compress more gracefully than people expect. Menus, UI panels, and cursor movement are usually less demanding than action footage. But the moment you add rapid zooms, transitions, animated backgrounds, or webcam overlays, the encoder needs more help.
Match the setting to the footage
A simple operating pattern works well inside Smooth Capture:
- Static tutorial or onboarding flow. Start conservative, then inspect text edges, cursor trails, and gradients.
- Feature demo with lots of animated UI. Give the encoder more room because micro-motion and interface changes add complexity.
- Short social cut-downs. Focus on clarity after re-encoding, not just local preview quality.
- App walkthroughs. Prioritize crisp text and stable motion over inflated bitrate numbers.
If you’re making narrated tutorials, this guide to screen casting on Mac is useful because capture choices and export choices affect each other.
A short product walkthrough can help you visualize the export flow before you lock settings:
The mistake I see most often is treating bitrate as a static house rule. The better habit is to treat it as a response to what’s on screen. If the footage is simple, don’t overspend. If it’s busy, don’t starve the encoder.
Troubleshooting Common Streaming Quality Issues
If this happens, check that
Most stream failures come down to a mismatch. Either the bitrate is too ambitious for the network, or it’s too small for the footage.
Use this quick diagnostic list when something looks wrong:
- If viewers report buffering, your stream bitrate is probably too high for the available upload headroom. Lower the target and retest under normal network load.
- If text looks soft or blocky, the bitrate may be too low for screen content. Raise it carefully, especially for UI-heavy demos and tutorials.
- If motion breaks apart during transitions, the content is more complex than the original estimate. Increase bitrate or reduce frame rate if smoothness isn’t critical.
- If Twitch behaves poorly while other platforms seem fine, the platform cap may be the issue rather than your local connection.
- If exports look good locally but worse after upload, the platform’s re-encoding is likely exposing weaknesses in your source file. Start with a cleaner master instead of trying to rescue it later.
When quality problems appear, don’t just raise every setting. Check whether the failure is caused by motion complexity, platform limits, or network headroom.
A reliable workflow is simple. Estimate with a calculator. Export a short representative clip. Test on the destination platform. Then adjust one variable at a time so you know what fixed the problem.
If your team produces demos, onboarding videos, App Store previews, or launch assets regularly, Smooth Capture gives you a faster way to record, edit, and export polished screen video on macOS without juggling a pile of separate tools.
Ready to create stunning app demos?
SmoothCapture makes it easy to record your screen with 3D device frames, cinematic cursor effects, and professional editing tools.