How to Edit Video in QuickTime Player: A Practical Guide
You’ve got a screen recording on your Mac. The first few seconds are dead air, there’s a mistake in the middle, and you need to send a clean version today. It's often assumed that means opening iMovie, Final Cut Pro, or some other full editor.
Often, it doesn’t.
If you want to learn how to edit video in QuickTime Player, the built-in app on macOS is better than most tutorials suggest. It handles fast trims, simple cleanup, clip splitting, and basic multi-clip assembly well enough for product demos, internal walkthroughs, and rough tutorial edits. But it also has sharp limits, and some of them can cost you work if you don’t respect them.
Table of Contents
- Getting Started with QuickTime Editing
- Advanced Edits for Polished Videos
- Handling Audio and Other Media
- Choosing the Right Export Settings
- Critical QuickTime Workflows and Shortcuts
- Knowing QuickTime's Limits and When to Upgrade
Getting Started with QuickTime Editing
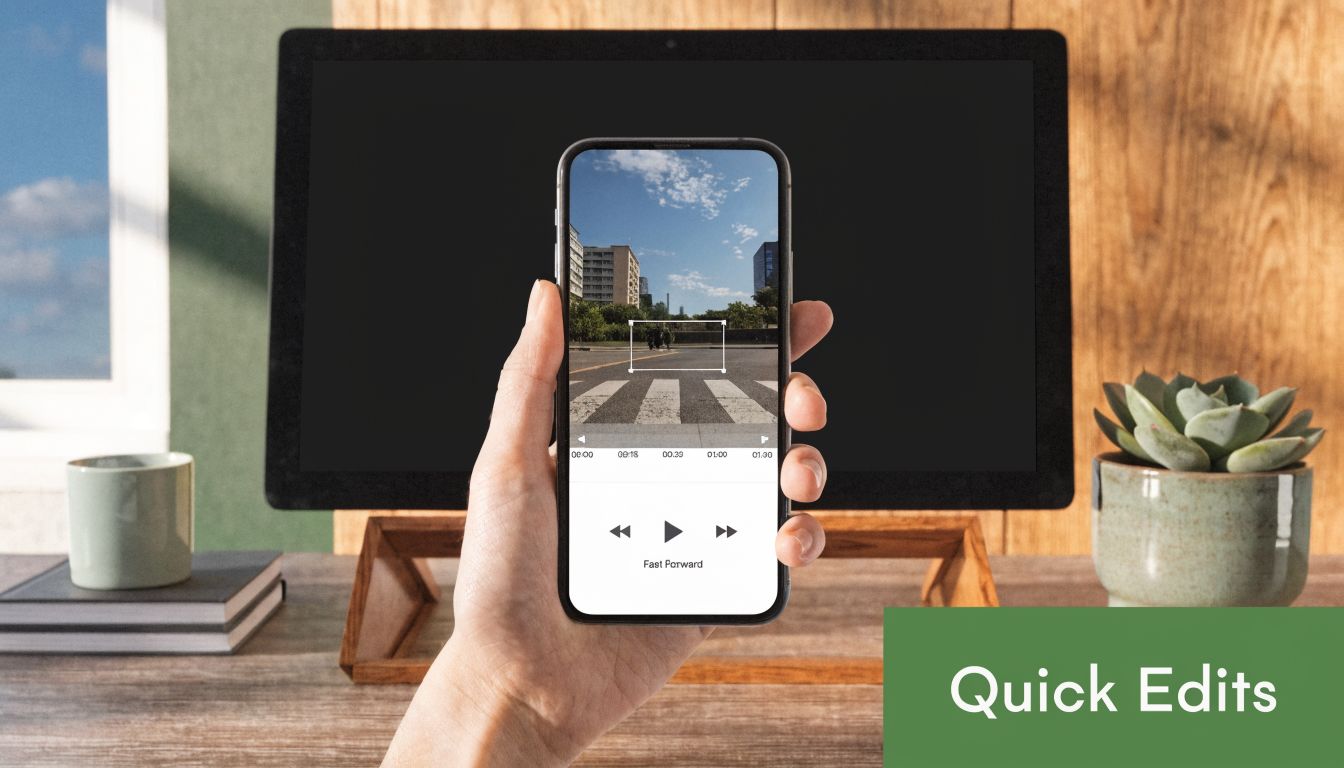
QuickTime is at its best when you need a clean cut now. If your recording has a sloppy intro, a long pause at the end, or a few seconds you never meant to capture, this is the fastest way to fix it.
Open the clip and trim it fast
Open your video in QuickTime Player. Then go to Edit > Trim, or press Command+T. A yellow bounding box appears around the timeline. That box defines what stays. Anything outside it gets removed when you confirm the trim.
The basic workflow is simple:
- Drag the left yellow handle to remove the messy opening.
- Drag the right yellow handle to cut the dead space at the end.
- Play the selection before committing, so you can hear the transition and make sure the cut feels natural.
- Click Trim when it looks right.
That’s enough for a surprising amount of day-to-day work. If you record feature walkthroughs, onboarding snippets, or bug repro clips, this alone can save a lot of unnecessary time. If your source footage came from a screen recording, this companion guide to recording your Mac screen with QuickTime pairs well with the editing workflow.
Practical rule: If the only problem is the start or end of the clip, stay in QuickTime. Opening a full NLE for that job is usually wasted effort.
Use the hidden precision mode
This is the part many Mac users never discover. QuickTime’s trim tool becomes much more precise when you click and hold the yellow trimming handles. According to Larry Jordan’s breakdown of hidden QuickTime Player features, QuickTime displays time in hundredths of a second, which gives you frame-accurate trimming behavior without exposing individual frames.
That matters more than it sounds. A rough drag might leave an ugly breath, half-spoken word, or flicker in a product demo. Holding the handle gives you a pseudo-timecode readout, so you can make much tighter cuts.
A few habits help here:
- Trim while listening, not just watching. Audio usually tells you where the cut should land.
- Cut slightly late on the front edge if someone starts speaking immediately.
- Preview twice before saving if the clip is customer-facing.
QuickTime won’t feel like a professional timeline at this stage, but for front-and-back cleanup it’s fast, accurate, and already on your Mac.
Advanced Edits for Polished Videos
Most tutorials stop at trimming. That’s where the useful part starts.
QuickTime can do more than shave seconds off the ends of a file. If you’re building a product demo from several takes, removing a mistake from the middle, or stitching together a short tutorial, the key is Clips view.
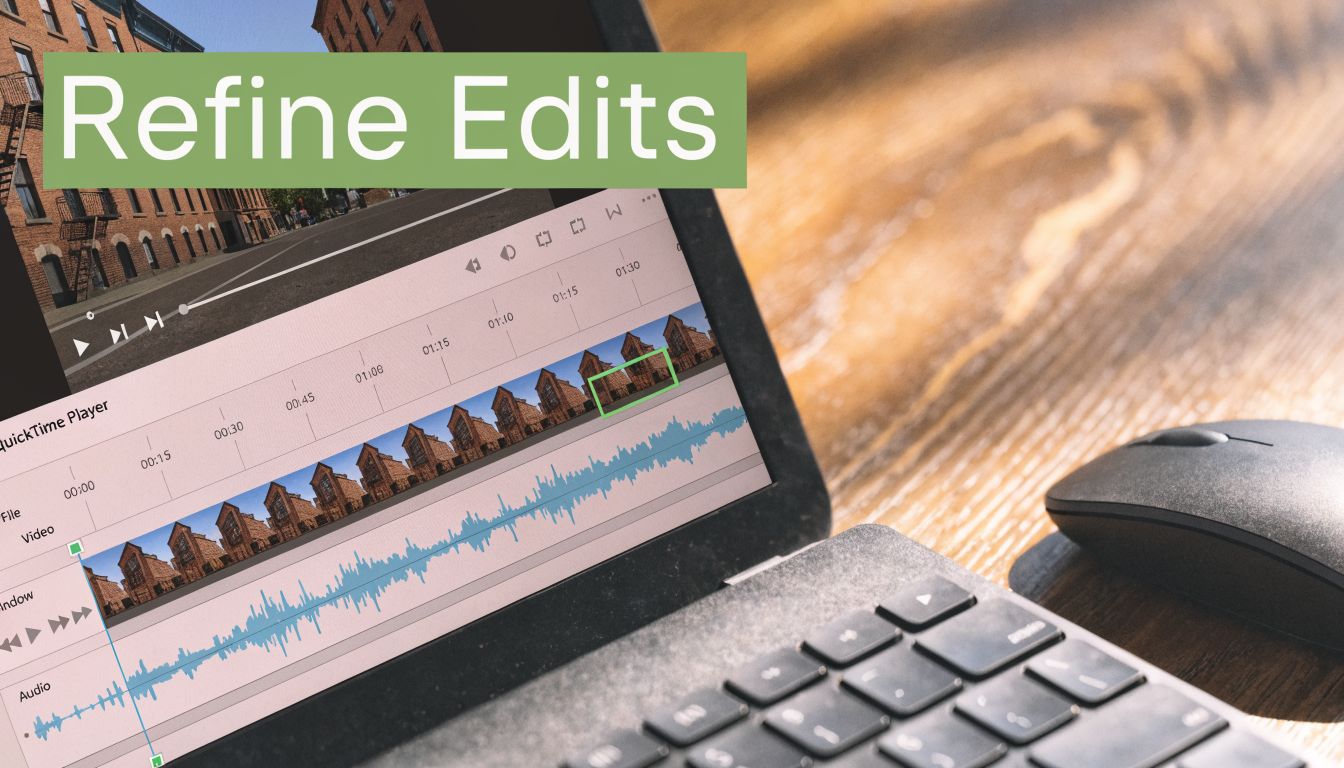
Switch into Clips view
Open your movie, then look for View > Show Clips. This changes the interface from a single continuous movie into separate clip segments you can work with more directly.
Once you’re in this mode, QuickTime becomes a lightweight sequential editor. Not a full one. But enough to handle common assembly work.
Use Clips view when you need to:
- Cut out a bad section in the middle of a screen recording
- Split one long take into smaller pieces
- Reorder segments to improve the flow
- Append new clips to the end of the current movie
QuickTime hides its best editing tools behind clip management. If you stay in the default player view, it feels limited much earlier than it really is.
Split delete and reorder
The workhorse command here is Split Clip, which uses Command+Y. Move the playhead to the point where you want the break, run Split Clip, then repeat wherever you need another cut. Once a bad section is isolated, click that segment and delete it.
This works well for a typical product demo cleanup. Maybe you recorded a feature tour, clicked the wrong menu, recovered, and kept going. Instead of re-recording the entire thing, split before the mistake, split after it, and remove the middle section.
According to this detailed QuickTime editing walkthrough on YouTube, QuickTime appends clips without re-encoding, which preserves the original quality during assembly. The same walkthrough notes that Split Clip operates at frame-level precision, and you can use the arrow keys to nudge the edit point one frame at a time.
That frame-level nudge is the difference between “good enough” and “clean.” If your cursor lands mid-animation or your voice cuts unnaturally, use the arrow keys before confirming the split.
A practical edit sequence looks like this:
- Find the mistake and place the playhead just before it.
- Press Command+Y to create the first split.
- Move to just after the mistake.
- Split again.
- Delete the unwanted middle clip.
- Play across the join and listen for a bump.
- If needed, adjust the split point more carefully.
Here’s a visual walkthrough if you want to see the interface in action:
Append clips without wrecking quality
QuickTime is surprisingly useful for combining several recordings into one file. Go to Edit > Add Clip, choose another video, and QuickTime appends it to the current project.
That makes it handy for sequential workflows like:
- A product demo built from intro, feature walkthrough, and outro clips
- A training video assembled from separate screen recordings
- A client walkthrough where each section was recorded as a clean take
Reordering clips is mostly drag and drop. That’s fine when you have a handful of segments. It gets clumsy when the project grows, which is a key limitation of the app. For short, linear work, though, QuickTime can move much further than is generally anticipated.
Handling Audio and Other Media
QuickTime can help with a few practical cleanup tasks that aren’t strictly cuts. That includes fixing orientation and doing basic audio-related work. Keep the expectations modest. This is utility editing, not full post-production.
Fix orientation first
If your video is sideways or upside down, correct that before doing anything else. QuickTime includes Rotate Left, Rotate Right, and flip options in the menu, which is enough to rescue a mobile capture or an incorrectly oriented recording.
This matters because every later step assumes the frame is already correct. If you trim, split, and export first, then realize the orientation is wrong, you’ll end up repeating work.
A good order is:
- Rotate or flip the clip
- Preview the whole frame
- Then start trimming and splitting
Work with audio carefully
QuickTime can support light audio tasks, but for many users, expectations for its audio capabilities are often too high.
For simple cases, you can attach media and create a basic combined output. That’s useful when you have a silent screen recording and a separate voiceover file, or when you need to extract sound from a video for reuse elsewhere. If your real goal is recording cleaner source material to begin with, this guide to a Mac screen recorder with audio is a good place to start.
If the project needs voiceover, background music, and original clip audio all balanced together, QuickTime isn’t the right editor.
That limitation changes the kind of work QuickTime can handle. It’s fine for straightforward video cleanup. It’s not built for layered edits where multiple audio sources need to be mixed, faded, ducked, or timed precisely.
Use it for simple media handling. Stop there if the soundtrack matters.
Choosing the Right Export Settings
Export is where QuickTime either feels efficient or oddly confusing. The presets are simple, but the right choice depends on where the video is going and how large a file you can tolerate.
What the presets mean in practice
QuickTime gives you several built-in export options, and the file size changes a lot depending on what you pick. Tufts EdTech’s guide to editing or trimming a QuickTime video on Mac notes that for a 10-minute video, 1080p exports are about 330MB, 720p about 170MB, and 480p about 79MB.
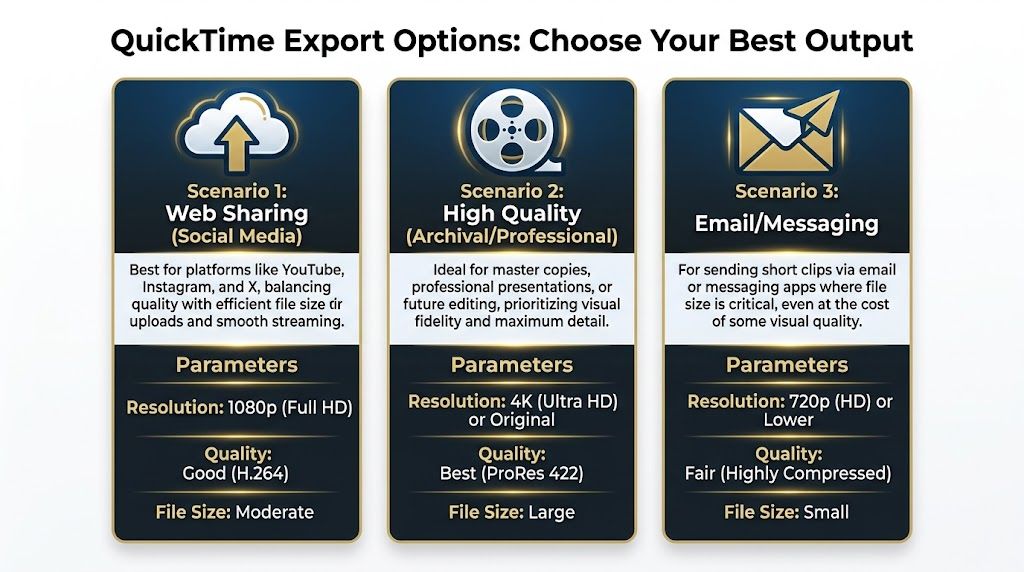
Those numbers make the trade-off easy to understand. If the video will be watched on a laptop, embedded on a site, or uploaded to social channels, 1080p is usually the safe default. If you need faster sending and smaller files, 720p is often the better balance. If the clip just needs to get through email or messaging with minimal friction, 480p has a clear place.
A simple export decision table
| Use case | Recommended export | Why |
|---|---|---|
| Product demo for web or social | 1080p | Keeps interface text and UI details clearer while staying more manageable than a native-size file |
| Internal review or fast sharing | 720p | Much lighter file size, still usable for most screen content |
| Email attachment or lightweight messaging | 480p | Prioritizes deliverability over visual polish |
A few export habits make QuickTime easier to live with:
- Choose based on destination, not pride. Not every clip needs the largest output.
- Protect a higher-quality version first if the video may be reused later.
- Check UI legibility after export. Screen recordings fail fast when text gets soft.
QuickTime also supports mobile-oriented exports and native-size output. That’s useful when one source video needs several deliverables for different channels. For simple business workflows, the built-in presets are often enough.
Critical QuickTime Workflows and Shortcuts
The biggest QuickTime lesson isn’t about trimming. It’s about avoiding damage.
Always edit a copy
QuickTime doesn’t behave like a modern non-destructive editor with a robust project file. Its biggest workflow risk is simple and serious. According to this QuickTime editing cautionary walkthrough, the Save command directly modifies the video file, with no undo history past the current session.

This is not optional. Work on a copy every time.
The safest routine looks like this:
- Duplicate the original file in Finder.
- Rename the copy before opening it.
- Do all trimming, splitting, and clip assembly on that copy.
- Save again after major milestones.
That habit matters even more if you’re preparing screen captures for a team. If a source file gets overwritten and someone later needs the original recording, QuickTime won’t rescue you.
Edit the duplicate. Archive the original. Treat QuickTime like a sharp utility knife, not a project-safe timeline.
If your workflow depends on cursor visibility and repeatable screen recordings before the edit even begins, tools built for cursor and click recording on macOS can remove a lot of downstream cleanup.
Shortcuts worth memorizing
QuickTime gets faster once you stop hunting through menus. The two shortcuts that matter most for editing are:
- Command+T for Trim
- Command+Y for Split Clip
A few other practical habits help even without memorizing more keys:
- Use arrow keys after placing a split when the cut lands a little early or late.
- Preview every join immediately after a deletion.
- Keep clip counts low if you know you’ll need reordering later.
Here’s the honest trade-off. QuickTime rewards small, disciplined edits. It punishes messy sessions where you improvise for too long and expect the app to manage complexity for you.
Knowing QuickTime's Limits and When to Upgrade
QuickTime is strong at quick cleanup and simple sequential assembly. It stops being the right tool when the project needs structure.
The app has no multi-track audio editing, no serious color work, no keyframing, and a clumsy approach to rearranging larger groups of clips. The further you move toward polished launch videos, narrated tutorials, or branded marketing assets, the more those limits show up.
That friction isn’t rare. A 2025 analysis of Mac user forums found that 65% of advanced QuickTime editing questions involved failures with split-and-join workflows, as noted in Reed College’s overview of trimming and editing QuickTime clips. That lines up with the experience many Mac users have. The first few edits feel easy. Then the project asks for layered audio, smoother motion, reusable templates, or faster revision cycles, and QuickTime runs out of road.
Use QuickTime when you need to trim, split, combine, and export a short piece of video fast. Upgrade when you need repeatable production, polished finishing, or a real timeline.
If your team records product demos, onboarding tutorials, client walkthroughs, or launch assets every week, Smooth Capture is worth a look. It gives you the parts QuickTime doesn’t: a fast timeline editor, multiple audio tracks, keyframing, cursor effects, device frames, zoom controls, subtitles, and exports built for polished shipping work on macOS.
Ready to create stunning app demos?
SmoothCapture makes it easy to record your screen with 3D device frames, cinematic cursor effects, and professional editing tools.