Mac Internal Audio Recorder: The Complete 2026 Guide
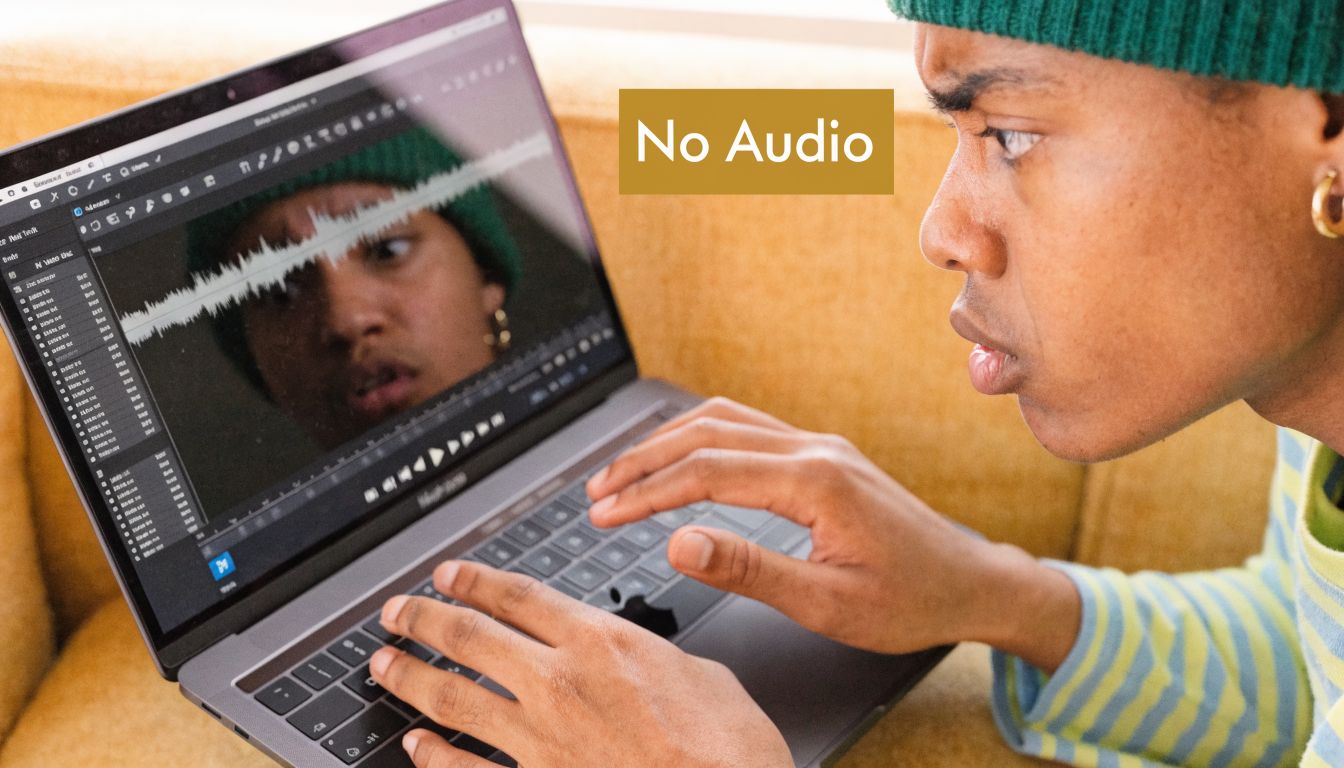
You finish a screen recording, skim the video, and everything looks right. Cursor movements are clean. The app demo flows. Your voice is there. Then you notice the product audio is missing, or the whole recording is silent.
That’s the Mac internal audio recorder problem in one sentence. On Mac, getting clean internal audio isn’t hard because recording software is bad. It’s hard because macOS has historically made system sound capture awkward by design, and the free fixes can break at exactly the wrong time.
For one-off clips, you can patch together a workable setup with BlackHole and QuickTime. For repeatable team workflows, reliability matters more than “free.” If your team ships launch videos, onboarding tutorials, support walkthroughs, or client demos every week, the actual question isn’t just how to record internal audio on Mac. It’s how to keep doing it without losing hours after the next macOS update.
Table of Contents
- Why Recording Internal Audio on Mac Is So Hard
- The Foundation Installing a Virtual Audio Driver
- How to Route and Monitor Your Mac's Audio
- Choosing Your Mac Internal Audio Recorder
- Troubleshooting Common Audio Recording Failures
- Best Practices for Polished Team Workflows
- Frequently Asked Questions
Why Recording Internal Audio on Mac Is So Hard
The first thing to understand is that your Mac isn’t “missing” a simple checkbox by accident. Apple left it out on purpose.
macOS has intentionally lacked a built-in option to record internal audio since its inception, primarily due to privacy and copyright protections. That policy goes back to OS X in 2001, helped drive tools like Soundflower around 2004, and later BlackHole by 2019, all to work around a problem affecting over 100 million Mac users according to this historical overview of internal audio recording on Mac.
Apple prioritized protection over convenience
That design choice makes sense from Apple’s side. If any app could freely capture system output, it could also capture notification sounds, private calls, or copyrighted media without much friction.
For creators and teams, though, the result is messy. QuickTime Player can record your screen. It can record a microphone. But it won’t directly grab the sound your Mac is already playing unless you build a routing layer yourself.
Practical rule: If your recording is silent, assume routing is wrong before you assume the recorder is broken.
That’s why so many “easy” Mac recording guides fall apart in practice. They skip the part where your Mac’s output and your recording app’s input are separate paths.
The community built the workaround stack
For years, Mac users filled the gap with virtual audio drivers. Soundflower was the old name most long-time users remember. BlackHole became the modern default because it does the same core job with better support on current macOS versions.
The idea is simple. You create a virtual audio device that catches system output, then point your recording app at that device as if it were a microphone.
The execution is where people get stuck.
If you’ve used the built-in screenshot toolbar or followed a QuickTime screen recording guide for Mac workflows, you’ve already seen the limitation. The built-in tools are good at capture. They’re not good at internal audio plumbing.
Two paths work today
Most Mac users end up choosing one of these:
- Free route: Install a virtual driver, configure Audio MIDI Setup, and record with QuickTime, OBS, Audacity, GarageBand, or another app.
- Integrated route: Use a recorder that handles internal audio capture for you and avoids the manual routing layer.
Both can work. Only one is pleasant when a team needs consistent output every week.
The Foundation Installing a Virtual Audio Driver
If you want the free route, BlackHole is the foundation. It isn’t a recorder by itself. It’s the cable between your Mac’s sound output and the app that will capture that sound.
Why BlackHole is the standard free choice
BlackHole largely replaced the older Soundflower workflow because Soundflower became harder to trust on newer macOS versions. BlackHole is the free option most guides and power users still recommend when they need a no-cost mac internal audio recorder setup.
Use the 2ch version for normal screen recordings. It’s enough for product demos, browser playback, app walkthroughs, and most tutorial work.
Install it carefully
The install is straightforward, but recent macOS versions add security friction. Go slowly and verify each step.
- Download BlackHole from its official GitHub-linked distribution path. Don’t grab random mirrors.
- Run the installer package and complete the standard macOS install prompts.
- Watch for macOS security approval prompts. If the system blocks part of the install, open System Settings and check Privacy & Security for any approval request related to the audio driver.
- Restart your Mac if the new device doesn’t appear immediately. This matters more often than people expect.
- Open Audio MIDI Setup after reboot and confirm that “BlackHole 2ch” appears in the device list.
What trips people up during installation
The biggest install mistake isn’t technical. It’s assuming the package finished means the setup finished.
macOS sometimes accepts the installer but doesn’t fully register the new audio device until after a restart. If BlackHole isn’t visible in Audio MIDI Setup, don’t start changing random settings in QuickTime. Fix device registration first.
A few practical checks help:
- Look in Audio MIDI Setup first. If BlackHole isn’t there, your recording app can’t use it.
- Check system approval prompts. Newer macOS builds can hold back background components until you approve them.
- Restart before troubleshooting further. That clears a surprising number of “it installed but doesn’t show up” problems.
If the virtual device isn’t visible at the system level, nothing above it in the workflow will work.
Keep expectations realistic
Installing BlackHole does not mean you can record internal audio yet. It only means your Mac now has a virtual endpoint available.
You still need to tell macOS where sound should go, and you need to preserve monitoring so you can hear what’s playing while you record. That second part is where many first attempts fail.
How to Route and Monitor Your Mac's Audio
The most important part of a free mac internal audio recorder setup happens in Audio MIDI Setup, not in QuickTime.
Put differently, recording apps usually aren’t the problem. Routing is.
Why the Multi-Output Device matters
A Multi-Output Device lets your Mac send audio to two places at once:
- your real speakers or headphones, so you can hear what’s happening
- BlackHole, so your recording app can capture it
Without that, you usually end up with one of two bad outcomes. You hear the audio but don’t record it. Or you record it but can’t hear it while recording.
The BlackHole plus Multi-Output Device method has a 95%+ first-time success rate, and the key step is creating a Multi-Output Device that includes both Built-in Output and BlackHole 2ch. Forgetting to select that new device in System Settings > Sound > Output causes 70% of failed recording attempts, according to this BlackHole routing guide.
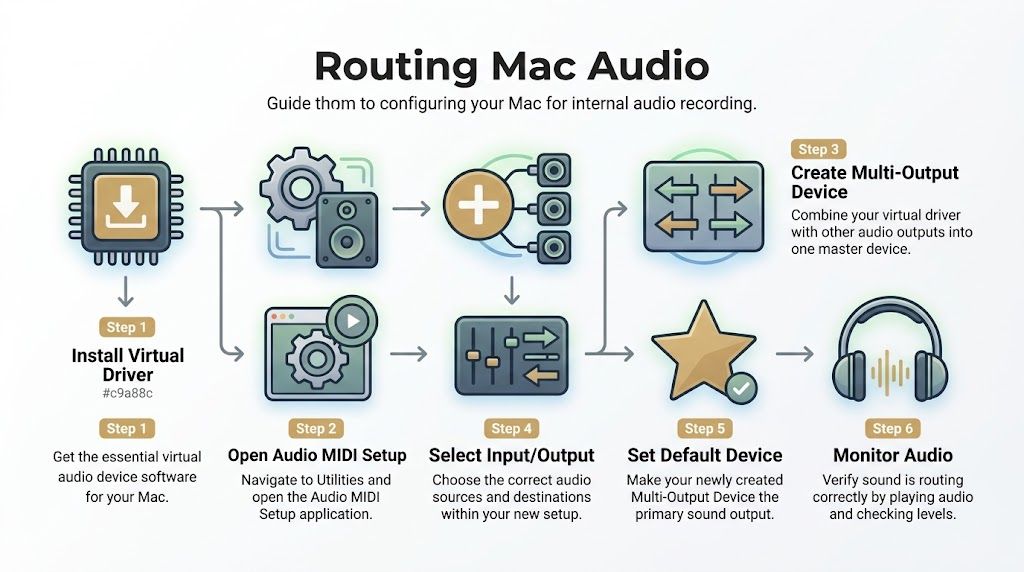
The exact routing flow that works
Open Audio MIDI Setup from /Applications/Utilities/.
Then do this:
Click the + button in the lower-left corner.
Choose Create Multi-Output Device.
In the device list, check Built-in Output or your headphones.
Also check BlackHole 2ch.
Rename the new device to something obvious, like “Mac Record Output.”
Open System Settings > Sound > Output.
Select the new Multi-Output Device as your system output.
That’s the routing layer.
Now your Mac’s sound goes to your ears and to BlackHole at the same time.
A visual walkthrough helps if you want to compare your screen against a working setup:
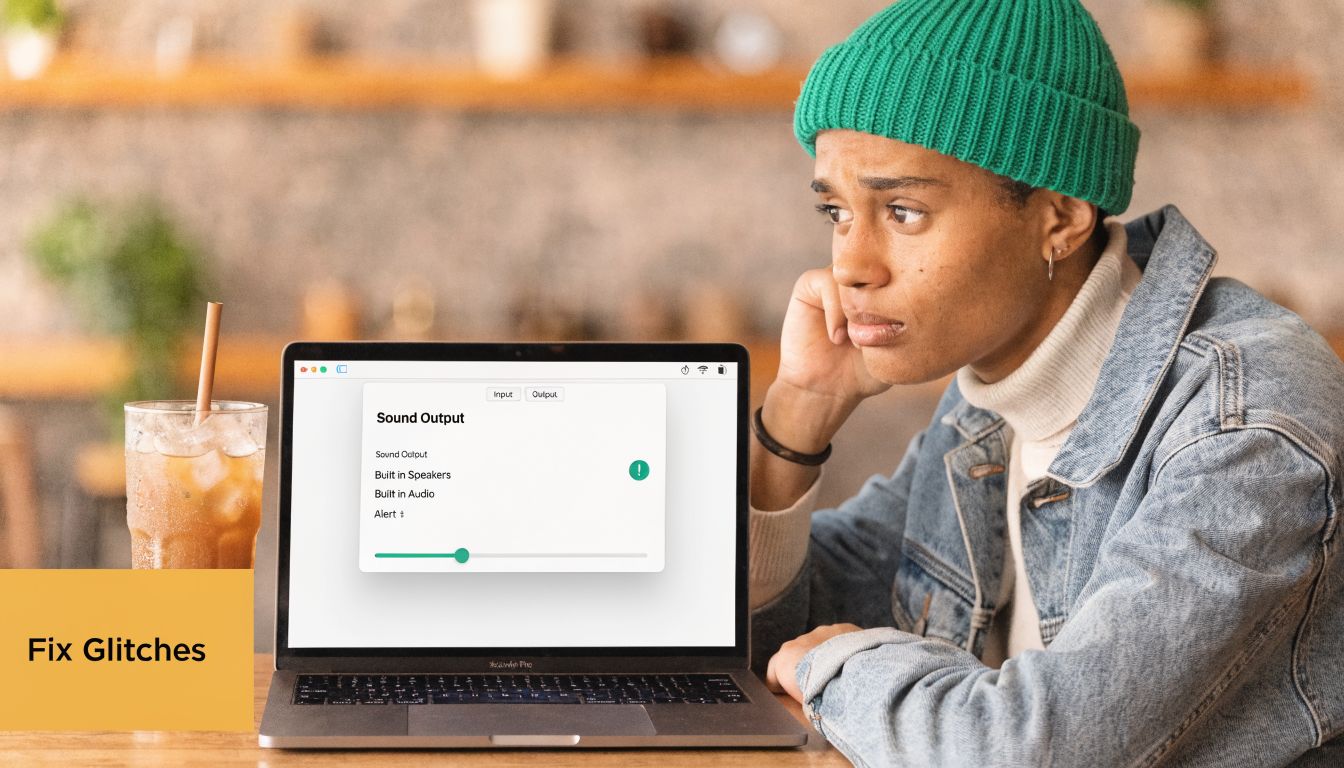
The one setting people miss
Most failed setups come from selecting BlackHole directly as system output instead of the Multi-Output Device.
That looks close enough to correct, but it changes the behavior completely. Your sound gets routed into the virtual device, and your monitoring disappears. People often think recording failed when the actual problem is they no longer hear playback.
Use this quick verification pass before every recording session:
- Play a test sound: Open a video or system sound and confirm you can hear it.
- Check output destination: In System Settings, verify the selected output is the Multi-Output Device, not BlackHole alone.
- Check recorder input: In QuickTime or your recording app, choose BlackHole 2ch as the input source.
- Do a ten-second sample: Stop, replay, and confirm sound before recording the full session.
You can also compare this against a broader screen recording workflow on Mac if you’re building a repeatable process for demos or tutorials.
The Mac setup that “worked last month” often fails because one output setting silently changed. Always verify output before you hit record.
Choosing Your Mac Internal Audio Recorder
Once routing is correct, the recorder itself becomes a workflow decision. The right choice depends less on raw capture quality and more on how often you record, how many people touch the workflow, and how much failure you can tolerate.
QuickTime with BlackHole
This is the classic free setup.
You create the routing in Audio MIDI Setup, then open QuickTime Player or the Shift-Command-5 screenshot toolbar and select BlackHole 2ch as the microphone input. Once that’s done, QuickTime can capture your screen with the system audio you routed into BlackHole.
Why people use it:
- It’s free.
- It’s already on the Mac.
- It’s good enough for occasional recordings.
Why teams outgrow it:
- There’s more setup to remember.
- Output settings can get changed between sessions.
- People forget to switch the Mac back afterward.
- Debugging falls on whoever happens to know Audio MIDI Setup.
QuickTime is fine when the person recording also understands the plumbing. It’s weaker when multiple teammates need the same result without side effects.
Paid recorders that remove setup friction
Paid recorders exist because the manual route costs time, not because Mac users enjoy spending money.
FonePaw Audio Recorder takes a different approach. It offers a no-driver path through direct kernel access, provides a single System Sound toggle, and reports 98% stability in the vendor’s benchmarks. It also includes built-in editing and is described as 1.2x faster than a typical Audacity plus BlackHole workflow for trimming a 10-minute file, according to FonePaw’s internal audio recording guide for Mac.
That kind of tool solves a specific problem. It removes the “did I route this correctly?” phase.
Still, there are trade-offs:
| Option | What it does well | Where it gets annoying |
|---|---|---|
| QuickTime + BlackHole | Free, built-in recorder, simple final capture | Manual routing, easy to misconfigure |
| FonePaw | Fewer setup steps, built-in editing, direct system sound toggle | Another app to manage, proprietary workflow |
| OBS Studio | More control over scenes and sources | Overkill for simple demos |
| GarageBand or Logic Pro | Better for audio shaping and track work | Not ideal as a fast screen recording flow |
What teams should actually choose
For solo creators, the answer is usually “whatever works today.”
For professional teams, the better question is different: What produces the same result every time, even after updates, handoffs, and deadline pressure?
That’s where integrated tools pull ahead. A recorder that handles screen capture, system audio, mic capture, timeline cleanup, and export in one place reduces the number of hidden dependencies.
A team workflow gets stronger when:
- Recording doesn’t depend on Audio MIDI Setup memory.
- The editor doesn’t need to reconstruct what the recorder did.
- A new teammate can follow the same flow without Slack rescue messages.
- You can move from capture to trim to export without swapping apps.
If you’re comparing options for a broader Mac screen recorder with audio workflow, that’s the lens worth using. Not “Can this record internal audio?” Most of them can. The useful question is “Can this still do it cleanly next month when three people on the team need it?”
Free tools are cheapest at the moment of download. They can become the most expensive option once setup time, failed takes, and team support get involved.
Troubleshooting Common Audio Recording Failures
Free virtual drivers work. They also fail in ways that waste half a morning.
The biggest gap in most guides is reliability after macOS changes. They show the happy path once, then stop. Real workflows don’t stop there.
The reliability of free virtual audio drivers is a significant issue, with users frequently reporting silent recordings after macOS updates. A common failure is setting system output directly to BlackHole instead of the required Multi-Output Device, which causes a loss of real-time monitoring. These recurring issues undermine business workflows that depend on repeatable, error-free recordings, as discussed in this Apple Communities thread on post-update audio capture problems.
Silent recording after a macOS update
If a setup used to work and suddenly records silence, check the routing layer first.
Run this checklist in order:
Confirm BlackHole still appears in Audio MIDI Setup.
Open System Settings > Sound > Output and verify the selected device is your Multi-Output Device.
Open the recorder and confirm BlackHole is still selected as input.
Restart the Mac if the device appears present but behaves oddly.
Recheck security prompts if macOS changed permissions during the update cycle.
Don’t skip the output check. That’s the setting most likely to drift.
You can record but can't hear anything
This usually means the Mac is outputting directly to BlackHole.
That’s not the same as a Multi-Output Device. BlackHole alone captures. It doesn’t give you normal monitoring through speakers unless you’ve built that monitoring path separately.
Use this fix:
- Open Audio MIDI Setup.
- Select your Multi-Output Device.
- Make sure both your real output device and BlackHole 2ch are checked.
- Return to System Settings > Sound and choose the Multi-Output Device as output.
When free methods stop feeling free
This is the practical trade-off many teams ignore at first.
A free method is fine when:
- one person owns the setup
- recordings are occasional
- a failed take is annoying but manageable
It becomes fragile when:
- several teammates share machines or instructions
- macOS updates land mid-project
- demos have deadlines
- someone needs to record now, not debug now
That’s why reliability matters more than setup cleverness. The best mac internal audio recorder for a business workflow isn’t the one with the fewest dollars attached. It’s the one that doesn’t produce silent footage after a system change.
Best Practices for Polished Team Workflows
Teams that produce polished videos regularly should treat audio capture like a production system, not a one-time hack.
Separate capture decisions from editing decisions
The cleanest workflow records system audio and microphone narration with as much control as possible, then handles polish later.
That matters because internal audio and spoken narration rarely need the same treatment. Product sound may need to stay crisp and low. Voiceover may need trimming, level balancing, or replacement. If your workflow mashes everything together too early, editing gets harder.
A stronger process usually includes:
- Short test recordings: Verify routing and playback before the actual take.
- Consistent device naming: Use the same Multi-Output Device name across machines if you rely on BlackHole.
- Quiet notification hygiene: Turn off nonessential alerts so random sounds don’t leak into recordings.
- Clear handoff rules: The person recording should note the selected input and output when passing files to an editor.
Recordings fail less often when the team follows one boring checklist instead of five personal setups.
Build a repeatable recording checklist
A checklist beats memory every time.
Keep it simple:
- output device verified
- input source verified
- monitoring confirmed
- sample clip reviewed
- final export destination chosen
Teams that record often also benefit from tools that combine capture and editing in one workflow. That removes the “who changed the Mac audio settings?” problem and cuts down on setup drift across contributors.
Frequently Asked Questions
Can a Mac record internal audio without extra setup
Built-in Mac tools don’t offer a native system-audio checkbox in the usual recording flow. In practice, you either use a virtual driver setup or a recorder that handles internal audio capture internally.
Can I record audio from just one app
Not with the standard BlackHole setup by itself. That approach captures system audio broadly. If you need app-specific capture, use a tool built for per-app routing.
What should I do if audio drifts out of sync
Start with a short test before long recordings. If drift shows up, check your Audio MIDI Setup configuration and verify the routing setup is still correct after any recent system changes. For team work, use a recorder and editor flow that keeps audio and video in one managed project instead of bouncing between several utilities.
Is it legal to record internal audio on Mac
The tools are legal. What matters is what you record and how you use it. Your own demos, tutorials, and internal training assets are one thing. Recording copyrighted media or private conversations without permission is another. Follow your local laws, company policy, and consent rules.
If your team records demos, onboarding tutorials, or launch videos regularly, Smooth Capture is the kind of tool worth evaluating because it removes the fragile Mac audio setup from the workflow. Instead of depending on virtual drivers, Audio MIDI Setup, and post-update rechecks, you get a native macOS recorder and editor built for repeatable business use, with screen capture, editing, multiple audio tracks, polished effects, subtitles, and export workflows in one place.
Ready to create stunning app demos?
SmoothCapture makes it easy to record your screen with 3D device frames, cinematic cursor effects, and professional editing tools.