Screen Casting on Mac: The Complete 2026 Guide
You’ve probably done this already. You record a product walkthrough on your Mac, watch it back, and immediately see the problems. The cursor darts around too fast. The menu bar flashes with things viewers shouldn’t see. Your voice sounds distant. A notification lands right in the middle of the key moment. The recording is technically usable, but it doesn’t look like something you want to send to customers, publish on a landing page, or hand to a sales team.
That gap is what matters in screen casting on mac. The Mac makes it easy to capture a screen. It does not automatically make the result clear, polished, or repeatable.
The difference usually isn’t a hidden setting. It’s workflow maturity. Early on, the built-in tools are enough for quick internal clips and one-off explanations. After that, quality starts depending on setup discipline, editing control, and the ability to make the same kind of clean recording over and over without rebuilding your process every time.
Table of Contents
- Why Most Mac Screen Recordings Look Unprofessional
- The 30-Second Screencast Your Mac's Built-In Tools
- Configuring Your Setup for Crystal-Clear Audio and Video
- Upgrading to a Professional Screencasting Workflow
- Advanced Techniques for Engaging Demos and Tutorials
- Troubleshooting Common Screencasting Headaches
- Frequently Asked Questions About Screen Casting on Mac
Why Most Mac Screen Recordings Look Unprofessional
Unprofessional recordings usually come from small failures stacked together, not one big mistake. The recording is the wrong size for where it will be published. The mouse movement is nervous. The speaker is thinking while talking instead of guiding the viewer. The desktop is cluttered. The edit leaves in hesitation, mistakes, and dead air.
macOS also encourages a kind of false confidence. You can start recording in seconds, which is great for speed, but speed hides planning problems. A quick capture tool doesn’t force you to check audio levels, clean the desktop, silence notifications, or think about framing.
The quality problem is usually workflow, not software alone
A built-in recorder is fine if your goal is “I need to show this bug to a coworker right now.” It falls apart when the recording becomes an asset that needs to represent a product well for more than one day.
That’s where teams get stuck. They keep using a throwaway workflow for videos that now need permanence. Product demos, onboarding tutorials, feature announcements, and client walkthroughs need consistency. They need clear cursor emphasis, reliable audio, clean cuts, and exports that fit the channel.
Practical rule: If a video will be seen by customers more than once, record it like an asset, not like a message.
What polished recordings usually have in common
They’re usually simple. Not flashy. Just controlled.
- Clean framing: The viewer sees only what matters.
- Steady pacing: Cursor movement, narration, and cuts feel intentional.
- Reliable sound: Voice is close, clear, and tested before the take.
- Visual emphasis: Zooms, highlights, and annotations guide attention without clutter.
- Repeatability: The same process works again for the next feature, release, or tutorial.
That’s the maturity curve for screen casting on mac. Start with fast native tools. Add a proper setup. Then move to a workflow that makes polish repeatable instead of accidental.
The 30-Second Screencast Your Mac's Built-In Tools
If you need to record something immediately, macOS gives you two solid options. They’re free, already on the machine, and good enough for quick internal demos, bug reports, and disposable walkthroughs.
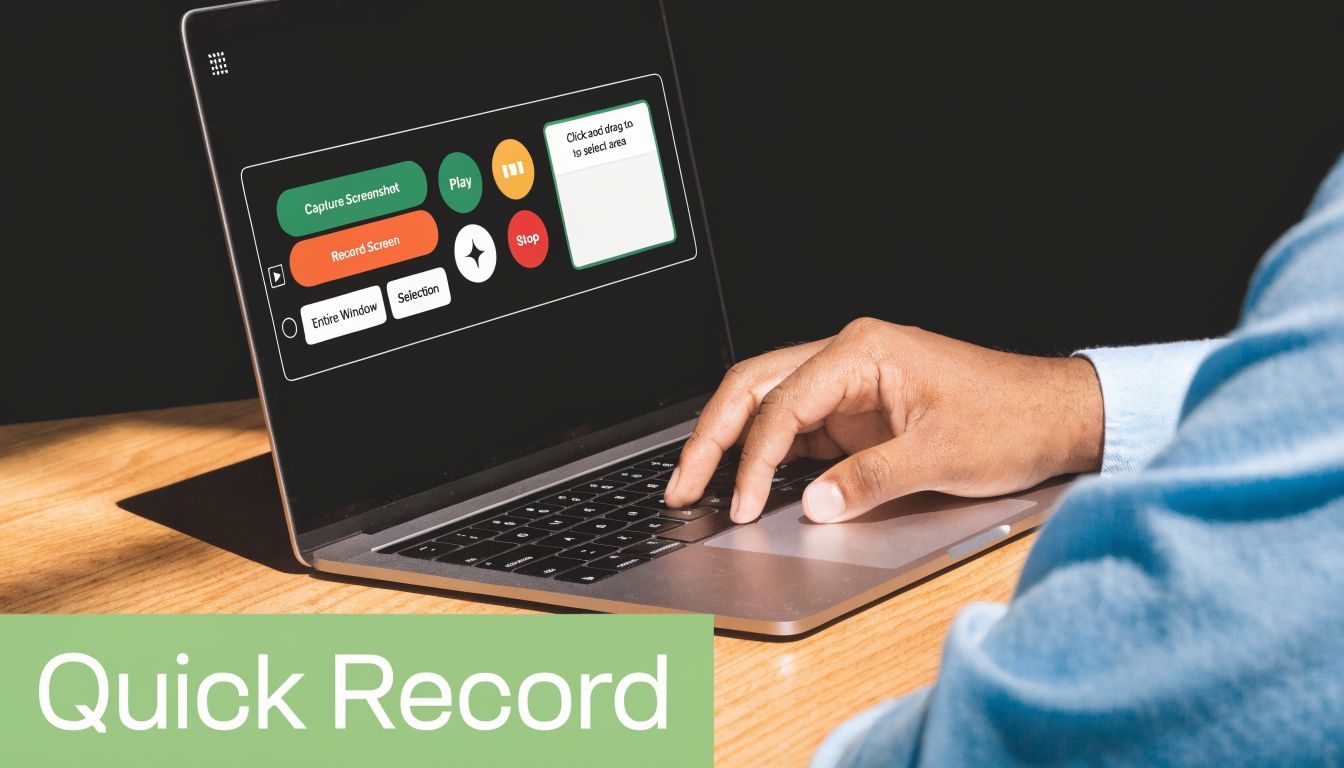
Use the Screenshot toolbar when speed matters
Press Command + Shift + 5. That opens the Screenshot toolbar with options to record the full screen or a selected portion. For most software demos, selected portion is cleaner because you can avoid unrelated UI and keep the viewer focused.
Before you hit record, click Options. Check your microphone selection. If you leave the wrong mic active, you can get a thin laptop-mic sound even when your external mic is plugged in. You can also set the save location, timer, and whether mouse clicks are shown.
A fast workflow looks like this:
- Choose region or full screen: Region is usually better for focused demos.
- Set the microphone: Confirm the right input device before every take.
- Close distractions: Quit chat apps, hide the dock if needed, and turn on Do Not Disturb.
- Record a few seconds first: Watch it back before doing the full take.
The Screenshot toolbar is the fastest option because it’s one shortcut away. It’s also limited. You don’t get timeline editing, layered effects, advanced cursor treatment, or built-in ways to make the result look intentionally produced.
Use QuickTime when you want a simple fallback
QuickTime Player is still useful because it’s predictable. Open QuickTime, choose File > New Screen Recording, and you’ll get a similar capture flow. If you already use QuickTime for trimming or quick playback checks, keeping everything in one familiar app can be practical.
If you need a step-by-step walkthrough, this QuickTime screen recording guide covers the native method in more detail.
What QuickTime does well is simplicity. What it doesn’t do well is finish the job. Once you need cursor effects, reframing, multiple audio layers, or polished exports for public-facing assets, the native path starts to feel narrow.
A short demo of the built-in approach is useful here:
Native tools are best when the recording only needs to exist, not impress.
That’s why I treat them as capture utilities, not a full production workflow. They’re excellent for speed. They’re weak for finish.
Configuring Your Setup for Crystal-Clear Audio and Video
A polished screencast usually falls apart before editing starts. The capture area is too large, the interface text ends up tiny, the mic clips on the first loud sentence, or the room noise is louder than expected. None of that gets fixed cleanly later.
For Mac creators, this is the point where the workflow starts to mature. Built-in tools are fine for getting a recording. Clear demos and repeatable tutorial production come from setting the frame, audio path, and recording environment on purpose before you hit Record.
Start with the final delivery format
Choose the destination first. Then configure the capture.
A support doc video, YouTube tutorial, sales demo, and vertical social cut all need different framing. If the final asset is widescreen, record for a 16:9 canvas and make sure the app window fills that space cleanly. If the interface has dense menus or small labels, increase the capture size only if your export and publishing platform will preserve that detail.
The practical rule is simple. Record only what the viewer needs to see.
That usually means:
- Frame the app window, not the whole desktop: Extra screen space makes text smaller and adds distraction.
- Check readability before the take: Open the actual screen you plan to show and confirm buttons, menus, and body text are readable at normal viewing size.
- Clean the recording area: Hide desktop icons, quit chat apps, close unrelated tabs, and remove anything that pulls attention away from the task.
- Use a consistent display scale: If you change Mac display scaling between videos, text size and composition will drift across your tutorial library.
If you plan to move beyond native capture, this roundup of screen recording software for Mac is useful because it shows where dedicated tools start saving time on repeat projects.
Audio needs a preflight every session
Viewers will forgive a plain visual style faster than they will forgive bad sound. Thin laptop audio, clipping, hum, and room echo make a tutorial feel amateur even when the screen capture is sharp.
Use a short audio check before every recording session, even if the desk setup looks unchanged. Input devices switch. Gain gets bumped. HVAC noise changes throughout the day.
A reliable preflight looks like this:
- Use the mic you plan to publish with: Built-in Mac mics are acceptable for internal walkthroughs. External USB or XLR mics are better once the video represents your brand.
- Set input level with real speech: Read a few lines at your normal delivery volume. Do not tap the mic and call it tested.
- Listen back on headphones: Meters catch level problems. Headphones catch hum, fan noise, echo, and mouth clicks.
- Keep the mic close: Distance adds room sound fast. For screen-first videos, place the mic just out of frame and aim it toward your mouth.
- Watch for inconsistent tone: Turning your head while narrating changes the sound more than many creators expect.
If you are still sorting out hardware, this guide to choosing the best audio recorder device does a good job of explaining the trade-offs between convenience, mic quality, and recording flexibility.
A few setup choices improve the result immediately
Screen recordings look cleaner when the Mac itself is prepared for capture. Turn on Do Not Disturb. Disable app notifications. Use a neutral desktop wallpaper or a solid color if any desktop area might appear on screen.
Cursor visibility matters too. If the pointer is small or moves erratically, viewers lose the thread. Slow down slightly during key actions and keep movements deliberate. Native tools do not give you much cursor styling control, so clean mouse work becomes part of production quality.
Lighting and camera are not part of every screencast, but they matter if you record picture-in-picture intros or webcam segments. In that case, match the camera framing and audio setup before the main take so you do not end up cutting between two visibly different setups.
The five minutes that save the retake
Experienced creators do a short test capture first. Record a few clicks, one transition, and a sample of narration. Then watch it back full screen.
That single habit catches the problems that waste the most time: soft text, wrong input source, clipped peaks, notification popups, and screen areas you thought were visible but are not. For quick internal clips, skipping that check is sometimes fine. For customer-facing demos, course content, or anything you may reuse later, it is a bad gamble.
I would rather spend a few minutes validating the setup than re-record a strong take with broken audio. That is the shift from good enough capture to a professional screencasting workflow on Mac.
Upgrading to a Professional Screencasting Workflow
There’s a clear point where native tools stop being enough. It happens when the recording has to do more than show a screen. It has to guide attention, support editing, fit multiple formats, and look consistent across a series of videos.
That’s when a dedicated app stops feeling optional.
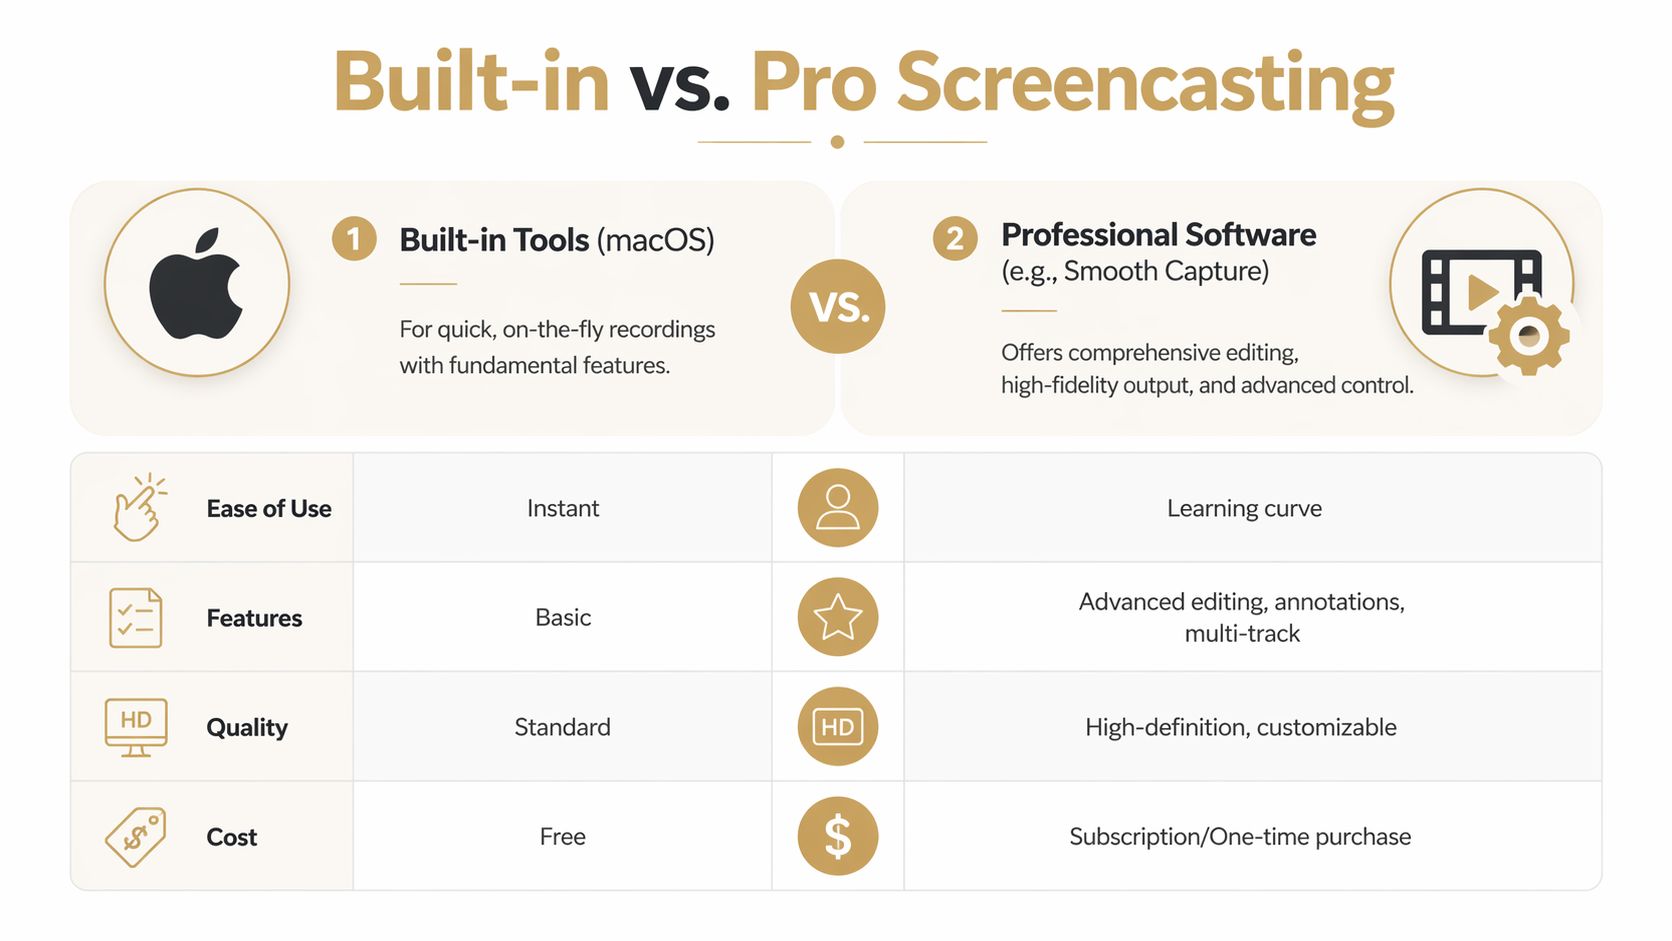
What built-in tools stop doing well
The native recorders are strong at capture. They are weak at production.
Here’s the practical trade-off:
| Workflow need | Built-in tools | Dedicated screencasting app |
|---|---|---|
| Start recording fast | Very good | Good |
| Trim and restructure takes | Minimal | Strong |
| Highlight clicks and cursor movement | Limited | Built for it |
| Create polished framing | Manual and awkward | Easier to repeat |
| Export multiple versions | Basic | Better suited to delivery workflows |
The pain usually shows up after capture. You want to remove mistakes, tighten pacing, add zooms around important interactions, swap between horizontal and vertical formats, or put a device frame around a mobile recording. Native tools don’t help much there.
When a dedicated app changes the workflow
A professional workflow should reduce effort after recording, not add to it. That means recording with editability in mind. Timeline editing matters because it lets you trim, split, rearrange, and smooth over mistakes without restarting from zero. Cursor effects matter because viewers follow motion before they read text. Automatic zoom matters because it saves manual reframing around every key interaction.
One option in this category is Smooth Capture, a native macOS app that records the screen and adds tools like a timeline editor, keyframing, cursor effects, device frames, automatic zoom, multi-audio-track editing, on-device subtitles, and the ability to swap between horizontal and vertical outputs from one capture. If you’re comparing tools, this roundup of screen recording software for Mac is a useful starting point.
What matters more than the feature list is the effect on workflow:
- Less restart pressure: You can fix pacing and structure in edit instead of chasing a perfect single take.
- Clearer viewer guidance: Zooms, click ripples, and magnification show people where to look.
- More reusable output: The same source recording can be adapted for tutorials, sales clips, and social snippets.
- Stronger visual consistency: Device frames, backgrounds, and subtitle styling make a series look related.
The right upgrade is the one that removes repeat friction, not the one with the longest feature page.
Export format decisions also become more important once videos move beyond internal use. If you’re weighing delivery trade-offs, this article on the best video format for quality and compatibility is helpful for thinking through compatibility versus fidelity.
The maturity test is simple. If you’re recording often, editing every take by hand with awkward workarounds, and still getting inconsistent results, you’ve outgrown the built-in layer.
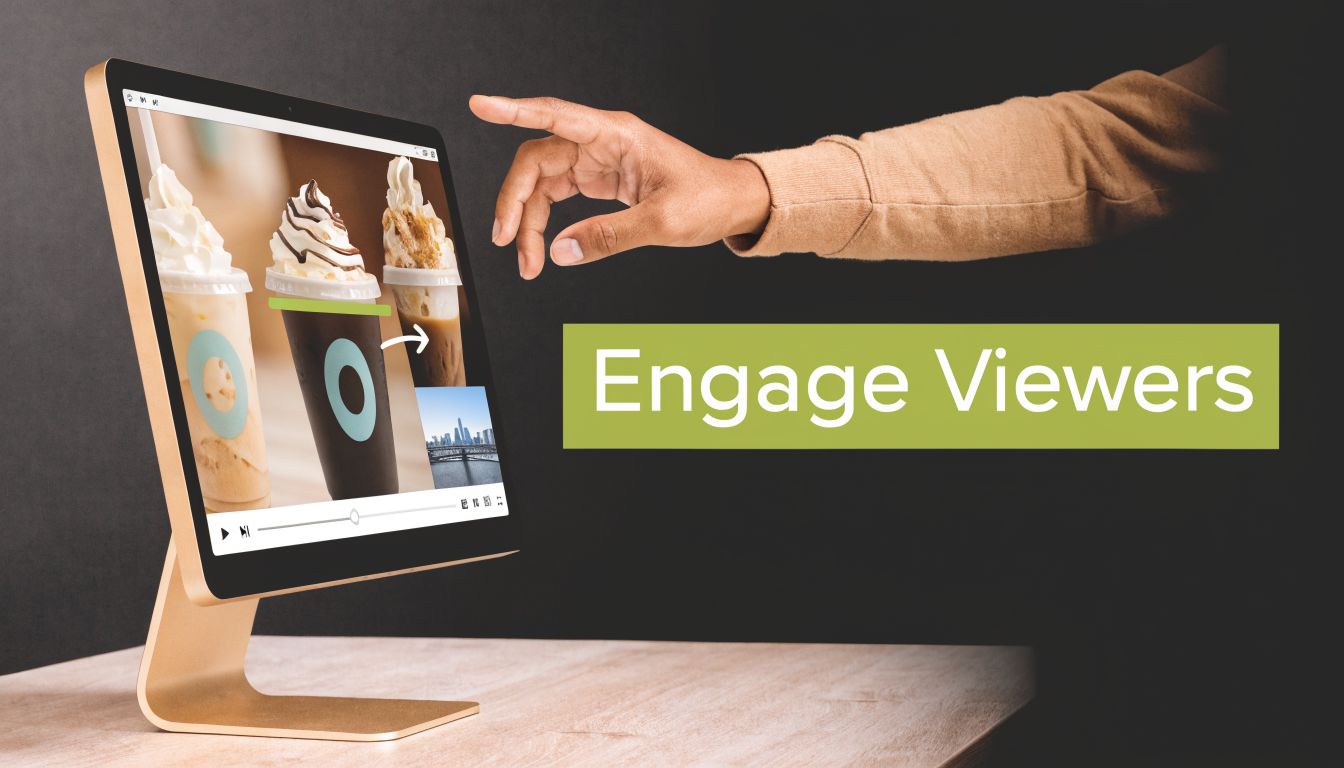
Advanced Techniques for Engaging Demos and Tutorials
A clean recording isn’t automatically an engaging one. The craft starts after your setup is solid. At this point, experienced creators separate “I showed the feature” from “the viewer understood it immediately.”
Control attention before you press record
Most boring demos are unfocused before the first click. The creator hasn’t decided what the viewer should notice first, second, and third.
Fix that with a short outline. Not a full script if you don’t need one. Just a sequence of actions and the one message tied to each. Then prepare the screen to support that sequence.
Good prep usually includes:
- Hide irrelevant apps: If the video is about one workflow, don’t leave five unrelated tools visible.
- Clean the desktop: Icons, random files, and open tabs make the recording feel accidental.
- Set browser zoom and app scale: Small UI text is a common failure in software demos.
- Rehearse the path once as practice: You’ll catch missed steps and awkward transitions immediately.
If you’re producing software walkthroughs regularly, this guide on how to create a demo video for software is a practical reference for structuring the narrative of the demo itself.
Use movement and framing deliberately
Cursor control is one of the biggest tells. Newer creators move the mouse while they think. Experienced creators move it only when it helps explain something.
Slow down. Pause briefly before a click. Don’t circle targets with the cursor unless your software supports a cleaner highlight treatment. If you need to show a multi-device setup, remember that Command + F1 (or Cmd + Brightness Down on MacBooks) toggles video mirroring on or off when connected to more than one display, according to Apple community guidance on video mirroring. In practice, that shortcut can cut setup time for multi-device demos by up to 60% from the same source.
That shortcut is especially useful when you’re switching between a main display and an external monitor or AirPlay target during a recording. It’s faster than digging through display settings mid-session.
Smooth cursor movement feels small while recording and huge on playback.
Edit for pace, not decoration
The best edits usually remove friction, not add spectacle. Cut the dead space before actions. Trim repeated phrases. Remove moments where the cursor is searching. If the video needs annotations, add them where viewers hesitate, not everywhere you can.
A practical edit pass often looks like this:
- Trim dead air first: Remove pauses, setup clicks, and recoveries from mistakes.
- Tighten transitions: If two steps are obvious, cut closer together.
- Add emphasis second: Use zooms, highlights, or labels only where understanding improves.
- Add subtitles last: On-device subtitles are useful for accessibility and silent viewing, but they should support the pacing, not dictate it.
Keyboard shortcuts matter here too. The more often you record, the more valuable it becomes to keep your hands off the mouse during editing. Fast trimming and split commands make a larger difference over a library of tutorials than any isolated visual effect.
Troubleshooting Common Screencasting Headaches
A recording can look perfect in rehearsal and fall apart the moment you start the actual take. On Mac, the failures are usually predictable. They show up at different stages of workflow maturity. Built-in tools fail first on control, then external displays, then network casting.
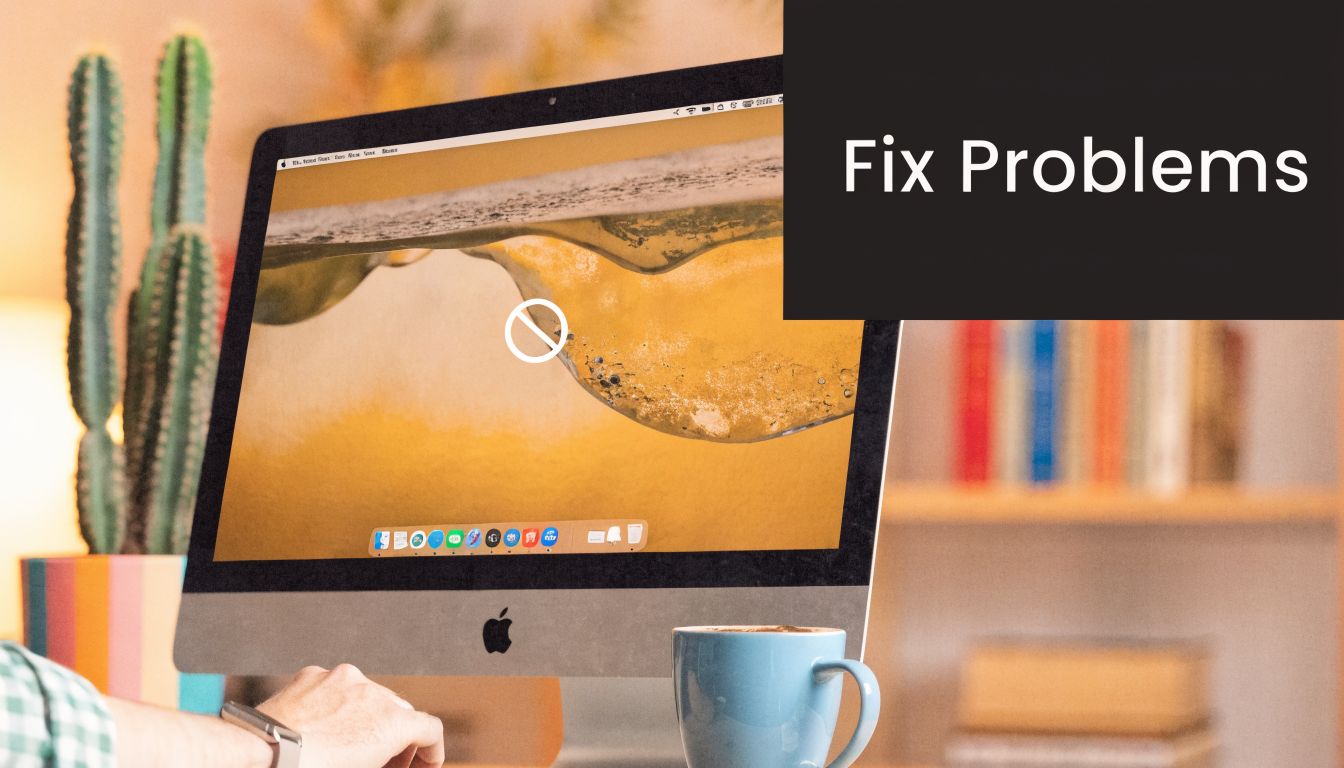
Fix basic capture failures before changing tools
Start with the faults that ruin a take outright. These are fast to verify, and they account for a large share of bad recordings.
- No microphone audio: Check that the app is pointed at the right input, then record a 10-second test with headphones connected.
- Choppy playback: Quit browser tabs, sync clients, exports, and anything else competing for CPU, GPU, or disk access.
- Wrong capture size: Reset the capture region and record again. Stretching a bad capture later usually softens text and UI detail.
- Notifications breaking the take: Turn on Do Not Disturb before opening the app you plan to demo.
Long recordings expose weak setups faster than short clips. If stutter appears after ten or fifteen minutes, check free storage, memory pressure, and whether background jobs started mid-session.
Solve display crop and border problems
At this stage, many creators outgrow the default workflow.
Connect a Mac to a TV or older monitor over HDMI and the frame can come back cropped, padded with black borders, or shifted just enough to make a polished demo look careless. Apple notes in its display settings guidance for overscan and underscan that display settings are the first place to check. In practice, that fix is inconsistent once adapters, TVs, docks, and mirrored displays enter the chain.
The fastest way to isolate the fault is to test the display path, not just the Mac:
- Check the display menu: TVs and some monitors often apply their own picture sizing, zoom, or overscan setting.
- Swap the cable or adapter: A different adapter chain can change how the display interprets the signal.
- Test another input on the display: HDMI ports do not always behave the same way.
- Try a second monitor: If the issue disappears, the Mac is usually not the root problem.
For one-off internal recordings, a minor border issue may be acceptable. For client demos, course content, or YouTube tutorials, it is usually a sign to stop relying on mirrored TV-style output and move to a direct monitor capture workflow instead.
Handle casting failures on office and enterprise networks
AirPlay and other casting workflows tend to break in shared office environments for boring reasons. Segmented Wi-Fi, blocked discovery traffic, cross-subnet rules, and strict firewall policies all interfere with device detection.
Do not troubleshoot this live while people are watching.
Test the exact room, network, and destination device before the session. If discovery fails, use a workflow that supports a direct connection or pre-paired receiver instead of depending on automatic network discovery every time. That is one of the clearest maturity jumps in Mac screencasting. Free tools are fine when you control the network. Repeatable production work needs a setup that behaves the same way every session.
Know when the problem is your workflow, not your Mac
If you keep seeing the same issues, the bottleneck is usually process. Rechecking inputs, display scaling, and network visibility before every take works for occasional recordings. It does not scale for a creator shipping demos every week.
At that point, the upgrade is not about extra features. It is about reducing failure points. Dedicated recording apps, fixed scene layouts, a known-good mic, and a tested external display path save more time than any repair step after a broken take.
Frequently Asked Questions About Screen Casting on Mac
Can I show keystrokes on screen while recording
Yes. macOS does not include keystroke overlays in its built-in recording tools, so creators who record tutorials, coding walkthroughs, or shortcut-heavy demos usually add KeyCastr or a similar utility. User examples in the KeyCastr reference describe post-production time dropping by an estimated 40% because viewers can see the shortcut as it happens instead of relying on text callouts added later.
Use it when the keyboard is part of the lesson. Skip it for simple click-through demos where extra visual noise hurts more than it helps.
Should I record system audio and microphone together
Record both only when the viewer needs both. App chimes, video playback, notification sounds, and interface audio can help in product walkthroughs, but they also make mixing harder and can make narration sound thin if levels are off.
For quick internal demos, the Mac mic plus light system audio is often good enough. For customer-facing tutorials, separate control is better. That is usually the point where creators outgrow the built-in workflow and move to a dedicated app or audio interface that gives cleaner voice capture and fewer retakes.
Do I need a webcam overlay for tutorials
Only when your face adds context.
I use webcam overlays for onboarding, teaching, and sales walkthroughs where eye contact helps hold attention. I leave them out for feature demos and technical training where the interface should stay large and readable. If the camera box covers controls, forces the app into a smaller capture area, or adds setup time you do not recover in engagement, leave it out.
What’s the fastest way to improve a bland recording
Clean up the pacing first. Cut dead air, trim mistakes, and keep the cursor purposeful.
Then add one visual cue that supports the lesson. Cursor emphasis, a tight zoom on the important step, or visible keystrokes usually does more than adding music, transitions, or a webcam bubble. That is the maturity jump many Mac creators miss. The built-in recorder gets the footage. A polished workflow improves clarity.
If your team records demos, onboarding videos, or launch assets on Mac regularly, Smooth Capture is worth evaluating as a dedicated workflow tool. It records screen, window, region, and iOS devices on macOS, and it adds timeline editing, cursor treatments, device frames, automatic zoom, subtitle generation, and flexible exports for teams that need polished videos more than once in a while.
Ready to create stunning app demos?
SmoothCapture makes it easy to record your screen with 3D device frames, cinematic cursor effects, and professional editing tools.