Capture Sound From Computer Mac: 2026 Guide
You hit record on a Mac, play a product demo, stop the capture, and then realize the video has your voice but none of the app audio. Or worse, it has the app audio, but now you can’t hear anything live because your output got hijacked by a virtual device. That’s the moment many users discover Mac audio capture isn’t a simple toggle. It’s a routing problem.
For solo creators, that’s annoying. For product marketing, customer education, and support teams shipping videos every week, it’s a workflow tax. The ultimate choice isn’t just which tool can capture sound from computer Mac. It’s which setup wastes the least time while still giving you clean, editable audio you can trust.
Table of Contents
- Why Capturing Mac System Audio Is So Hard
- The Free Route Setting Up A Virtual Audio Driver
- The Pro Route One-Click Recording With Polished Tools
- Advanced Audio Routing With Aggregate Devices
- Troubleshooting Common Audio Capture Issues
- Best Practices For High-Quality Audio
- Frequently Asked Questions About Mac Audio Capture
Why Capturing Mac System Audio Is So Hard
The most important thing to understand is this: the Mac isn’t broken. Apple designed it this way. A foundational historical fact documented in Apple support discussions is that macOS has intentionally lacked built-in support for recording internal system audio since its early versions, including QuickTime Player, and that limitation persists as of 2026.
The missing setting isn’t missing by accident
If you’ve searched every menu in QuickTime or the built-in screen recorder, you already know there’s no “record system audio” checkbox. That’s because macOS separates playback audio from recording inputs as part of its privacy and security architecture. Your speakers or headphones are output paths. Recording apps usually see microphone-style inputs.
That’s why QuickTime happily records your USB mic but ignores the sound from Safari, Figma, Keynote, or your product itself. From a production standpoint, this is the core frustration behind trying to capture sound from computer Mac. The operating system treats the audio you hear and the audio an app can record as different lanes.
Practical rule: Stop looking for a hidden native setting. On Mac, internal audio capture usually requires routing, not discovery.
Why older fixes don’t age well
For years, people solved this with Soundflower, which was an early virtual audio driver that routed system output into something recording apps could see. It mattered because it proved the workaround was possible. It also trained an entire generation of Mac users to think audio capture meant driver installation, Audio MIDI Setup, and a bit of trial and error.
That legacy still shapes a lot of tutorials, but old advice often breaks on current macOS versions. Security changes made many kernel-extension-based tools harder to trust and harder to maintain. In practical terms, that means older blog posts may be technically correct in spirit and still be a waste of your afternoon.
Here’s the bigger takeaway for teams: the problem isn’t only whether a method works. It’s whether it works reliably, repeatedly, and with low setup friction when multiple people need to produce demos under deadline.
| Method | Cost | Setup friction | Reliability for teams | Best use |
|---|---|---|---|---|
| QuickTime alone | Free | Low | Poor for internal audio | Mic-only captures |
| Legacy virtual driver workflows | Free | High | Mixed | Budget setups |
| Newer native capture inside supported apps | Free | Medium | Better | OBS-based production |
| Integrated recording tools | Paid | Low | Strong | Repeatable team workflows |
If you make one launch video a quarter, a workaround may be fine. If your team records customer tutorials every week, the cheapest option often becomes the most expensive one in staff time.
The Free Route Setting Up A Virtual Audio Driver
Free still works. It just asks more from you. If you need to capture sound from computer Mac without paying, the default modern route is BlackHole, not Soundflower.
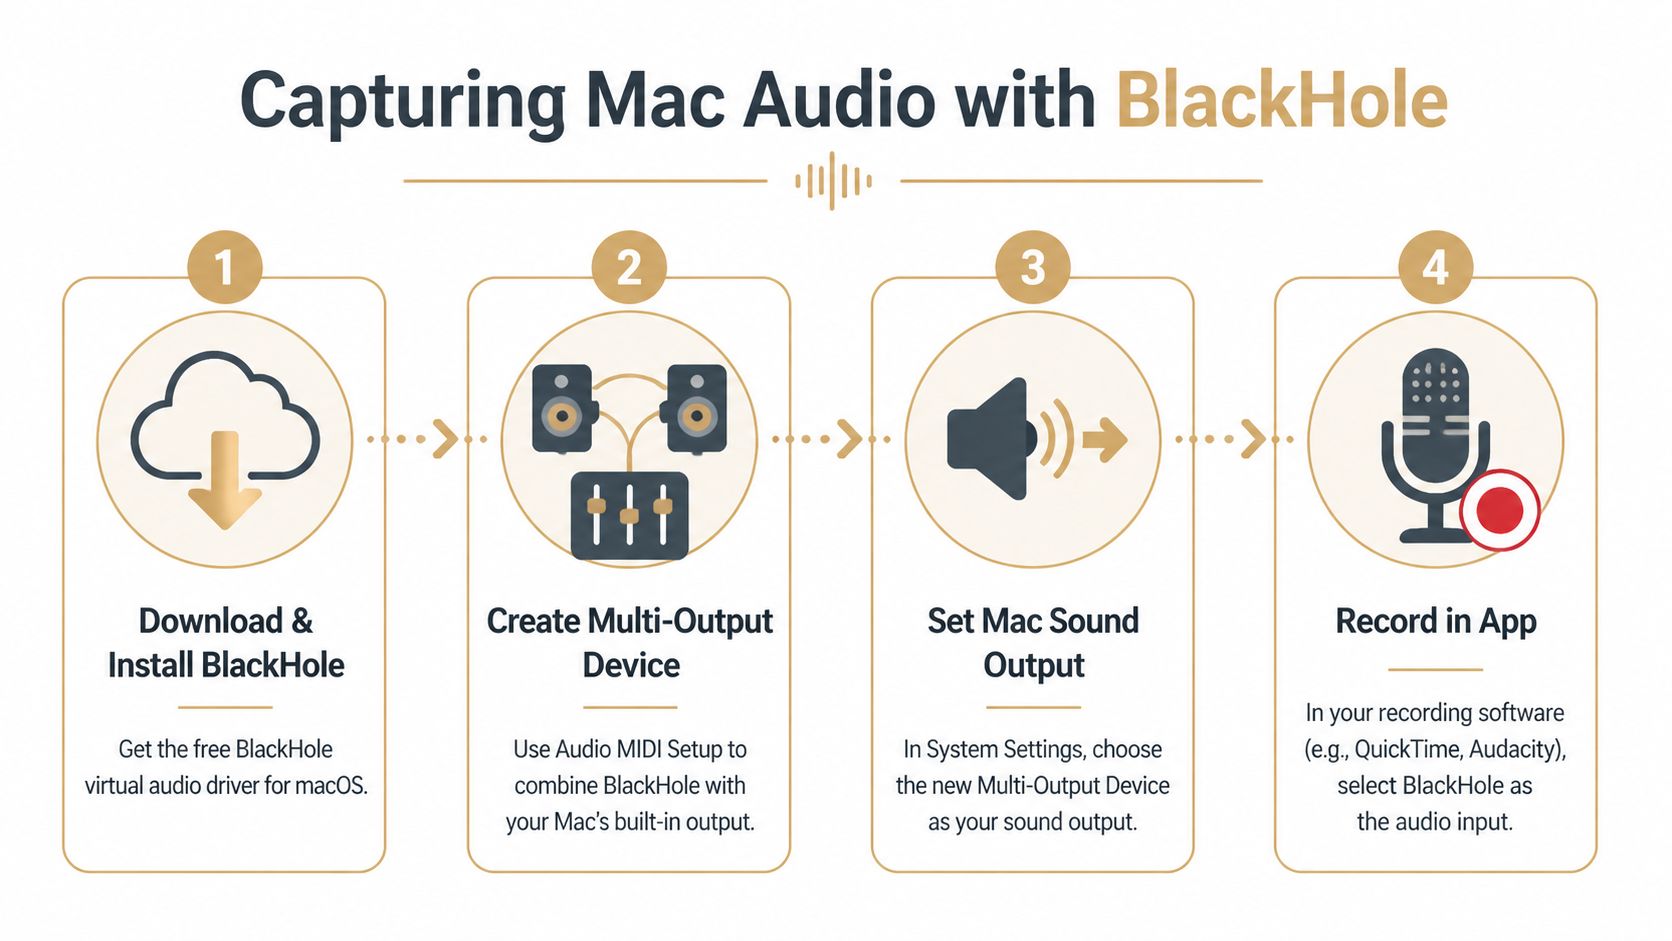
BlackHole is the standard free workaround
BlackHole acts like a virtual audio pipe. Instead of sending your Mac’s playback only to speakers, you can send it to BlackHole so a recording app can treat that audio like an input. That’s the basic trick.
The catch is monitoring. If you route audio only to BlackHole, you often stop hearing it yourself. For production work, that’s not acceptable because you need to hear timing, transitions, notification leaks, and whether the app audio is present. So the proper setup usually includes a Multi-Output Device in Audio MIDI Setup.
A lot of people quit here because the workflow feels more technical than it should. It is. But once it’s configured properly, it can be stable enough for occasional use.
How to set up BlackHole without losing monitor audio
This is the version I’d hand to a teammate who needs it to work on the first try.
Install BlackHole
Download and install the driver. Use the standard stereo version unless you know you need more complex routing.Open Audio MIDI Setup You’ll find it in Applications > Utilities. macOS exposes the routing controls there that normal users almost never touch.
Create a Multi-Output Device
In Audio MIDI Setup, create a new Multi-Output Device that includes:- BlackHole
- Your usual output, such as MacBook speakers, studio monitors, or headphones
Set your Mac output to the Multi-Output Device
In System Settings > Sound, choose the Multi-Output Device as the output destination.Set your recording app input to BlackHole
In QuickTime, Audacity, or another recorder, pick BlackHole as the audio input source.Do a live test before the actual take Play audio, confirm you can hear it, confirm the app sees input, then record a short sample and play it back.
If you can record but can’t hear playback during capture, the Multi-Output Device is usually the missing piece.
For QuickTime-specific setup details around screen recording behavior, this QuickTime screen recording guide is a useful companion because it shows where QuickTime itself becomes the bottleneck.
OBS on Ventura and newer is the cleaner free option
If you’re on a current Mac and you’re open to using OBS, there’s a better free path. On macOS 13 Ventura and higher, OBS Studio 30+ can capture desktop audio through the native macOS Audio Capture Source rather than relying on the older driver-routing method. According to ScreenCharm’s write-up on OBS desktop audio capture, this approach uses Apple’s ScreenCaptureKit API and reduces CPU overhead by 40 to 60 percent compared with driver-based methods.
That matters in real projects. Driver-based routing can work, but it adds moving parts. OBS’s newer native capture path is usually less fiddly and better suited to long recordings or heavier screen captures.
A practical comparison:
| Free option | What’s good | What’s a hassle | Best fit |
|---|---|---|---|
| BlackHole + recording app | Flexible, widely used | Routing setup, monitoring confusion | Occasional capture in simple apps |
| OBS native macOS audio capture | Cleaner on modern macOS, fewer routing headaches | OBS learning curve | Regular screen recording on Ventura or newer |
If you already use OBS for webinars, product walkthroughs, or live capture, use the native audio capture source and skip the driver if your setup supports it. If you need a lightweight one-off capture in an app like QuickTime, BlackHole remains the practical free fallback.
The trade-off is simple. BlackHole costs less money. OBS native capture costs less patience.
The Pro Route One-Click Recording With Polished Tools
Free setups are fine until they start eating production time. That’s the line organizations eventually cross. Somebody misses audio on a launch video, somebody else records a great walkthrough with system sound but no mic, and then the team realizes the savings were mostly theoretical.
What you’re paying for is fewer failure points
The market has clearly moved beyond native Mac tools for this job. One Instructables-based summary of Mac audio capture demand states that demand for Mac internal audio capture has surged 300% since 2020, and that a 2025 Setapp survey found 85% of professional users turning to third-party solutions because native tools are insufficient. The same verified data says integrated tools like Smooth Capture can reduce setup time by 80% versus manual BlackHole configurations.
Those numbers line up with what production teams already feel in practice. The cost of a polished tool isn’t just the license. It’s buying back setup time, reducing retakes, and letting more than one person on the team get the same result without becoming the office audio-routing specialist.
Where dedicated tools earn their keep
Professional tools usually solve one of two problems.
First, they remove configuration work. You open the app, pick the screen or window, confirm the mic, and record. That’s worth paying for if your team needs repeatable output and doesn’t want to document a fragile routing workflow.
Second, they give you better control. Tools in the Rogue Amoeba ecosystem, for example, are popular because they let you think in terms of sources and destinations instead of hacks. That matters when you need app-specific capture, cleaner monitoring, or a more deliberate signal path.
Here’s the business lens I use:
- Choose free routing when budget matters more than operator time and the same person handles capture every time.
- Choose dedicated capture software when multiple teammates need consistent recordings without a setup checklist taped to their monitor.
- Choose integrated recording and editing tools when your bottleneck isn’t capture alone. It’s capture plus cleanup, trimming, track balancing, subtitles, and export.
A team doesn’t outgrow free tools because free stops working. It outgrows free tools when reliability becomes more valuable than tinkering.
If you’re comparing options for polished work, this roundup of best screen recording software for Mac is worth reviewing because actual differences show up after the recording starts. Editing speed, audio track flexibility, and export workflow matter more than a feature checklist suggests.
Advanced Audio Routing With Aggregate Devices
Most how-to guides stop at “record internal audio.” That’s only half the actual production challenge. Teams often need system audio and an external microphone at the same time, especially for narrated demos, onboarding videos, and support walkthroughs.
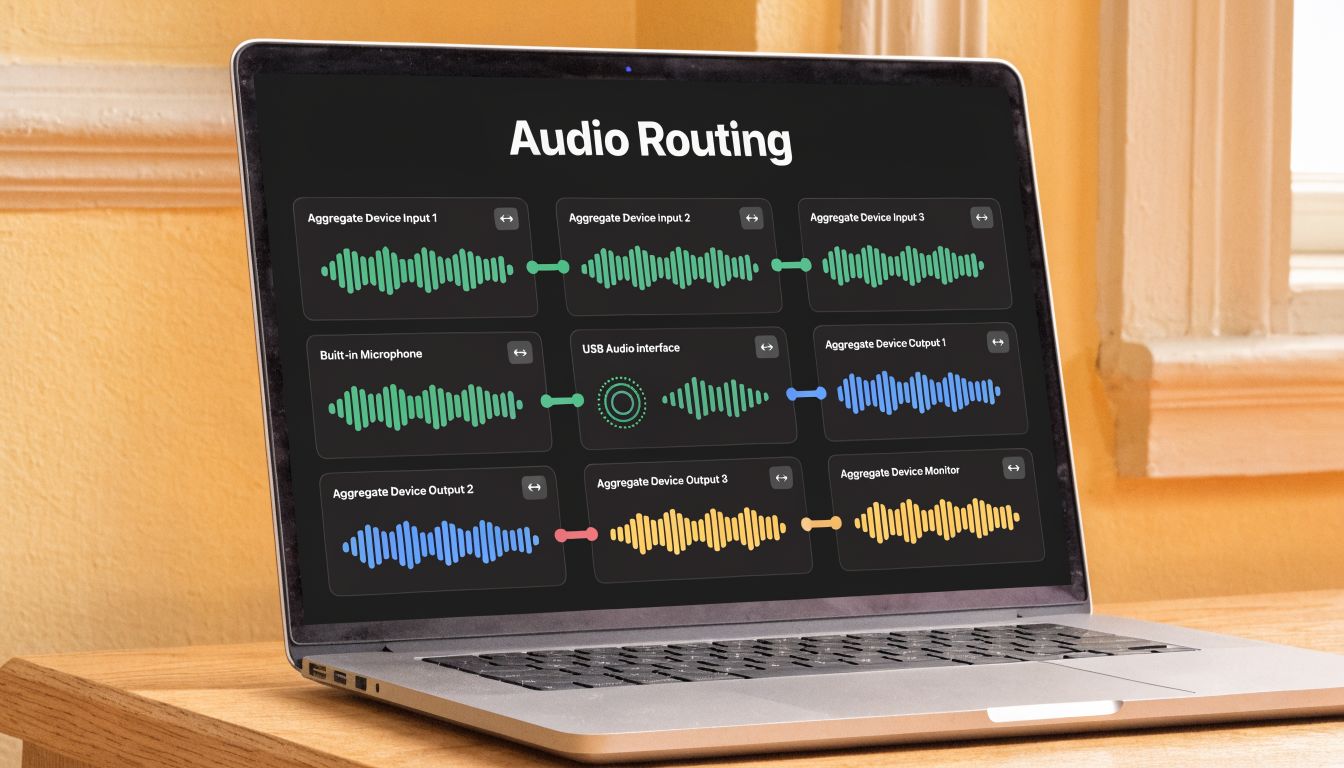
When an Aggregate Device is the right tool
An Aggregate Device in Audio MIDI Setup combines multiple input devices so software can treat them as one source. This is useful when your recorder only wants one input device, but your real session needs two things at once, such as:
- your USB mic for narration
- your routed system audio source
- sometimes an interface or extra monitor path
This isn’t the first setup I’d recommend to a casual user. It adds another layer of routing, and if you rush it, you can create more confusion than flexibility. But for tutorial production, it can be the difference between a clumsy two-pass workflow and a clean live narration workflow.
A practical setup for voiceover plus system audio
Here’s a common scenario. You’re recording a product walkthrough. You want the app’s native sounds in the capture, and you want your voice recorded live while you click through the UI.
A workable approach looks like this:
Route system audio with your chosen method
That might be BlackHole or a native capture path inside software that supports it.Open Audio MIDI Setup and create an Aggregate Device
Add your microphone and the routed audio source.Select that Aggregate Device as the input in your recording software
Your app now sees one combined source instead of forcing you to choose only mic or system audio.Test for channel behavior before recording the full take
Some apps merge sources in ways that are less editable later, so a short test matters.
A few production notes matter here:
- Use headphones. Open speakers make it much easier to create echo or re-recorded bleed.
- Keep the voice signal strong. If the app audio is loud and your mic is weak, your narration becomes harder to salvage.
- Know whether your app records separate tracks or a mixed result. That determines how much control you’ll have later.
This setup is powerful, but it also shows the limit of manual Mac audio workflows. You can absolutely make them work. The question is whether your team wants to keep rebuilding them every time a new laptop, headset, or macOS update enters the mix.
Troubleshooting Common Audio Capture Issues
Most Mac audio capture failures aren’t random. They come from a short list of predictable mistakes. Once you know where the weak points are, you can diagnose them quickly instead of restarting apps for half an hour.
No audio in the recording
The first assumption people make is “the recorder failed.” Usually, the routing failed.
Check these first:
Wrong input selected
Your recording app may still be listening to the microphone instead of BlackHole, an Aggregate Device, or the native capture source you intended.Output not routed correctly
If the Mac is still sending sound to speakers instead of your Multi-Output Device, the recorder never sees the internal audio path.Monitoring confusion
Hearing audio live does not prove it’s being recorded. Silent playback does not prove it isn’t. Always run a short test file.
The fastest fix is often to trace the signal from end to end: app output, macOS output, virtual or aggregate device, recorder input.
Permissions drift and sync problems
macOS permissions can subtly break a setup that worked yesterday. Screen recording access, microphone access, and related prompts matter. If you denied one earlier, the app may open normally and still capture nothing useful.
If your recorder supports modern native capture and still behaves oddly, reset the permissions in System Settings and grant them again. For a broader walkthrough of what a reliable Mac recorder should handle, this guide to a Mac screen recorder with audio helps frame what “working correctly” looks like.
A separate issue is sync drift. When picture and audio slowly stop matching, the usual culprit is a sample-rate mismatch somewhere in the chain. Keep every relevant device and app aligned to the same sample rate when possible. If you’re using a more complex setup, this matters even more.
A short diagnostic table helps:
| Problem | Likely cause | First fix |
|---|---|---|
| Silent recording | Wrong input or output routing | Recheck app input and macOS output |
| Can’t hear audio live | No Multi-Output monitoring path | Rebuild monitoring path |
| App captures nothing after update | Permissions reset or revoked | Regrant permissions |
| Voice and screen drift apart | Sample-rate mismatch | Align audio settings across devices |
The bigger lesson is simple: don’t troubleshoot from the recorder backward. Troubleshoot from the audio path forward.
Best Practices For High-Quality Audio
Capturing audio is technical. Making it usable in post is editorial. That’s where a lot of Mac tutorials fall short. They show how to get sound into a file, but not how to avoid painting yourself into a corner once editing starts.
Separate tracks save bad recordings
A key gap in most Mac capture tutorials is multi-track audio control. The verified guidance for this topic notes that most tutorials focus on capturing system audio versus a microphone, but they miss the professional workflow challenge of recording multiple sources simultaneously and controlling their levels independently in post-production, which is especially important for product marketing and customer education teams, as summarized in this discussion of the multi-track workflow gap.
That’s the key dividing line between a quick recording and a professional one.
If your voiceover and system audio get baked into one stereo mix, you lose options fast. If the app sound is too loud, your narration gets buried. If your narration peaks, you can’t repair it without also affecting the demo audio. If a Slack ping slips in, it’s now part of the same track as everything else.
Clean post-production starts before record. Separate sources whenever your tools allow it.
Production habits that keep audio usable
A few habits make a bigger difference than commonly expected:
- Monitor with headphones so the mic doesn’t pick up your playback.
- Do a ten-second test take and listen back before the actual recording.
- Watch levels, not just waveforms. A visible waveform can still be clipped or unbalanced.
- Silence the machine. Notifications, message pings, and calendar alerts ruin otherwise good takes.
- Record with editing in mind. Leave a beat before and after important spoken lines so cuts sound clean.
If your work includes voice-heavy content, podcast editing practices carry over well. A practical resource on optimizing podcast audio for listeners is worth borrowing from because the fundamentals are the same: clear speech, controlled levels, minimal distractions, and enough separation between elements to make good editorial decisions later.
For teams, this isn’t perfectionism. It’s efficiency. Clean tracks shorten edit time, reduce re-records, and make the final demo sound intentional instead of improvised.
Frequently Asked Questions About Mac Audio Capture
Can QuickTime record internal Mac audio by itself
No. QuickTime can record microphone input, but internal system audio requires extra routing or a different tool. If you’re using QuickTime, assume you’ll need a virtual driver or another supported capture method.
Is it legal to record streaming audio
That depends on what you’re recording and how you plan to use it. Internal capture is a technical capability, not a rights clearance. Teams should only record audio they have permission to use, especially for published demos, tutorials, ads, or customer-facing assets.
Do virtual audio drivers slow down a Mac
They can add complexity and overhead, but the bigger problem is usually reliability, not raw slowdown. More routing layers mean more chances for wrong device selection, monitoring issues, or sync drift. For lightweight occasional use, that may be acceptable. For repeated production work, it often becomes a maintenance burden.
Which export format should you choose
Use WAV when you want the cleanest master file for editing or archiving. Use AAC or another compressed delivery format when the video is final and file size matters more than edit flexibility. If you’re unsure, keep a lossless master and export compressed copies for distribution.
What’s the simplest way to capture sound from computer Mac today
For many people, it comes down to this:
- Use OBS on modern macOS if you want a free method and don’t mind working inside OBS.
- Use BlackHole if you need a free workaround in apps that don’t support native internal capture.
- Use a polished capture app if your team records often and wants fewer setup failures.
The right answer depends less on feature lists and more on how expensive failed recordings are for your team.
If your team records demos, onboarding videos, launch assets, or customer walkthroughs on a regular basis, Smooth Capture is worth a serious look. It’s built for repeatable Mac workflows, not one-off recording hacks, so you spend less time configuring audio paths and more time shipping polished video.
Ready to create stunning app demos?
SmoothCapture makes it easy to record your screen with 3D device frames, cinematic cursor effects, and professional editing tools.