Cropping Video Mac: 5 Easy Methods (2026)
You've probably got a screen recording that looks right on your Mac and wrong everywhere else. The demo is wide, the UI is small, the cursor disappears once you crop for social, and the same asset now needs to work as a product walkthrough, a square post, and a vertical short. This is the core cropping video mac problem in practice. It isn't merely trimming frame borders. It's deciding how to turn one recording into multiple deliverables without re-recording, rebuilding the edit, or making your interface unreadable. Basic guides usually stop at “open Photos and drag the crop handles.” For teams shipping App Store previews, onboarding videos, and launch assets, that's not enough. As MacMost notes in its guide to cropping video on your Mac, the hard part is building a repeatable workflow for 16:9, 1:1, and 9:16 while keeping text, UI, and cursor focus readable. If you also work with footage that has overlays, obfuscation, or visual cleanup issues before reframing, a separate guide on how teams recover censored video content can help you think through what should be fixed before you crop.
Why Cropping Your Mac Videos is Essential
A good recording can still fail if it's framed for the wrong destination. A desktop demo that works in 16:9 often feels distant on a phone. A square cut can hide the exact click path you're trying to teach. A vertical version can turn a clean interface into a cramped mess if you don't choose the crop deliberately.
That's why cropping matters far beyond aesthetics. It controls what the viewer notices first, what stays readable, and whether one source file can support several publishing channels without another recording session.
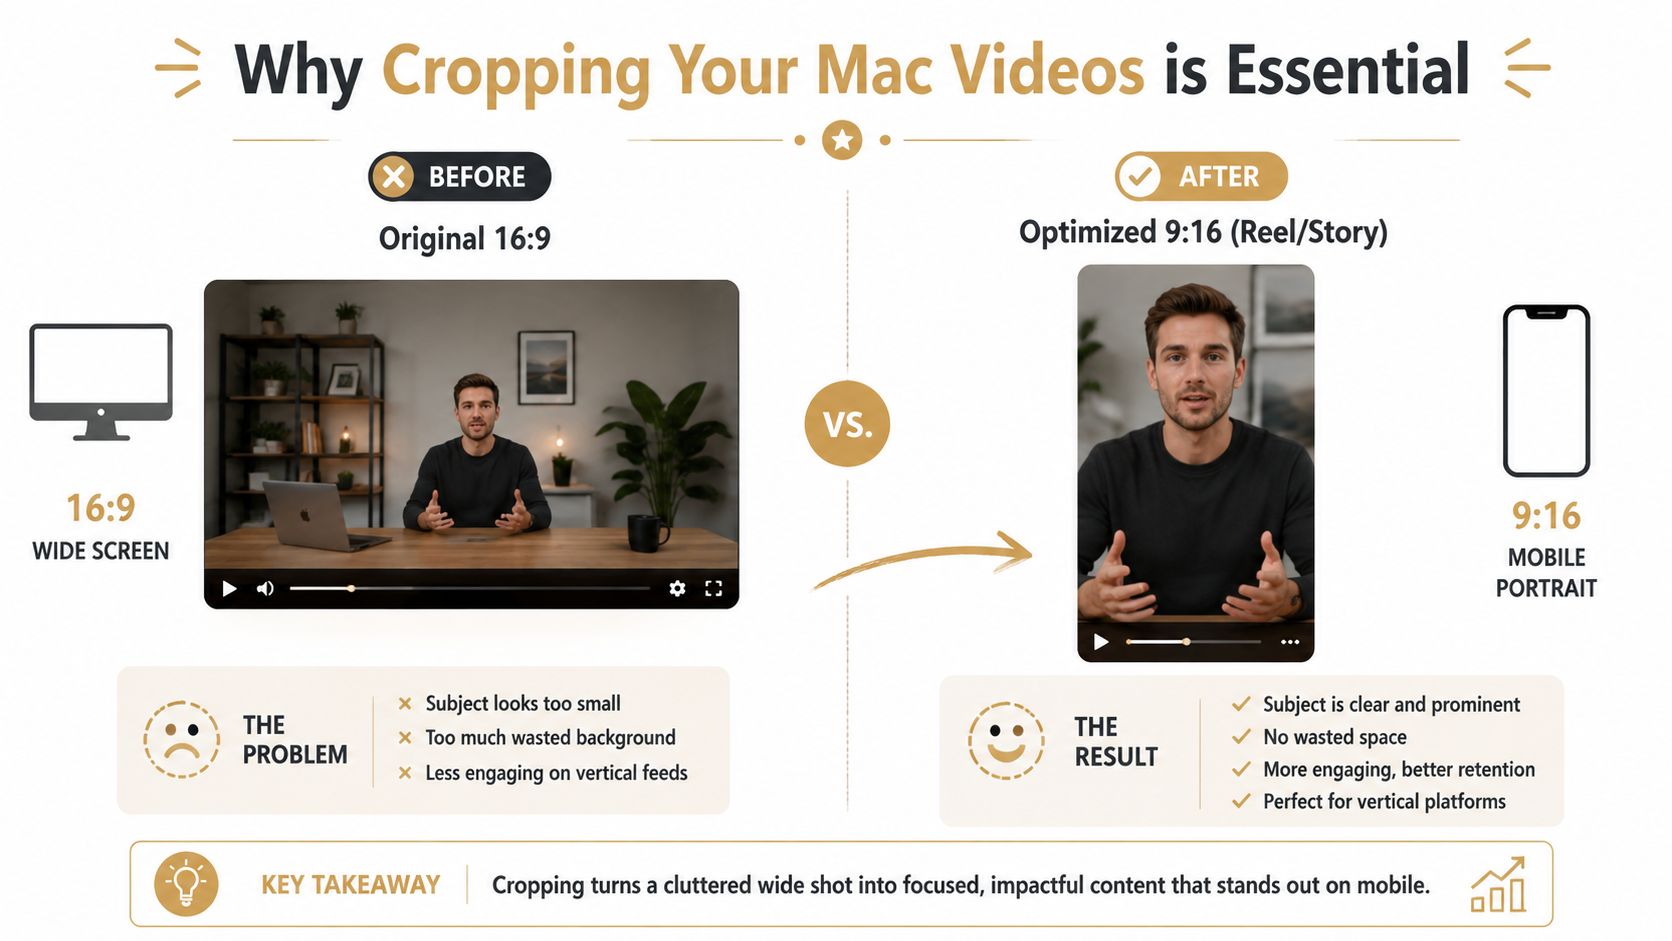
One recording rarely stays in one format
Marketing teams usually don't publish a single version anymore. The same demo might need to live on a landing page, in an App Store listing, inside a help center article, and as a social cut-down. Each destination rewards a different frame. What makes this hard isn't the crop tool itself. It's maintaining intent across formats.
- For product demos: the crop has to keep buttons, menus, and cursor movement visible.
- For onboarding videos: viewers need context, not just magnification.
- For social clips: the frame has to get tight quickly or the subject disappears on mobile.
Practical rule: Crop to guide attention, not just to “make it fit.”
The best cropping video mac workflow starts before export. You need to know whether you're making a one-off adjustment, a timeline-based edit, or a reusable system that can produce several versions from the same source.
Five methods fit five different jobs
These tools aren't interchangeable.
| Tool | Best use | Limitation |
| **Photos** | Fast one-off reframing | Not built for project-level editing |
| **QuickTime Player** | Trim a clip fast | Not the right tool for true cropping |
| **iMovie** | Simple project-based reframing | Tied to project format decisions |
| **Smooth Capture** | Screen demos with multiple outputs from one capture | More specialized than general media apps |
| **Final Cut Pro / FFmpeg** | Precision and repeatability | More setup and skill required |
Some jobs only need a clean crop and export. Others need a process that lets a team create horizontal, square, and vertical versions without rebuilding the edit every time. That's the difference between casual editing and production workflow.
Cropping for Free with Photos and QuickTime
Mac users often open QuickTime first because it's already there. That makes sense for fast cleanup, but it creates one of the most common mistakes in cropping video mac workflows. People use a trimming tool when they need a frame tool.
Know what each built in app actually does
QuickTime Player is mainly for trimming, not pixel-level cropping. If your goal is to shorten the beginning or end of a clip, it's fine. If you want to remove the sides of the frame and export a newly reframed file, use Photos instead. MacMost demonstrates that you don't need a third-party app to crop video on a Mac, and that the Photos app performs true pixel-level cropping, including exports that can turn a 1080-wide clip into a 776x776 square in that workflow, while QuickTime remains associated primarily with trimming in comparison (MacMost video walkthrough). If you need a refresher on QuickTime's editing role before you decide where to crop, this guide on editing video in QuickTime Player is useful because it separates length edits from framing edits.
A fast Photos workflow that works
Photos is the practical free option when you need one clean deliverable and don't want a project timeline. Use this sequence:
- Import the clip into Photos.
- Open it and click Edit.
- Go to the Crop controls.
- Reframe the shot so the UI or subject fills the right part of the image.
- Export a new file rather than treating the crop as a temporary view. That last step matters. You're not just masking the picture. You're creating a new video output with a new frame dimension.
If you only need to remove dead space around a screen recording or make a quick square post, Photos is usually the shortest path from raw clip to deliverable.
Photos also works well when your source already lives in the Apple ecosystem. For a single clip, it avoids the overhead of creating a project, managing a timeline, and setting up a more complex export path. A short video example helps if you want to see the process before trying it.
The trade-off is scope. Photos is fast, but it won't give you the kind of multi-version workflow that teams need when one recording has to become several aspect ratios. It's a strong tool for one file at a time.
Simple Cropping and Reframing in iMovie
iMovie sits in the middle. It's more structured than Photos, less technical than Final Cut Pro, and useful when the crop belongs inside a broader edit rather than as a quick standalone export. What catches people off guard is that iMovie doesn't approach cropping as a freeform framing tool first. It approaches it as part of a project.
How iMovie thinks about cropping
In iMovie, the familiar control is Crop to Fill. That tells you almost everything about its logic. You're not casually slicing a frame into any shape you want. You're making a clip fill the shape of the project.
 A typical workflow looks like this:
- Create a new project and place the clip on the timeline.
- Select the clip, then open the crop controls.
- Choose Crop to Fill if you want the image to fill the project frame.
- Adjust the framing rectangle so the important area stays inside the visible region.
- Use Ken Burns if you want motion between a start frame and an end frame. That Ken Burns option is more useful for tutorials than many people expect. A subtle pan or push can help lead the viewer's eye toward a feature or menu without cutting away to another shot.
Where iMovie helps and where it gets in the way
iMovie works well when all your outputs live in one standard format and the crop is part of a simple edit. It's good for basic YouTube explainers, internal walkthroughs, and straightforward product clips where everything is staying in the same shape. It's less helpful when your real need is format repurposing.
| Good fit for iMovie | Poor fit for iMovie |
| A short tutorial in one format | One source that must become multiple aspect ratios |
| Light edits plus simple reframing | Precision batch work |
| Basic motion with Ken Burns | Technical crops with exact coordinates |
iMovie is easiest when your framing decision is tied to one final timeline, not several distribution versions.
For many Mac users, iMovie is the first place where cropping starts to feel like editing instead of file cleanup. That's useful. But once the job becomes “make this demo work as wide, square, and vertical,” you start fighting the project instead of using it.
Advanced Cropping for Demos and Tutorials with Smooth Capture
The hardest production problem isn't learning where the crop button lives. It's keeping one recording useful across several outputs while preserving clarity around text, UI, and cursor actions. That's where a specialized workflow starts to matter more than a general editor.
Why this workflow fits product teams
For demos, onboarding videos, App Store assets, and social cut-downs, the frame is part of the message. A generic crop can remove distraction, but it can also remove context. Product teams usually need both focus and repeatability. One option built around that kind of workflow is Smooth Capture for Mac video recording and editing. It's a native macOS tool built for screen recording and post-recording edits, including switching between horizontal and vertical outputs from one capture, adding device frames, using cursor effects, and applying automatic zoom with focus detection. That combination matters in real production work because the recording doesn't have to be treated as a single fixed canvas. You can build one clean source and then adapt it for different destinations without starting over from scratch.
What to look for in a multi format workflow
A professional cropping workflow should answer these questions before you commit to a tool:
- Can it reframe one recording into multiple outputs? That matters when the same demo needs site, social, and store versions.
- Can it keep motion readable? Cursor movement and interface transitions often break first when you force a wide recording into a narrow crop.
- Can it add structure around the crop? Device frames, background treatments, and controlled zoom often produce a cleaner result than a raw punch-in.
- Can your team repeat it? A tool isn't useful if every editor invents a different export process. A lot of editors can crop. Fewer support a workflow where the original capture is planned for repurposing from the beginning.
For software videos, reframing is usually more effective when it follows interaction. Static crops are often fine for talking heads, but product walkthroughs need the frame to support what the user is doing.
That's why teams often move beyond Photos or iMovie once volume increases. The issue isn't just capability. It's operational consistency.
Ultimate Precision with Final Cut Pro and FFmpeg
Some jobs need exactness that consumer tools won't provide. If the crop has to move over time, line up with motion, or be repeated across a large set of files, use tools designed for control rather than convenience.
Final Cut Pro for animated reframing
Final Cut Pro is the right choice when cropping becomes part of the edit itself. For example, you might need to start on a full application window, push into one settings panel, then shift attention to a confirmation area a few seconds later. That's no longer a simple export crop. That's an editorial move. The core approach is straightforward:
- Put the clip in the timeline.
- Use Transform to scale and reposition the image inside the frame.
- Add keyframes when the framing needs to change over time.
- Preview the movement at full size to check for cut-off text or awkward timing. This gives you precise control over motion and timing. It's especially useful for polished feature videos, launch edits, and tutorial sequences where the crop has to feel intentional rather than improvised.
FFmpeg for repeatable technical crops
FFmpeg is for users who want exact coordinates, automation, or batch processing. It doesn't give you a polished interface, but it gives you direct control.
The crop filter uses this pattern:
crop=w:h:x:y
That means:
- w is the cropped width
- h is the cropped height
- x is the horizontal starting point
- y is the vertical starting point
A simple command looks like this:
ffmpeg -i input.mp4 -vf "crop=1280:720:100:50" output.mp4That command crops the video to a 1280 by 720 region, starting 100 pixels from the left and 50 pixels from the top. For developers, technical marketers, or anyone handling repeated asset prep, this is often the cleanest way to standardize output.
| Use Final Cut Pro when | Use FFmpeg when |
| You need visual control and keyframes | You need repeatable exact crops |
| The crop is part of storytelling | The crop is part of automation |
| You're editing by eye | You're editing by coordinates |
The trade-off is simple. Final Cut Pro is better for nuanced visual judgment. FFmpeg is better for consistency at scale.
Preserve Quality and Choose the Right Aspect Ratio
Cropping solves framing problems, but it can also create quality problems. Every crop throws away image area. If you push too far, the viewer sees softness instead of focus.
Match the frame to the destination
Before you crop, decide what shape the clip needs to be.
- 16:9 works for standard widescreen demos, many landing pages, and general horizontal playback.
- 1:1 can work for feeds where square layouts still display cleanly.
- 9:16 is the right direction when the video is meant to fill a phone screen vertically.
- 4:5 is another useful compromise when you want more vertical presence without going fully tall.
The important part isn't memorizing ratios. It's matching the frame to the viewing behavior. If viewers will watch on mobile first, a wide desktop capture usually needs a stronger framing decision than a web embed does.
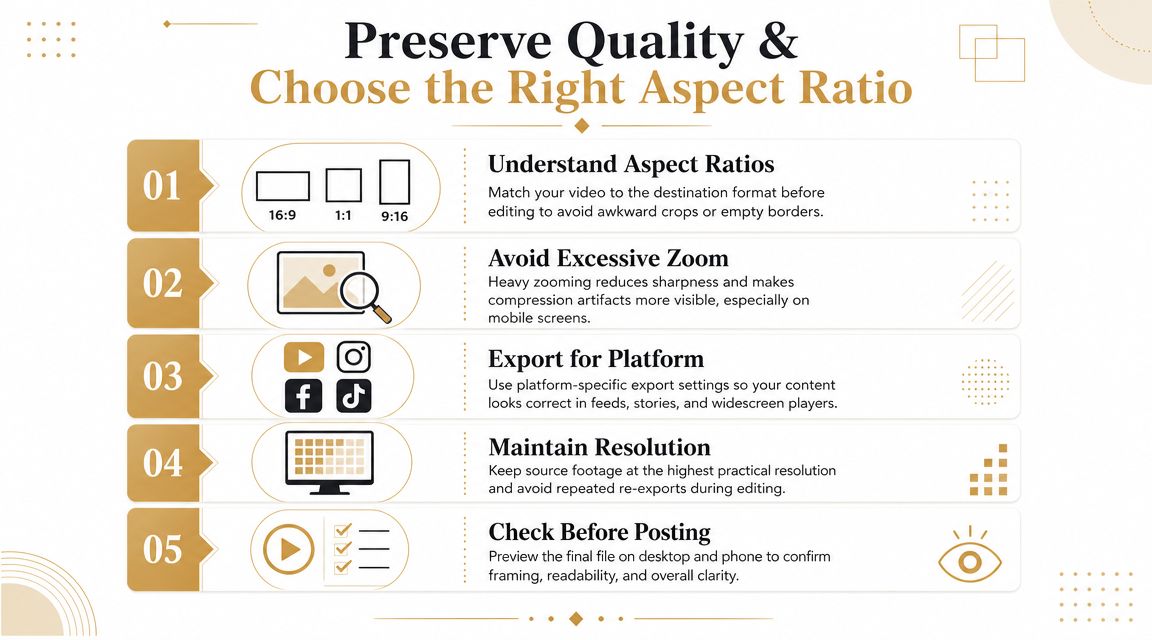
Protect clarity before you export
Cropping is effectively a zoom into the remaining pixels. Screen Charm warns that the more you crop, the more quality suffers because you're stretching a smaller portion of the original image to fill the frame. It also gives a concrete example where a heavy crop can reduce a source to 480x480, while MacMost's example in the earlier section showed a cropped export at 776x776, which makes the pixel budget change very visible in practice (Screen Charm on crop quality tradeoffs). That matters most in screen recordings. Text, icons, and cursors fall apart quickly when the crop gets aggressive. Use a few practical rules:
- Record with extra quality headroom: If you expect heavy reframing, start with the highest practical source quality available to you.
- Leave buffer space while recording: Don't park critical UI elements against the edges of the frame.
- Check readability, not just composition: A crop can look balanced and still make text too small.
- Export for the destination: If you're reducing file size after the crop, handle that separately and carefully. This guide on compressing video on Mac is useful when you need smaller files without careless quality loss.
A crop is successful when the viewer notices the product faster, not when the frame is merely tighter.
The best defense against quality loss is planning. Record for flexibility, then crop with restraint.
Frequently Asked Questions About Cropping Video
What is the difference between cropping trimming and resizing
Cropping changes the visible frame. You remove part of the image.Trimming changes duration. You remove time from the beginning or end.Resizing changes the output dimensions of the whole image. It doesn't necessarily remove any part of the frame. QuickTime Player is usually the trimming tool in this group. Photos is the built-in app that handles true crop-and-export work.
Can you crop on Mac without losing quality
You can minimize visible loss, but heavy cropping always reduces the image area you have to work with. The practical question is whether the result still looks sharp enough for the destination. For interface-heavy videos, small losses become obvious fast because text and cursor detail are unforgiving.
How should you handle vertical footage in a horizontal project
Decide whether the horizontal version should preserve the full vertical frame with background treatment, or whether you'll crop into the center action. If context matters, don't force a full-screen crop that cuts off important UI. If focus matters more, reframe tightly and accept that some original area won't survive. If your team records product videos on Mac regularly, Smooth Capture is worth considering when one source needs to become multiple clean outputs. It gives you a native macOS workflow for recording, reframing, editing, and exporting demos, tutorials, and social-ready cuts without bouncing between several separate tools.
Ready to create stunning app demos?
SmoothCapture makes it easy to record your screen with 3D device frames, cinematic cursor effects, and professional editing tools.