How to Change Cursor for Mac: A Complete Guide 2026
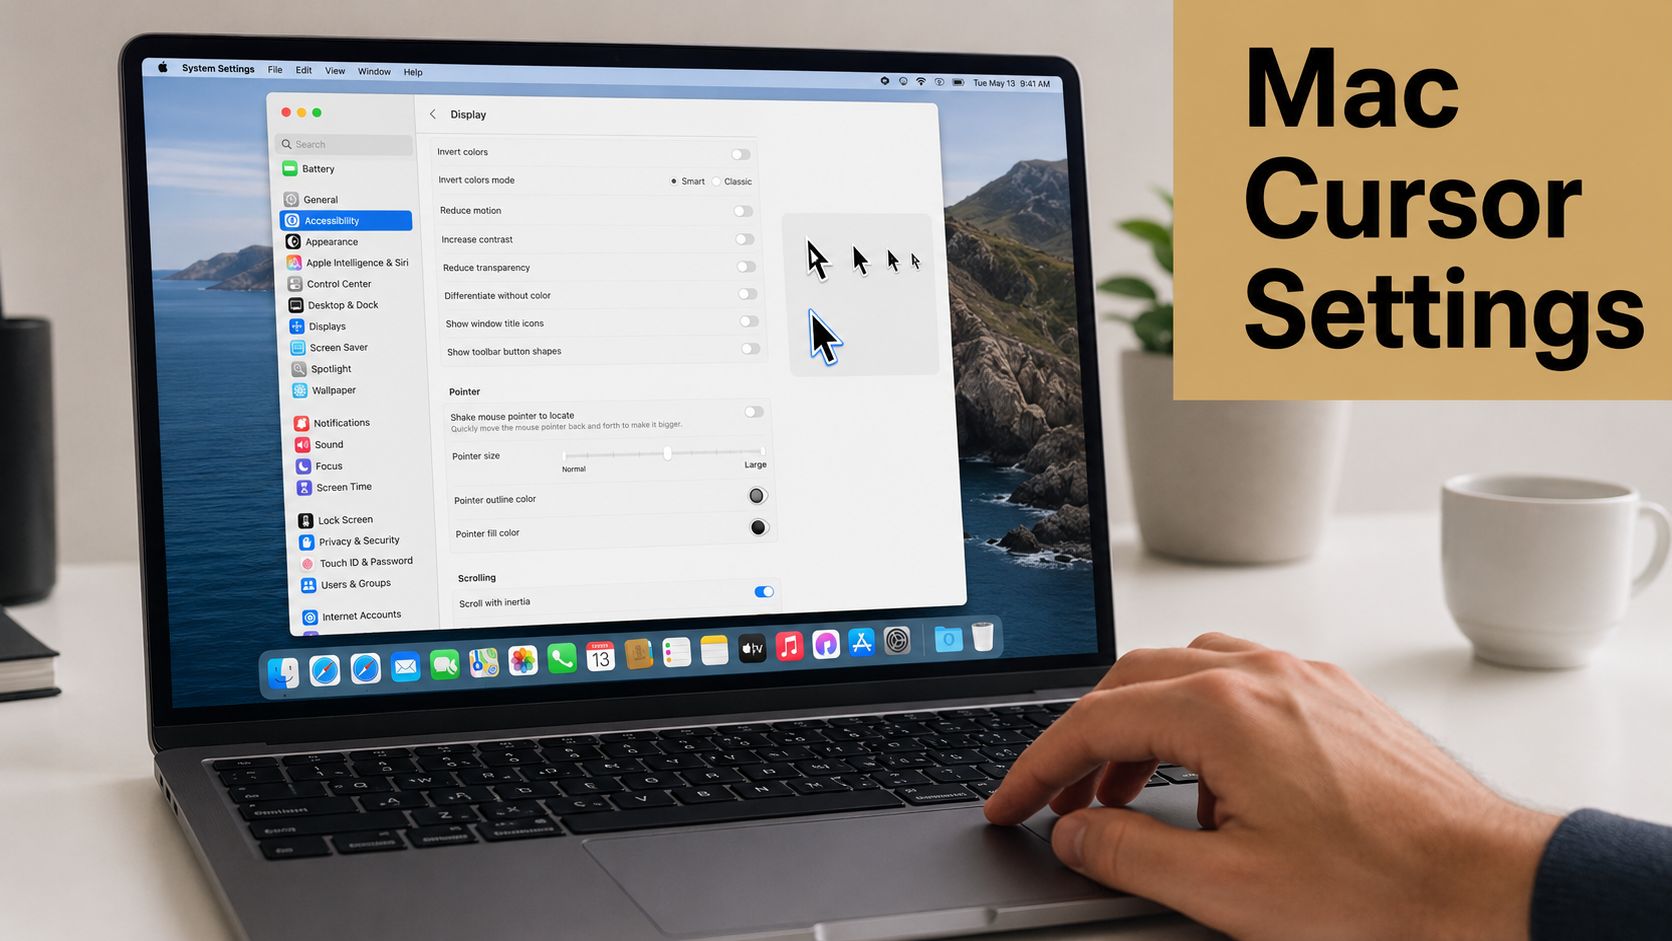
Quick answer: open System Settings > Accessibility > Display > Pointer. Drag Pointer size up until the cursor is easy to spot, then set Pointer outline color and Pointer fill color for contrast. The change applies instantly, and Reset Colors undoes it just as fast.
Here is exactly what those two settings do, animated:
System Settings > Accessibility > Display > Pointer — both changes preview live as you drag.
You’re probably here because one of two things keeps happening. You lose the Mac pointer on a bright display, or you record tutorials and realize your audience can’t follow where you clicked.
Both problems look small until they slow you down. A hard-to-see cursor adds friction all day, and in a screen recording it makes good teaching look sloppy. The good news is that macOS already gives you a solid starting point, and if you need more than that, there are workable paths beyond the built-in settings.
Table of Contents
- Why Change Your Mac Cursor
- The Easiest Method Using Built-in macOS Settings
- Full Customization with Third-Party Cursor Apps
- Advanced Tip Aligning Your Custom Cursor Hotspot
- Enhancing Cursors for Professional Screen Recordings
- Choosing the Right Cursor Method for Your Needs
Why Change Your Mac Cursor
If you want to change cursor for Mac, start with your primary reason for doing so. Users typically aren’t chasing novelty. They want visibility, less frustration, or a cursor that reads clearly in a presentation or recording.
On a large monitor, the default pointer can disappear against bright interfaces, busy dashboards, and design tools with pale canvases. In teaching and demo work, the problem shifts. You may be able to see the pointer just fine, but your viewers can’t track it quickly enough. That creates unnecessary confusion, especially when you’re moving between menus, sidebars, and tiny controls.
Apple’s own direction tells you this isn’t just a cosmetic tweak. Apple has moved pointer visibility controls into Accessibility, with options for Shake mouse pointer to locate, Pointer size, and pointer color settings in the native system interface, according to Apple’s pointer visibility documentation. That matters because it frames cursor visibility as part of everyday usability, not an obscure preference.
Practical rule: If you lose your cursor during work, your audience definitely loses it during a recording.
For daily use, a larger or higher-contrast pointer reduces hunting. For client demos and team training, it also makes your actions easier to follow. That’s one reason screen-recording workflows often start with cursor visibility before anything else, especially when you’re building a Mac screencast workflow for demos and tutorials.
There’s also a style layer. Some users want a branded look, a themed cursor, or animation. That’s possible, but it comes with trade-offs. The more dramatic the customization, the less you’re working with Apple’s stable path and the more you’re relying on third-party behavior.
A simple way to put it:
| Need | Cursor approach |
|---|---|
| You keep losing the pointer | Increase size or use higher contrast |
| You present live on Zoom or Meet | Make it bigger and easier to locate |
| You record product tutorials | Use visibility changes, then add recording-specific effects |
| You want custom art or animation | Use third-party cursor tools |
The Easiest Method Using Built-in macOS Settings
Generally, the built-in method is the right one. It’s fast, reversible, and doesn’t ask you to install anything that might break later.
Go to the right settings panel first
The correct path is System Settings > Accessibility > Display > Pointer. Apple documents that you can change pointer size, outline color, fill color, and enable Shake mouse pointer to locate in the native interface, as shown in Apple’s macOS pointer settings guide.
A common mistake is opening Pointer Control first. That sounds like the obvious place, but it isn’t where the visual cursor settings live.
If you want the shortest possible path:
- Open System Settings
- Click Accessibility
- Open Display
- Select Pointer
Make the pointer larger
The Pointer size slider is the first setting I recommend changing. It updates immediately, which makes it easy to stop when the cursor feels visible without looking oversized.
Bigger isn’t always better. On everyday office work, a moderately larger pointer usually gives the best balance between visibility and precision. If you push it too far, the cursor becomes easier to see but can feel visually heavy, especially in design apps or spreadsheets where you’re targeting small elements.
Use this rule of thumb:
- For laptop screens: a modest increase is usually enough
- For large external displays: go larger than you think
- For recording tutorials: bias toward visibility over subtlety
Change pointer colors for contrast
The color controls are more useful than many Mac users realize. You can set Pointer outline color and Pointer fill color separately, then use Reset Colors if you want to return to the default white outline and black fill.
You can solve a very specific problem. If your cursor keeps disappearing on bright white apps, a stronger outline can help. If you work in darker interfaces, changing the fill can make the pointer stand out without making it huge.
A few practical combinations work well:
- High contrast for light backgrounds: darker fill, stronger outline
- Better visibility on dark apps: lighter fill with a distinct edge
- Mixed workflow setup: choose contrast over style
Don’t overdesign the system cursor. The goal is to spot it instantly, not admire it.
If you want a quick visual walkthrough before changing anything, this demo helps:
Use shake to find when the cursor disappears
The Shake mouse pointer to locate option is worth enabling even if you don’t change anything else. When you move the mouse quickly, macOS temporarily enlarges the pointer so you can find it fast.
That feature is especially useful on multi-monitor setups, high-resolution displays, and screen-sharing sessions where your attention is split between talking and navigating. It’s one of those settings that feels minor until you use it for a week and don’t want to turn it off.
Built-in settings are the safest answer if your goal is simple: make the cursor easier to see and leave the rest of the system alone.
Full Customization with Third-Party Cursor Apps
Built-in macOS settings handle visibility. They don’t fully replace pointer artwork, add animation, or give you a branded cursor theme. If that’s what you want, you’re in third-party territory.
What third-party tools add
Apps like Mousecape open up a different category of customization. Instead of changing size and color, you can swap the cursor graphic itself, create themed pointer sets, and even work with animated cursors.
A 2026 tutorial demonstrates that Mousecape can import cursor frames, use 10 frames, and adjust frame duration to control animation speed in ways that go far beyond Apple’s built-in controls, as shown in this Mousecape animation walkthrough.
That matters for a few specific use cases:
- Personal theming: you want the cursor to match a desktop style
- Brand-led content: you want a pointer that feels closer to your product visuals
- Creative demos: you want motion or novelty that the system cursor can’t provide
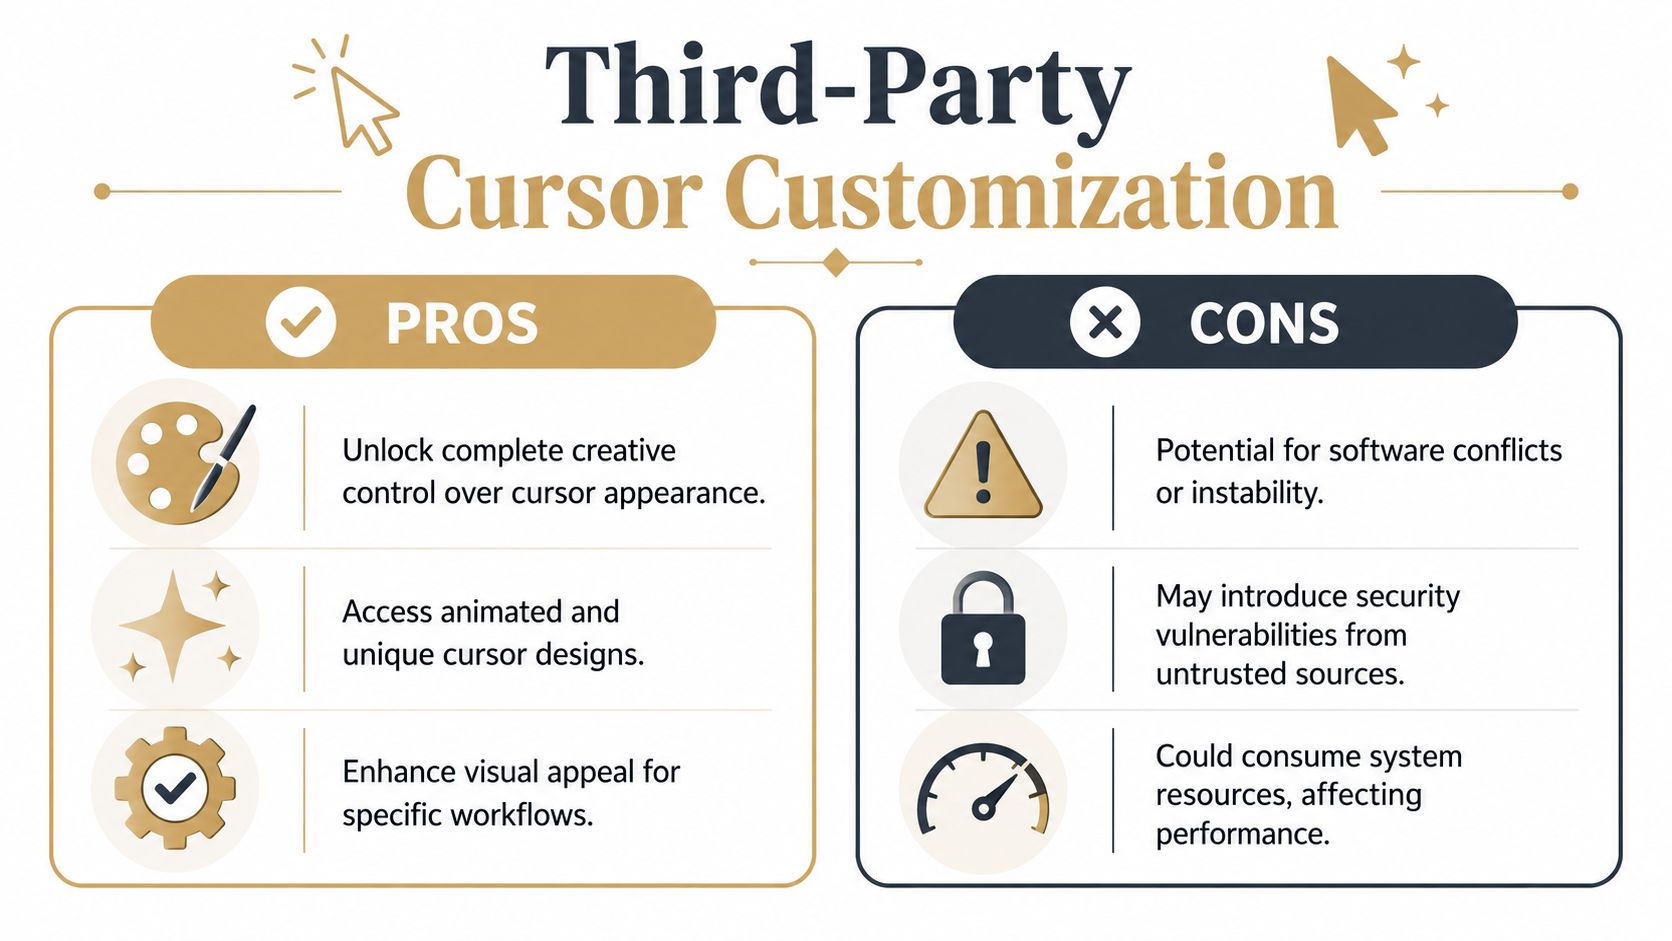
What you give up
The trade-off is stability and simplicity. Apple documents how to make the pointer easier to see, but Apple does not document a built-in method for fully replacing pointer artwork. That means third-party customization sits outside the standard system path.
In practice, that creates friction:
| Built-in macOS controls | Third-party cursor apps |
|---|---|
| Native and easy to reverse | More setup and testing |
| Stable for everyday use | Can require extra permissions |
| Good for size and contrast | Good for custom art and animation |
| Works well for accessibility | Better for styling and visual experimentation |
Another issue is workflow reliability. If you’re already searching for a Mac screen recording app that handles polished demos, it’s worth asking whether you need a system-level cursor replacement at all, or whether a recording-focused tool solves the actual problem more cleanly.
When this route makes sense
Third-party cursor apps make sense when the visual identity of the cursor matters more than native simplicity. That can be true for themed desktops, novelty setups, or highly customized presentations.
They make less sense when you need predictable behavior every day. If you’re onboarding a team, recording product walkthroughs on a deadline, or moving between macOS versions often, deep system cursor mods can become one more thing to troubleshoot.
A custom cursor can look great in a screenshot and still feel wrong in actual use.
That’s the line to remember. The more visual flair you add, the more carefully you need to test the cursor in real work. Animation speed, pointer shape, click targeting, and app compatibility all matter more than the preview makes it seem.
Advanced Tip Aligning Your Custom Cursor Hotspot
Most custom cursor problems aren’t design problems. They’re hotspot problems.
If you change cursor for Mac with a third-party editor and the pointer suddenly feels inaccurate, the hotspot is usually the reason. The hotspot is the exact point macOS treats as the click location. On a normal arrow cursor, that point is at the tip. If the hotspot sits even slightly away from that tip, every click feels off.
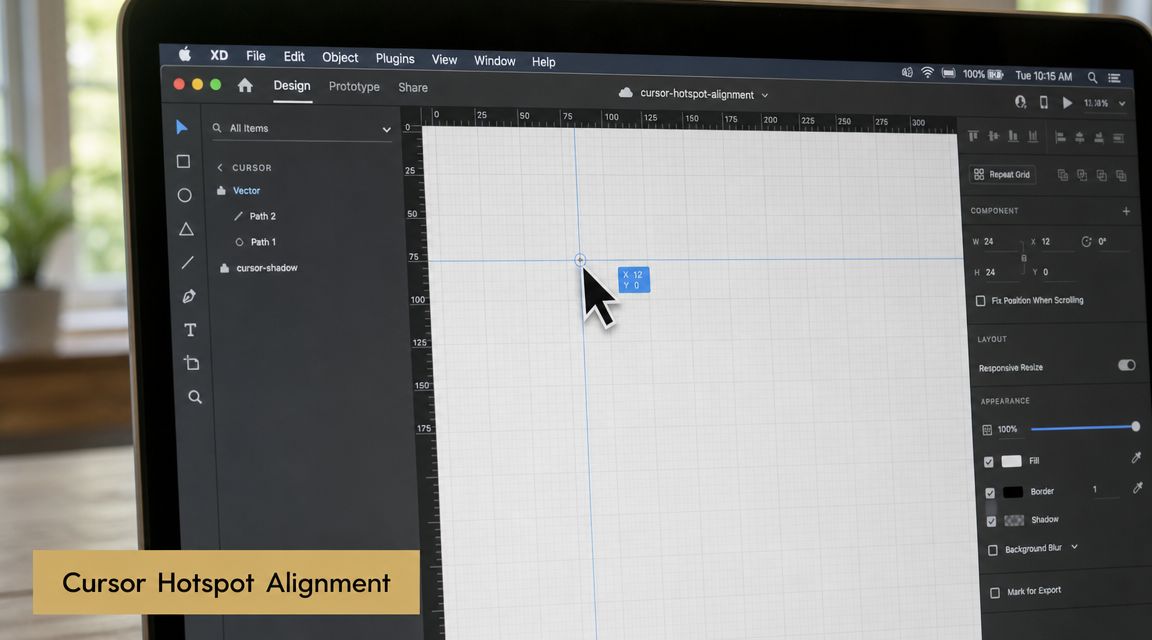
What the hotspot actually does
In tools like Mousecape, you don’t just import cursor art and save it. You also need to place the hotspot marker correctly. Tutorial guidance for Mousecape explicitly shows moving the small red dot to the cursor tip before saving, because even a small offset can make click targeting feel unreliable, according to this Mousecape hotspot setup walkthrough.
This matters more than beginners expect. A custom pointer can look perfectly sharp and still behave badly because the click point is wrong.
Typical signs of a bad hotspot:
- Buttons feel harder to hit: you click where the tip appears to be, but the registered click lands elsewhere
- Menus feel fussy: opening and selecting menu items takes extra care
- Screen recordings look sloppy: the pointer seems to hesitate or miss obvious targets
How to align it correctly
A simple workflow works well:
- Import the custom cursor graphic.
- Add the appropriate cursor type, usually the standard arrow or unknown/arrow type.
- Place the artwork in the correct resolution slot.
- Move the hotspot marker so it sits exactly on the visible click point, usually the arrow tip.
- Save and apply the cursor.
- Test it before treating it as finished.
The most common mistake is eyeballing the hotspot too casually. That’s fine for decorative cursors you rarely use. It isn’t fine if you spend hours in the interface or record software tutorials where viewers track your pointer closely.
If the cursor misses tiny controls in Finder or System Settings, it’s not ready for production work.
How to test before you keep it
Don’t test a custom cursor by waving it around the desktop. Test it on small targets.
Use a quick checklist:
- Finder sidebar items: see whether selection feels natural
- Toolbar buttons: hover and click small controls
- Menus: open and target short menu items cleanly
- Checkboxes and toggles: these reveal hotspot drift fast
For recording work, test inside the app you’ll demonstrate. A cursor that seems acceptable on the desktop can feel much worse inside dense interfaces like analytics tools, design platforms, or app settings panes.
If the hotspot stays inaccurate after repeated adjustment, the artwork itself may be the problem. Some pointer designs look stylish but don’t provide a visually obvious tip. In that case, the cursor is fighting usability from the start.
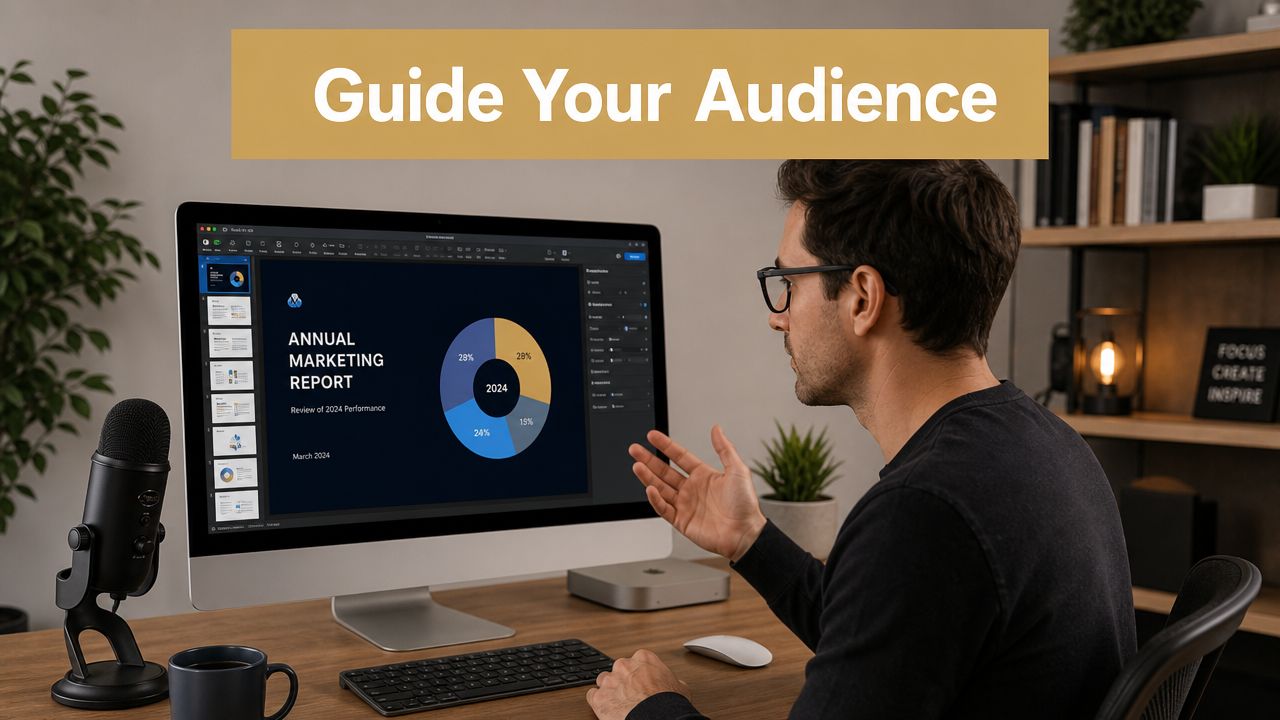
Enhancing Cursors for Professional Screen Recordings
A visible cursor is enough for personal use. It usually isn’t enough for polished tutorial video.
When people watch a product demo, they aren’t looking at the cursor the way you do. They’re processing your voice, the interface, and the action at the same time. That means a larger pointer helps, but it still may not clearly communicate every click, drag, or area of focus.
Why system cursor changes fall short on video
System settings only change the pointer itself. They don’t explain your actions to the viewer.
That’s the gap many tutorial creators run into. The pointer is larger, maybe higher contrast, but the audience still misses what happened. They don’t notice a click, they lose track of fast movement, or they can’t tell what part of the screen matters right now.
There’s also a reliability issue with full cursor replacement. Tutorials often use Mousecape-style hacks, but these can be unreliable and may require re-authorization after macOS updates, which makes system-level cursor mods a risky choice for recording workflows, as noted in this video discussion of third-party cursor reliability.
What recording apps can do that macOS cannot
For video work, app-level cursor effects are usually the cleaner solution. Instead of modifying the system cursor extensively, the recording app renders visual guidance into the recording workflow itself.
That can include:
- Click ripples: viewers can see exactly when a click happened
- Cursor highlights: the pointer stands out without needing extreme system colors
- Magnifying lens effects: important areas get visual emphasis
- Smooth cursor interpolation: fast or slightly jerky mouse movement reads more cleanly on playback
A recording tool can solve the communication problem rather than just the visibility problem. One option is Smooth Capture cursor and click recording on macOS, which adds cursor effects, click ripples, magnifying lenses, and smooth cursor interpolation as part of the screen-recording workflow rather than through system-level pointer replacement.
A practical setup for tutorials and demos
For teams making onboarding videos, feature announcements, or customer education content, this layered approach works well:
| Goal | Recommended approach |
|---|---|
| Everyday visibility on your Mac | Use native Accessibility pointer settings |
| Branded or novelty cursor styling | Use a third-party cursor editor carefully |
| Clear instructional video | Keep the system cursor stable and add recording-level effects |
That distinction matters in production. A custom animated pointer may look fun, but if it introduces permission prompts, breaks after an update, or distracts from the interface, it costs more time than it saves. By contrast, a stable system cursor plus recording-specific overlays tends to be easier to repeat across multiple videos.
I’ve found that viewers respond best when the cursor communicates intent without drawing too much attention to itself. A clean pointer, visible clicks, and smooth motion are easier to watch than a heavily stylized cursor that steals focus from the product.
For launch videos and tutorials, polish usually comes from clarity, not novelty.
Choosing the Right Cursor Method for Your Needs
The right way to change cursor for Mac depends on what problem you’re solving.
If you just want to stop losing the pointer, use the built-in macOS settings. They’re the lowest-friction option, they’re easy to reverse, and they handle the most common visibility issues without extra software.
If you want the cursor itself to look different, third-party tools are the path. That’s where themed artwork and animation live. Just go in knowing that visual freedom comes with more setup, more testing, and more chances for breakage.
If you record tutorials, onboarding videos, or product demos, treat cursor customization and video clarity as separate jobs. Use macOS settings for baseline visibility, then use recording-specific effects when you need clicks, focus, and motion to read clearly on playback.
A simple decision framework looks like this:
- Choose built-in settings if you care about visibility and stability
- Choose third-party cursor apps if you care about appearance and don’t mind maintenance
- Choose recording-level cursor effects if your real goal is better video communication
The same logic applies to desktop visuals more broadly. If you also like tailoring the rest of your Mac workspace, this guide to live wallpapers for Mac desktop is a useful companion read.
If you create demos, tutorials, or launch videos on macOS, Smooth Capture is worth a look. It’s a native Mac screen recording and editing app that includes cursor effects, click ripples, magnifying lenses, smooth cursor interpolation, timeline editing, device frames, and export options geared toward repeatable video workflows.
Ready to create stunning app demos?
SmoothCapture makes it easy to record your screen with 3D device frames, cinematic cursor effects, and professional editing tools.