Mac Screen Cast: A Pro Guide to Polished Videos (2026)
You’re probably in one of two situations right now. You need a Mac screen cast for a launch, onboarding flow, support article, or App Store preview, and the basic recording part was easy. The hard part is making it look deliberate. That gap is where many lose time. They capture the screen, then spend too long fixing bad audio, trimming hesitation, hiding accidental notifications, and rebuilding clarity with zooms, captions, and overlays. A professional Mac screen cast isn’t just a recording. It’s a workflow that protects quality before you hit record and keeps the edit fast afterward.
Foundations for a Flawless Mac Screen Cast
The fastest way to ruin a strong take is to trust your setup too much. Teams often catch the obvious visual issues, but they miss the subtle ones: room echo, Slack pings, a cluttered desktop, or a cursor that moves like you’re in a hurry. Once those problems are baked into the source recording, the edit gets slower and the result still looks compromised.
The biggest mistake is treating audio as secondary. It isn’t.
Audio is the first quality gate
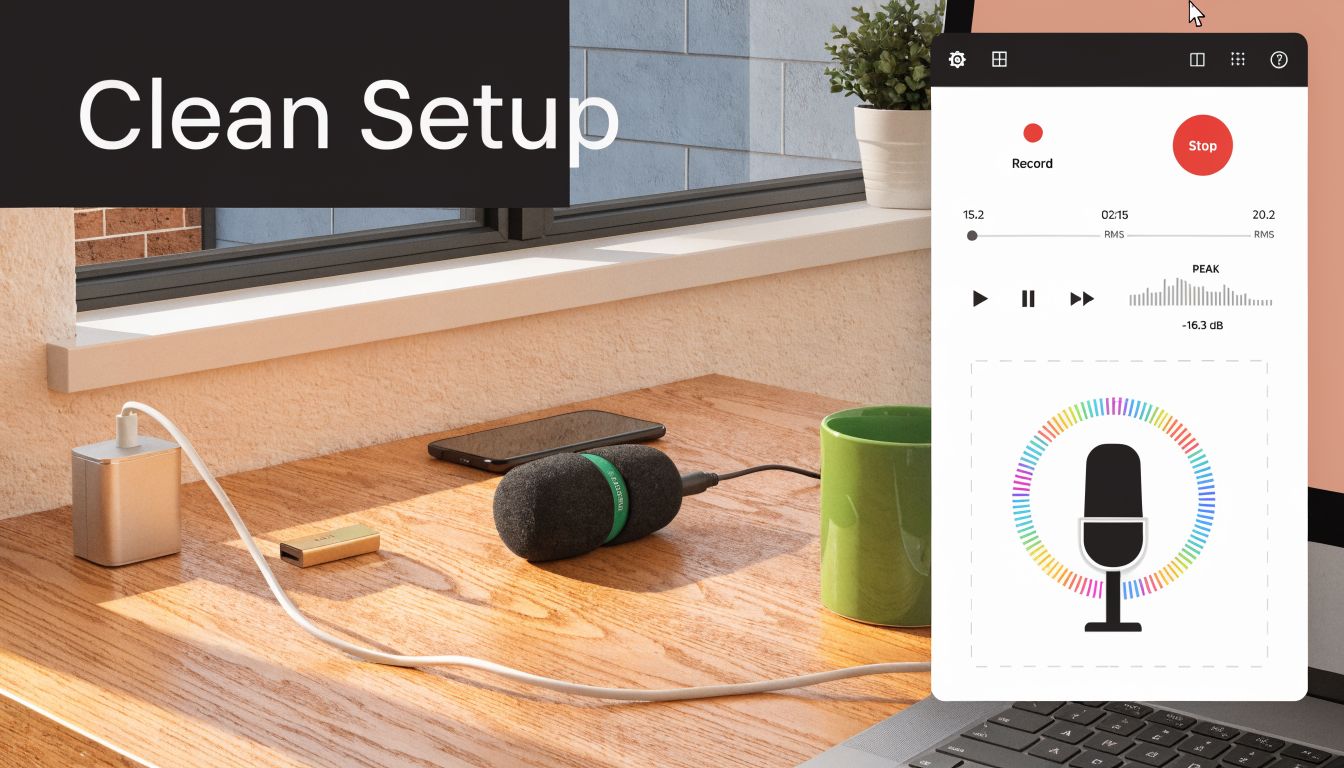
Built-in Mac microphones are convenient, but they’re a poor choice for business video. ScreenCharm’s guide to screencasting on Mac puts it plainly: integrated mics are “notorious for picking up every keyboard click, your computer's fan noise, and all the echo in the room.” It also notes that even if the video looks sharp, bad audio makes viewers stop watching. That matches what happens in production. You can forgive a tiny visual imperfection. You can’t hide thin, noisy, hollow audio for long.
Practical rule: If you’re choosing between upgrading your visuals or buying a decent external mic, choose the mic first.
A solid pre-record setup usually includes:
- An external microphone: USB is fine if you want simple setup and consistency across teammates.
- Input selection check: Confirm the recording app is using the correct mic, not the MacBook default.
- Basic monitoring: Do a short test clip and listen back through headphones.
- Distance control: Keep the mic close enough for a full voice tone, but out of frame if you’re using a webcam overlay.
Build a pre-flight checklist
The cleanest Mac screen cast workflows rely on a repeatable checklist, not memory. That matters even more when multiple people on a team are recording demos. Use a short checklist before every session:
- Turn on Do Not Disturb: Notifications are the easiest way to wreck an otherwise polished take.
- Clean the desktop: Remove random files, screenshots, and anything that looks temporary.
- Close extra apps: Menu bar clutter and accidental app switching make the recording feel messy.
- Prepare the path: Know the exact clicks, inputs, and screens you’ll show.
- Write a lean outline: Don’t improvise the whole thing. A bullet outline keeps pacing tight without sounding robotic.
- Check permissions: Screen recording, microphone, Accessibility, and Input Monitoring permissions can interrupt a session if they aren’t handled first. A script doesn’t need to be verbose. For most demos, a spoken outline plus a click path is enough. What matters is that you know where the viewer’s attention should go and you don’t search for features live on camera.
Clean source footage saves more time than any editing trick. The goal isn’t perfection. It’s removing predictable mistakes before they happen.
Mastering the Recording Process on Mac
A polished Mac screen cast usually goes wrong in the first 30 seconds. The cursor hesitates. The wrong window comes forward. Text looks smaller than it did during prep. By the time you notice, you already have a take you cannot really use.
Recording well on macOS starts with framing the story correctly before you hit record.
Choose the capture mode based on the message
The capture area controls how professional the final video feels. Full-screen recording gives viewers the surrounding context. Use it when the workflow crosses apps, browser tabs, system settings, or menu bar actions. It feels realistic, which is useful for onboarding and support content, but it also exposes every distraction on your desktop. Window-only capture is better for product marketing demos and internal training clips where the application should hold attention. It creates a cleaner frame, makes zooms easier later, and usually adapts better to repurposed cuts for social, sales, and help center use. Custom-region capture works best for one high-value interaction, such as a settings drawer, data table, or modal. It can look more deliberate than full-screen recording, but only if the crop leaves enough breathing room. Tight crops save space and hurt clarity fast. Use this decision framework:
| Recording mode | Best use | Trade-off |
| Full screen | Cross-app walkthroughs, settings flows, realistic environment | More visual noise |
| Window only | Product demos, training clips, app-first storytelling | Less environmental context |
| Custom region | Feature detail, small UI targets, focused tutorials | Easy to over-crop |
If you need a refresher on native tools and setup options, this guide to recording screen on Mac covers the basics.
Use mirroring to review framing before the real take
Screen casts for business use are rarely a one-person asset. Product marketing, customer education, sales engineering, and design often need to review the same workflow before the final export. Native display mirroring is useful for that review pass. Put the draft flow on a larger display or conference room screen and weak spots show up immediately. Tiny text becomes obvious. Cursor travel looks longer than it felt on your laptop. Transitional moments that seemed clear during rehearsal suddenly feel slow. That review step saves time because it catches problems before editing. It is much faster to adjust the capture area, zoom level, or click path before recording than to try to repair a hard-to-read take later. Use mirroring for:
- Client review sessions: Validate legibility and pacing before you record approval-ready takes.
- Internal sign-off: Let product, design, and marketing react to the same framing in real time.
- Training rehearsals: Test whether the workflow reads clearly on a larger screen before turning it into an async asset. A quick visual walkthrough helps if you want to compare approaches and controls in motion.
Record mobile flows through your Mac
Cross-device demos fall apart when the Mac segment and phone segment feel like separate stories. If your product moves from desktop to iPhone or iPad, record the actual handoff whenever possible. Connecting the mobile device to your Mac and capturing the actual sequence produces a more credible demo for onboarding, companion apps, QR flows, authentication steps, and settings changes. It also makes downstream editing cleaner because the viewer sees one continuous task instead of an obvious patchwork of clips.
Record the real handoff when the transition matters. Viewers notice when a "cross-device" workflow is only implied in the edit.
Frame rate deserves the same practical thinking. Fast interface animation, scrolling, and pointer-heavy interactions usually benefit from smoother capture. Straightforward walkthroughs often do not. Choose the setting that keeps motion readable and file sizes manageable, especially if your team needs repeatable export presets for reviews, revisions, and final delivery.
Editing Essentials for a Professional Narrative
Raw footage is not a finished demo. It’s material. Most weak screen videos fail for the same reason. They preserve the order of recording instead of shaping the order of understanding. That’s why the first pass in the timeline should focus on sequence and pacing, not effects.
Edit for sequence not chronology
A real recording includes hesitation, menu hunting, accidental pauses, and throwaway narration. Keep any of that in the final cut and the video starts to feel unprepared. The fastest cleanup pass looks like this:
- Trim the open and close: Remove the dead air before the action starts and after it ends.
- Split the middle aggressively: Cut filler words, repeated phrases, wrong clicks, and moments where nothing useful happens.
- Reorder clips for clarity: If the cleanest explanation comes from different takes, move them into the order that teaches best. That last point matters. A professional edit isn’t obligated to follow the exact timeline of the original recording. It should follow the viewer’s mental model. A common example is feature setup. In real life, you might check settings, backtrack, open another panel, then return. In the final video, viewers should see the shortest path that makes the feature understandable.
Use zoom and pan with discipline
Zooms and pans help when the interface has small targets or the final delivery format compresses the frame. They hurt when they feel disconnected from the user’s action. Smashing Magazine’s screencasting guidance gets the core issue right: “while zoomed in on a detail, the audience can't see everything outside the cutout area.” It also recommends moving the camera with the mouse pointer so the pan feels natural. That’s one of the clearest markers of a polished screen edit.
If the cursor moves first and the camera follows with intention, the motion feels guided. If the camera jumps independently, the viewer has to reorient.
Use this as a practical rule set:
- Zoom only when the viewer would otherwise squint.
- Pan with the cursor, not ahead of it.
- Return to a wider view after the detail moment passes.
- Avoid constant micro-zooming. It makes the edit feel nervous. When a team ignores these rules, they usually end up re-recording or over-editing because the first cut feels strangely hard to follow.
Treat audio as a separate layer
Screen video editing gets easier when you stop thinking in terms of one clip and start thinking in layers. Voiceover, system sound, music, and click emphasis each do different jobs. They shouldn’t fight for the same space. A reliable audio workflow includes:
| Audio layer | Job in the edit | Common mistake |
| Voiceover | Carries the explanation | Too quiet against music or system sounds |
| System audio | Adds realism and interface feedback | Left too loud during narration |
| Music bed | Adds pace and polish | Used continuously at distracting levels |
Keyframes matter here. You don’t need elaborate sound design, but you do need level changes that feel intentional. Lower the music under explanation, fade it up in transitions, and keep system sounds only when they reinforce the action on screen. Teams that ship weekly demos usually win by keeping the edit simple. Tight cuts, clean audio balance, and a well-timed zoom will outperform a complex timeline that still feels messy.
Applying Cinematic Effects and Overlays
Polish has a job. It should make the product easier to understand and the video feel more deliberate. If an effect only announces itself, it’s probably the wrong effect.
The strongest Mac screen cast edits use motion and overlays to direct attention. They don’t decorate the frame just because the tool allows it.
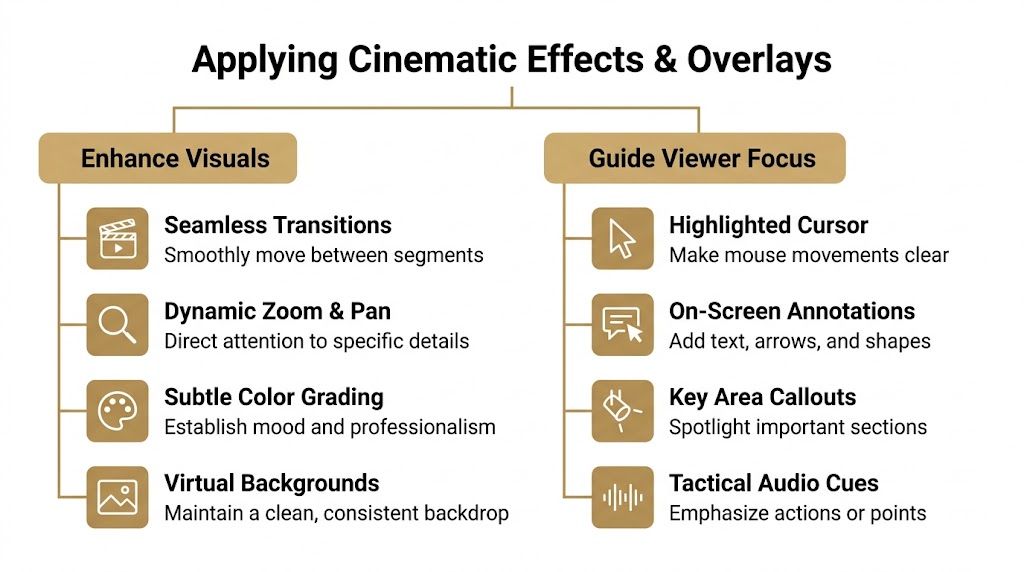
What actually improves clarity
Start with cursor treatment. Raw cursor motion often looks twitchy in recordings, especially when the presenter knows the interface too well and moves faster than a first-time viewer can follow. Smoothing that movement improves perceived control immediately. Click indicators also help, but only when they’re restrained. A subtle ripple or highlight gives the eye a confirmation point. Loud click effects, oversized bursts, or constant animation make the video feel synthetic. Keystroke overlays are one of the few additions that save work both during recording and in post. This KeyCastr walkthrough supports a practical point many Mac creators already know: tools like KeyCastr fill a native macOS gap by showing keystrokes on screen, and they can reduce tutorial post-production by 30 to 50% because the interaction context is embedded directly in the recording. That matters most when your demo relies on shortcuts, command palettes, or repeated keyboard input. Without a keystroke visualizer, you end up adding text callouts later to explain actions that should have been obvious in the source footage.
Where teams waste time with polish
Manual zoom keyframing is a common time sink. It can look excellent, but only when someone applies it carefully. In high-volume workflows, automatic zoom tied to focus points usually makes more sense because it handles the repetitive work while keeping attention on the active area. Another area where teams overwork the edit is webcam compositing. A talking head can add trust and pace, especially for onboarding, founder updates, and customer education. But it needs rules:
- Keep placement consistent: Don’t let the webcam jump corners across scenes without a reason.
- Use a clean background treatment: A gradient, image, or simplified replacement is better than a distracting room.
- Respect the product UI: If the webcam covers navigation or key metrics, it hurts more than it helps. For editors who need product-style presentation treatments, device frame screen recording techniques are useful when the goal is to present Mac, iPhone, or iPad footage in a cleaner, branded layout rather than as a raw desktop capture.
Use overlays to add context not decoration
Overlays work best when they answer a viewer question the product alone doesn’t answer fast enough. Use them for:
- Short labels: Name a feature, state a step, or confirm an outcome.
- Callouts and arrows: Direct the eye to a small target.
- Magnification: Enlarge detail where text would otherwise shrink too much.
- Device frames or perspective treatments: Add context when the recording appears in a promo, App Store asset, or launch page. Smooth Capture is one option in this category. It combines screen recording with timeline editing, cursor effects, automatic zoom, webcam overlays, on-device subtitles, and device frames in a native macOS workflow. That kind of all-in-one setup is useful when a team wants fewer handoffs between separate tools.
A polished look comes from consistency. Same cursor treatment, same zoom behavior, same overlay style, same framing logic.
That consistency matters more than having a long list of effects. One restrained visual language beats a stack of flashy edits every time.
Final Steps: Captions, Exports, and Team Collaboration
A finished edit still isn’t ready to publish until it’s legible without sound, exported for the right destination, and repeatable across the team. In this state, a lot of otherwise strong videos lose quality.
Captions should be part of the default workflow
Captions improve more than accessibility. They help viewers follow along in offices, on trains, in open-plan homes, and in every context where autoplay starts muted or the environment is noisy. For business video, that changes how the content performs in real use. Captions also force clarity. If the transcript reads as rambling, the narration probably sounds rambling too. Good subtitle workflows share a few traits:
- They’re generated early: Add captions before final export so you can spot terminology issues.
- They stay on brand: Font, size, line length, and positioning should remain consistent.
- They don’t cover the UI: Move subtitles if the product’s key actions happen in the lower third.
Export presets remove last-minute mistakes
Teams waste time when every editor chooses export settings from scratch. Presets solve that. They also reduce the chance that a strong Mac screen cast gets uploaded with the wrong aspect ratio, fuzzy scaling, or platform-inappropriate dimensions. Here’s a practical baseline.
| Platform | Resolution | Frame Rate (FPS) | Aspect Ratio | Notes |
| App Store preview | Match the required device presentation | Use the source frame rate consistently | Device-dependent | Keep framing tight and text readable |
| Optimize for feed readability | Match capture unless motion needs a smoother look | Horizontal or vertical depending on placement | Prioritize subtitles and larger UI detail | |
| X | Keep files lightweight and clear | Match the delivery need | Horizontal, square, or vertical depending on post format | Strong opening seconds matter |
| Internal training library | Favor readability over compression | Use the frame rate that preserves cursor clarity | Usually horizontal | Consistency matters more than stylization |
If you’re preparing marketplace assets, this App Store preview video guide is a useful reference for aligning exports to stricter submission requirements.
Shared standards make teams faster
The mature workflow isn’t “everyone uses the same app.” It’s “everyone uses the same standards.” That means shared presets for:
- Exports
- Caption styling
- Cursor effects
- Zoom behavior
- Webcam placement
- Background treatments
- Intro and outro conventions A product marketing team, support team, and customer education team can all use different source material while still producing videos that feel like one brand made them. That’s what scales.
Publish fewer one-off masterpieces. Build a system that lets the whole team ship polished videos without reinventing the process each week.
Troubleshooting Common Mac Screen Cast Issues
You finish a clean product demo, hit playback, and notice the browser tabs are cut off or the UI looks soft on the external display. That is the kind of failure that wastes an hour, because the recording was technically successful but not usable for a customer-facing video.
The TV edge problem is still real
Mac mirroring can still mis-handle screen fit on older TVs and some non-Apple displays. The result is overscan or underscan. Parts of the interface disappear off the edge, or black bars frame the image. Apple documents the issue and points users to TV-side display controls in this Apple support article about display fit issues. For casual viewing, that workaround may be fine. For demo production, it is not. If navigation, buttons, or footer actions are clipped, the video looks careless and the viewer assumes the product is messy too. Start with the display, not the recording app. Use these fixes first:
- Check the TV’s aspect setting: Look for labels such as Just Scan, Screen Fit, Original, or 1:1.
- Try a different Mac scaling mode: A small change in resolution scaling can remove edge clipping.
- Avoid TV mirroring for final takes: If framing matters, record from a direct monitor connection instead of a living-room display path.
Blurry casting ruins sharp UI work
Soft text is one of the fastest ways to make a polished product look cheap. It shows up often on Full HD and 1440p displays, where sharpness loss during casting or mirroring is a common complaint. Treat blur as a capture-path problem. Editing will not rescue fuzzy text or a muddy cursor outline. If the interface does not look crisp before you record, it will look worse after export, compression, and upload. The fixes are usually practical:
- Prefer direct screen capture over mirrored TV output
- Test display scaling before the main take
- Use display utilities if you need cleaner HiDPI-style output on a non-4K monitor
- Record a 10-second sample and review it at 100% size before doing the full session This matters even more on teams. One person records on a Retina MacBook panel, another records through a soft external monitor, and the final video library starts to feel inconsistent. Good troubleshooting protects brand quality, not just technical quality. Smooth Capture helps teams turn a Mac screen cast into a repeatable production workflow instead of a patchwork of separate tools. If you need one native macOS app for recording, editing, cursor effects, zooms, subtitles, device frames, and export presets, take a look at Smooth Capture.
Ready to create stunning app demos?
SmoothCapture makes it easy to record your screen with 3D device frames, cinematic cursor effects, and professional editing tools.