How to Use iPhone as Microphone for Computer: 2026 Guide
You've probably heard this happen on your own recordings. The screen capture looks clean, the cursor moves exactly where it should, and then your voice comes in sounding like it's trapped inside a metal box. That's the built-in computer mic problem. It's usually acceptable for a quick internal call, but it falls apart fast when you need clear, close, believable voice audio.
The good news is that the fix may already be sitting in your pocket. If you want to use iPhone as microphone for computer, the workflow is no longer a hack reserved for forum tinkerers. On Mac, Apple now supports it natively. On Windows, a few mature apps make it practical. The question isn't “can it work?” It's “which method fits the job you're trying to do?”
Table of Contents
- Why Your Computer's Mic Is Holding You Back
- The Easiest Method for Mac Users with Continuity Camera
- Top App-Based Solutions for Windows PCs
- A Quick Comparison of Connection Methods
- Optimizing Audio Quality and Reducing Latency
- How to Select Your iPhone Mic in Popular Apps
Why Your Computer's Mic Is Holding You Back
Laptop mics fail in a very specific way. They don't just sound “bad.” They sound far away, they pull in room reflections, and they hear keyboard noise, fan noise, and desk bumps as if those sounds matter as much as your voice.
That's why so many recordings feel cheap even when the visuals look polished. A product walkthrough can look premium and still lose trust because the narrator sounds thin and echoey. The same thing happens on client calls. People may not say it out loud, but they notice when your audio feels weak.
Using an iPhone instead makes sense because the phone is built to capture speech clearly at close range. It's also not a new idea. The concept goes back to at least 2010, when people used Apple's bundled earphones and the headphone jack as a budget workaround. Interest grew fast at the time, with searches for “iPhone mic PC” rising 300% from 2009 to 2012 according to the historical reference tied to this early tutorial on using an iPhone mic with a computer.
Why this still matters
The old wired trick existed because people needed a better voice option without buying a dedicated microphone first. That same logic still applies now. If you already own an iPhone, it's often the fastest upgrade available.
If you don't have a recent model handy, a used one can still be a smart dedicated recording device. This roundup of best refurbished iPhones is useful if you want a spare phone just for audio or camera duties.
Practical rule: If the recording matters, stop using the microphone that's furthest from your mouth.
There's another reason to care about input quality. A lot of “no audio” problems in recordings aren't really missing audio. They're input-selection mistakes, muted tracks, or the wrong mic being active. If that sounds familiar, this guide on screen recordings with no audio is worth checking before you blame the app.
The Easiest Method for Mac Users with Continuity Camera
For Mac users, the cleanest answer is built into Apple's ecosystem. Continuity Camera lets the iPhone appear as a microphone source on a Mac without the usual third-party friction.
Apple formalized this in macOS Ventura. According to the cited overview, Continuity Camera has been adopted by 68% of eligible users, and poor built-in mics remain a top complaint for 45% of video podcasters, which helps explain the demand for this feature in the first place, as discussed in this piece on using an iPhone as a wireless microphone on Mac.
What makes this the default choice on Mac
It removes almost all of the ugly parts of setup. You don't need to install a virtual audio driver. You don't need to route audio through a helper app. You don't need to explain to your recording software what exotic device you've created.
If your Mac and iPhone are on the same iCloud account with Wi-Fi and Bluetooth enabled, the iPhone can show up directly as an input device in macOS. For meeting-heavy users, that's the easiest route by far. For creators, it's also good enough for serious voice recording if your network is stable and your room isn't noisy.
How to turn it on
The process is short:
Check compatibility. Your Mac needs macOS Ventura or later, and your iPhone needs iOS 16 or later.
Sign into the same iCloud account on both devices.
Turn on Wi-Fi and Bluetooth on both devices.
Keep the devices nearby. Distance matters. Don't leave the phone across the house.
On the Mac, open System Settings > Sound > Input.
Select iPhone Microphone.
Open the app you care about and confirm it's using that same input.
That's it when everything cooperates.
Where it works best
This method shines in two situations:
- Meetings and calls. You want better audio without turning setup into a project.
- Solo voice recording on Mac. You want cleaner narration for tutorials, demos, or explainers.
It's less ideal if your network is flaky or your desk setup changes constantly. Wireless convenience is real, but it still depends on the environment.
Keep the iPhone close to your mouth, not close to the keyboard. People often optimize for convenience and then wonder why the recording still sounds distant.
If you want a visual walkthrough before changing settings, this video shows the general Mac-side process:
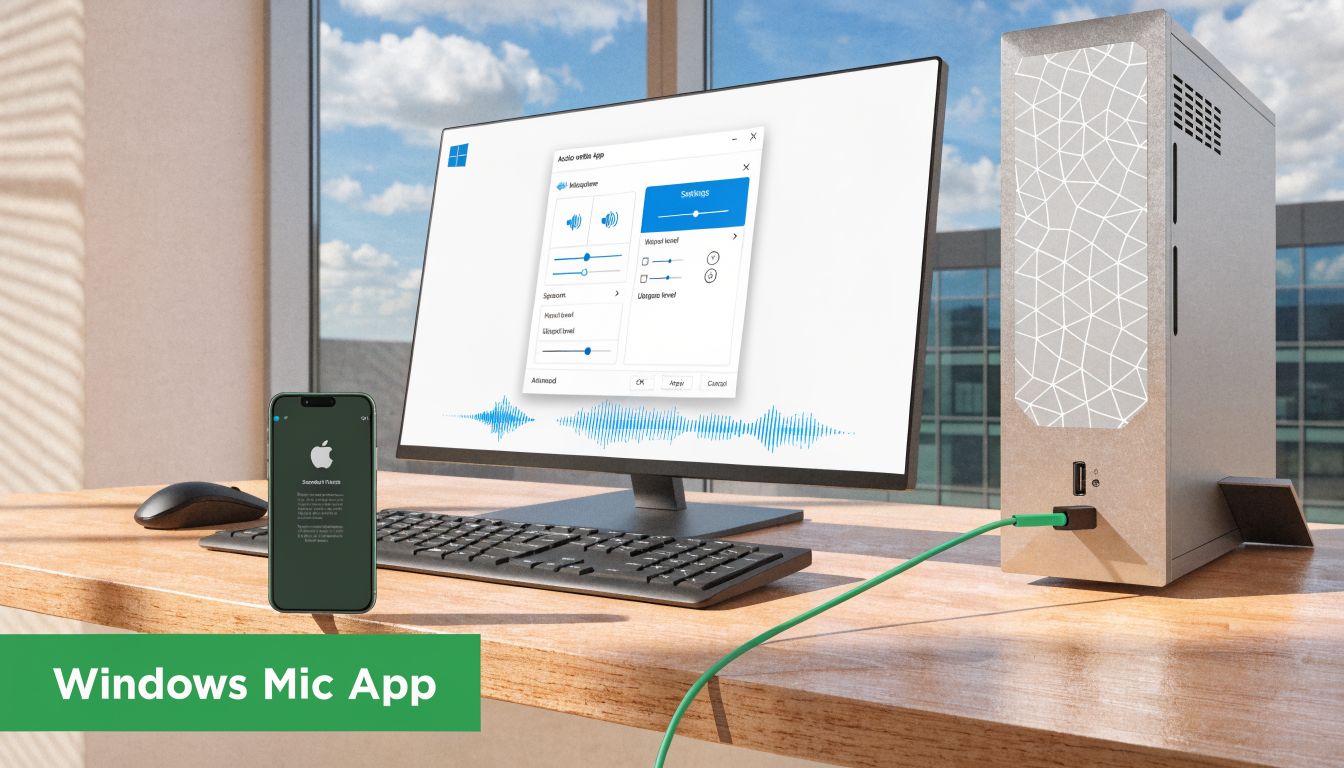
Top App-Based Solutions for Windows PCs
Windows doesn't have Apple's native Continuity Camera path. That doesn't mean you're stuck. It means you need a bridge app, and the most practical choice for users is WO Mic.
Why WO Mic is the practical default
WO Mic is popular because it works across iPhone and Windows without demanding expensive hardware. The trade-off is that setup is more technical than Apple's built-in option. You install an app on the phone, a client on the PC, and usually a driver layer too.
The cited benchmark summary is useful here: WO Mic can deliver less than 100ms latency on 5GHz networks, with aggregated success rates of 82% over Wi-Fi and 98% via USB. The same source also notes common failure points, including driver conflicts in 15% of failures and firewall blocks in 12% of failures, based on the referenced WO Mic setup walkthrough.
Wi-Fi setup for convenience
Wi-Fi mode is the fastest way to test the workflow.
- Install WO Mic on the iPhone from the App Store.
- Install the WO Mic client and server components on the Windows PC.
- Connect the phone and PC to the same Wi-Fi network.
- In the iPhone app, choose Wi-Fi transport.
- Note the address shown by the app.
- Open the PC client and connect to the phone.
- In Windows Sound Settings, choose WO Mic Device as the recording input.
- Open Zoom, Discord, OBS, or your recording app and confirm that input is selected there too.
This is the best option when you want freedom of movement. It's good for casual streaming, voice chat, and flexible desk setups.
USB setup for reliability
USB is the version I'd choose for anything important on Windows. It cuts out a lot of network weirdness, reduces disconnect risk, and makes the setup feel less fragile.
Use USB when:
- You're recording long-form audio
- You're doing live commentary
- You can't tolerate dropouts
- Your Wi-Fi is crowded or inconsistent
The usual USB workflow is straightforward. Connect the iPhone by cable, choose USB transport inside WO Mic, then select the WO Mic device inside Windows and inside the target app.
Wi-Fi is fine when convenience is the priority. USB is the safer choice when the recording has to survive the first take.
What usually goes wrong on Windows isn't the phone. It's the PC side. Security software blocks the connection. Another audio driver takes priority. Windows automatically keeps the old default microphone selected.
A short troubleshooting list helps:
- Firewall first. If WO Mic can't connect, check security prompts before reinstalling everything.
- Driver confusion second. If the input appears but no signal comes through, the virtual device may not be active correctly.
- App-level input third. Even when Windows sees the iPhone mic, Zoom, Teams, Discord, or OBS may still be listening to the laptop mic.
A Quick Comparison of Connection Methods
Once you know the main paths, the right choice becomes a workflow decision. Not every method serves the same job well.
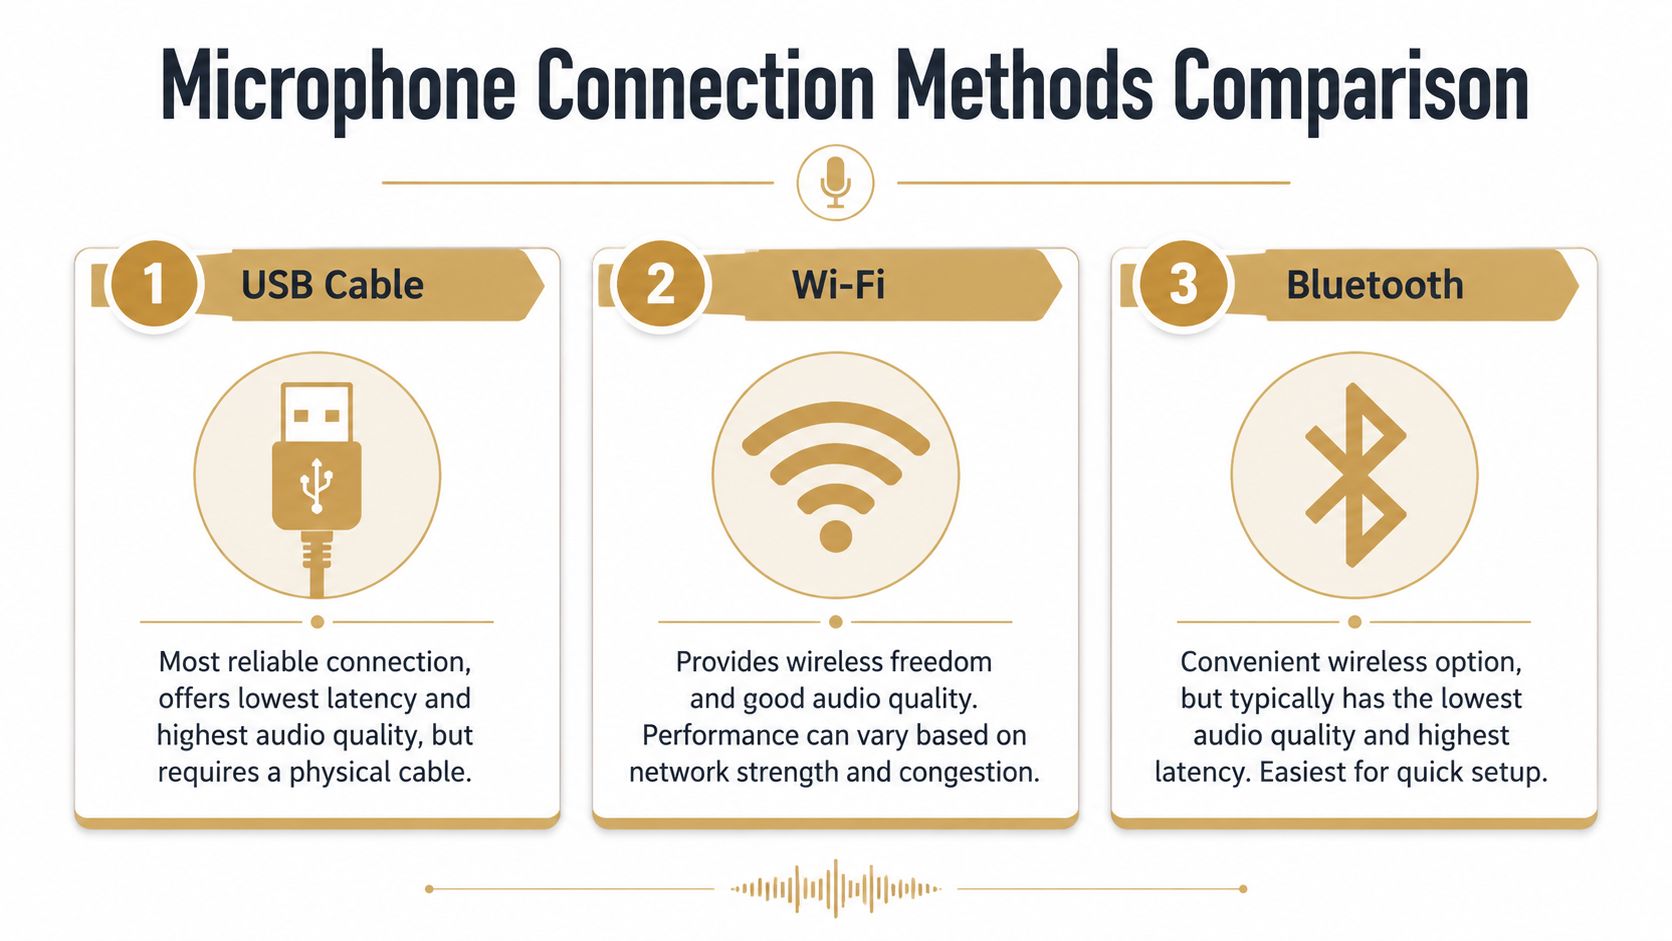
Which method fits which job
If you need a quick answer, use this table:
| Method | Best For | Latency | Setup Difficulty | OS |
|---|---|---|---|---|
| Native wireless | Fast Mac meetings and simple recording | Low | Easy | macOS |
| App wireless | Flexible Windows use without cables | Moderate | Medium | Windows |
| USB cable | Stable recording and longer sessions | Lowest | Medium | Windows / macOS |
The hidden issue is that people often optimize for the wrong thing.
For example, wireless feels modern and tidy. That matters if you're jumping into meetings all day and want the least friction possible. But if you're narrating a polished tutorial, recording a podcast segment, or capturing a launch demo, stability matters more than a clean desk.
Bluetooth is usually the least attractive route for this job. It's convenient in theory, but for spoken-word recording it tends to lose on both latency and audio quality compared with proper Wi-Fi or USB methods. If your goal is “it works once in a pinch,” fine. If your goal is “this sounds professional,” skip it.
A simple way to decide:
- Choose native wireless on Mac if you want the easiest setup and you're already in Apple's ecosystem.
- Choose app-based Wi-Fi on Windows if mobility matters and your network is dependable.
- Choose USB on either platform if the recording matters more than convenience.
The best method isn't the most advanced one. It's the one that stays connected and sounds consistent for the whole session.
Optimizing Audio Quality and Reducing Latency
Getting the iPhone connected is only the beginning. Good results come from placement, room control, and choosing the right connection for the session you're doing.
According to the cited PopSci-based reference, audio professionals note that the iPhone's beamforming microphones can reduce ambient background noise by up to 30% compared to standard USB microphones, which is one reason the phone works surprisingly well in untreated spaces, as noted in this guide on using your iPhone as a Mac microphone.
Placement matters more than people expect
Most audio problems aren't caused by the microphone model. They're caused by where the microphone sits.
A few rules make an immediate difference:
- Keep the phone close. Speech sounds stronger when the mic is near your mouth. Distance is the enemy.
- Get it off the desk. Desks transmit taps, typing, and vibrations.
- Aim for mouth level. If the phone sits too low, your voice often sounds less direct.
- Avoid hard reflective surfaces nearby. Glass, bare walls, and empty tabletops can make speech feel splashy.
If you're in a room with no treatment, soft furnishings help more than people expect. Curtains, a rug, and a bookshelf won't make the room “studio quality,” but they can make spoken audio feel much less harsh.
How to avoid the usual problems
For low latency and fewer dropouts, your method should match the session.
Use Wi-Fi when convenience matters. Use USB when reliability matters. That sounds obvious, but people keep forcing wireless setups into situations where a cable would solve the whole problem.
A practical checklist helps:
- Silence the phone. Turn off notifications and anything that might interrupt a take.
- Use stable network conditions. If Wi-Fi is congested, switch to USB rather than fighting through glitches.
- Watch battery level. Long sessions can drain the phone faster than expected, especially with the screen active.
- Monitor before you record. Say a few lines, listen back, and fix the problem before the actual take.
If your iPhone itself has microphone issues, handle that before troubleshooting the computer side. This guide on fixing iPhone audio issues at home is a practical starting point.
For Mac users doing voice-plus-system-audio workflows, input quality is only half the story. If you also need cleaner computer audio capture, this article on capturing sound from a Mac helps sort out the output side.
A cleaner signal at the source saves more time than any noise reduction plugin later.
How to Select Your iPhone Mic in Popular Apps
A lot of people complete the hard part, then miss the final click. The computer sees the iPhone mic, but the app still uses the laptop microphone because that app has its own input menu.
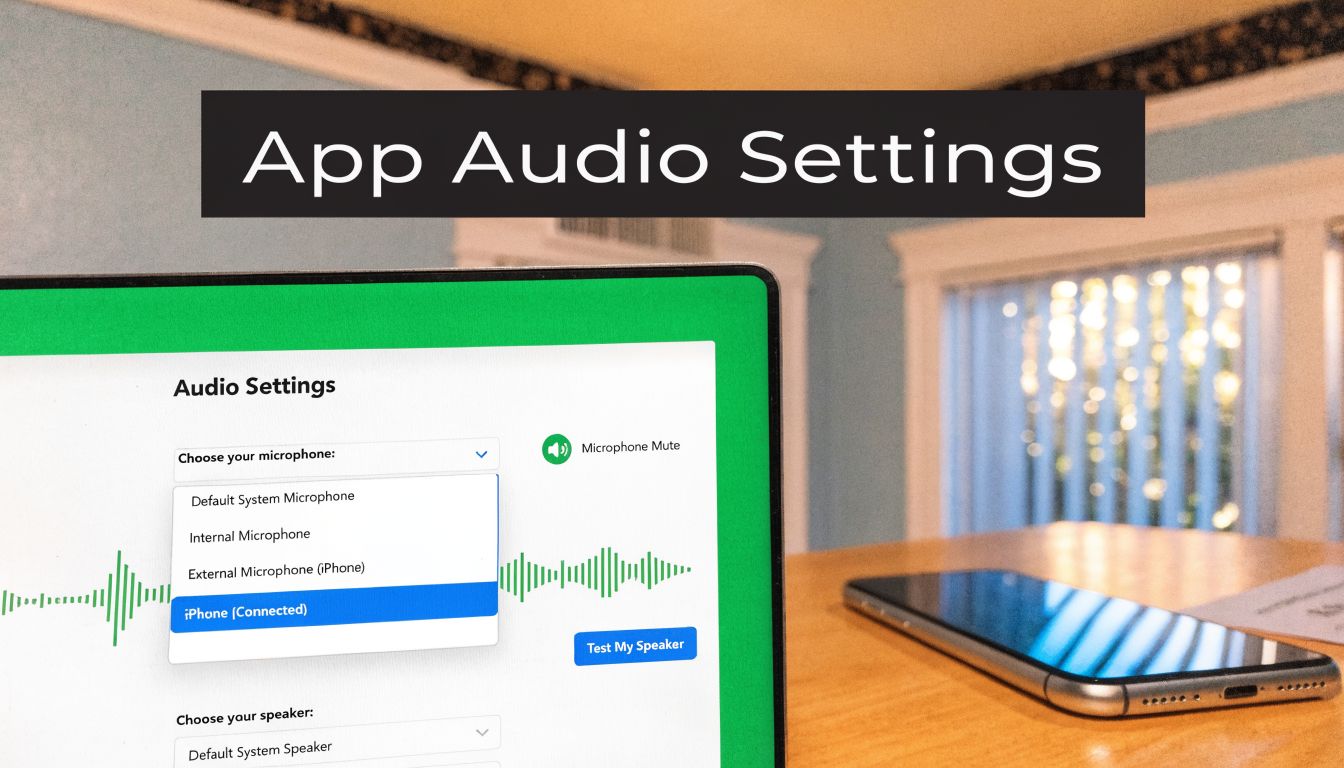
Zoom and Teams
In Zoom, go to audio settings and open the microphone dropdown. Select the iPhone microphone or the virtual device created by your setup method. Speak and watch the input meter. If the meter doesn't move, Zoom is still listening to the wrong source.
In Microsoft Teams, open device settings and choose the same input manually. Teams often defaults to “same as system,” which is fine only if your system input is already correct.
A good habit is to disable automatic mic switching when the app allows it. Automatic switching sounds convenient, but it can revert to a headset or built-in mic at the wrong time.
Discord and recording tools
In Discord, go to Voice & Video, then set the input device directly instead of leaving it on automatic. If you spend a lot of time on voice chat, this value-focused microphone guide for Discord is useful for understanding when an iPhone setup is enough and when a dedicated mic makes more sense.
For OBS or other recording tools, treat the iPhone as you would any other microphone input. Add or select the device, speak into it, and confirm signal is present before recording.
For screen recording tools in general, always check two things before hitting record:
- The app-level microphone choice
- The input level meter moving when you speak
If either one is wrong, the take is already compromised.
What to check if the app ignores your iPhone mic
When the app refuses to cooperate, the fix is usually simple.
- Reconnect the input. Unplug, reconnect, or reselect the iPhone mic.
- Restart the target app. Some apps only detect devices at launch.
- Check system privacy permissions. The app may not be allowed to access microphones.
- Verify the system default input. Some apps inherit from the operating system, others don't.
- Run a short test file. Don't trust a menu label. Trust a recorded playback.
If you're unsure whether your recorder is even supposed to capture mic audio, this explanation of whether screen recording records audio clears up the usual confusion.
The final rule is simple. Don't assume that because the phone is connected, the app is using it.
If you record walkthroughs, onboarding videos, feature announcements, or polished demos on Mac, Smooth Capture gives you a fast way to pair clean voice audio with professional screen recording and editing in one workflow. It's especially useful when you want to move from “the mic works” to “the finished video sounds and looks ready to ship.”
Ready to create stunning app demos?
SmoothCapture makes it easy to record your screen with 3D device frames, cinematic cursor effects, and professional editing tools.