Using a Loom: A Practical Guide to Screen Recording
You’re probably staring at a Slack thread, an email draft, or a product spec comment that’s getting longer by the minute. You need to explain a workflow, show a bug, walk a client through a feature, or give design feedback without scheduling another meeting. That’s the moment when using a loom style screen recorder makes sense. You say it once, show the context, and send a link. A fast recording is easy. A useful recording takes a little more judgment. The difference usually isn’t the tool itself. It’s the small decisions around setup, framing, pacing, trimming, and sharing permissions that keep a video from feeling rushed or confusing. Modern recording tools sit in a long tradition of “using a loom” to structure communication. The earliest warp-weighted loom dates back about 9,000 years, with loom weights found around 7000 BC, and that foundational weaving system persisted across civilizations for millennia, as summarized in this history of looms. The metaphor holds up. A good video also depends on tension, structure, and clean alignment. If the setup is off, the result looks uneven.
From Idea to First Recording in Minutes
The fastest path from idea to shared video starts before you open the recorder. Most weak recordings aren’t ruined by the app. They’re ruined by a noisy mic, a cluttered desktop, or a notification that pops up in the middle of a client explanation. A clean setup means three things. First, use the best microphone you already have and test it with a short sample. Second, clear your desktop and close tabs you won’t need. Third, silence notifications across chat, calendar, mail, and system alerts. If you wouldn’t show it in a live demo, don’t leave it visible on your screen. The workflow itself is simple:
- Define the job of the video. Is it feedback, onboarding, bug reproduction, or a polished demo?
- Pick one destination. Team chat, client email, help center, or internal wiki.
- Write a one-line outcome. “By the end of this video, the viewer should know what changed and what to do next.”
- Open the recorder only after the story is clear.
Practical rule: If you can summarize the point in one sentence before recording, the final video will usually feel concise even without heavy editing.
That’s the power of using a loom recorder well. It replaces long asynchronous text with context, tone, and momentum. You don’t need a studio. You need a setup that respects the viewer’s time.
Configuring Your Setup for Clear Communication
A polished recording starts with configuration, not improvisation. The app can only capture what you give it. If the source looks chaotic or sounds thin, the final link will too.
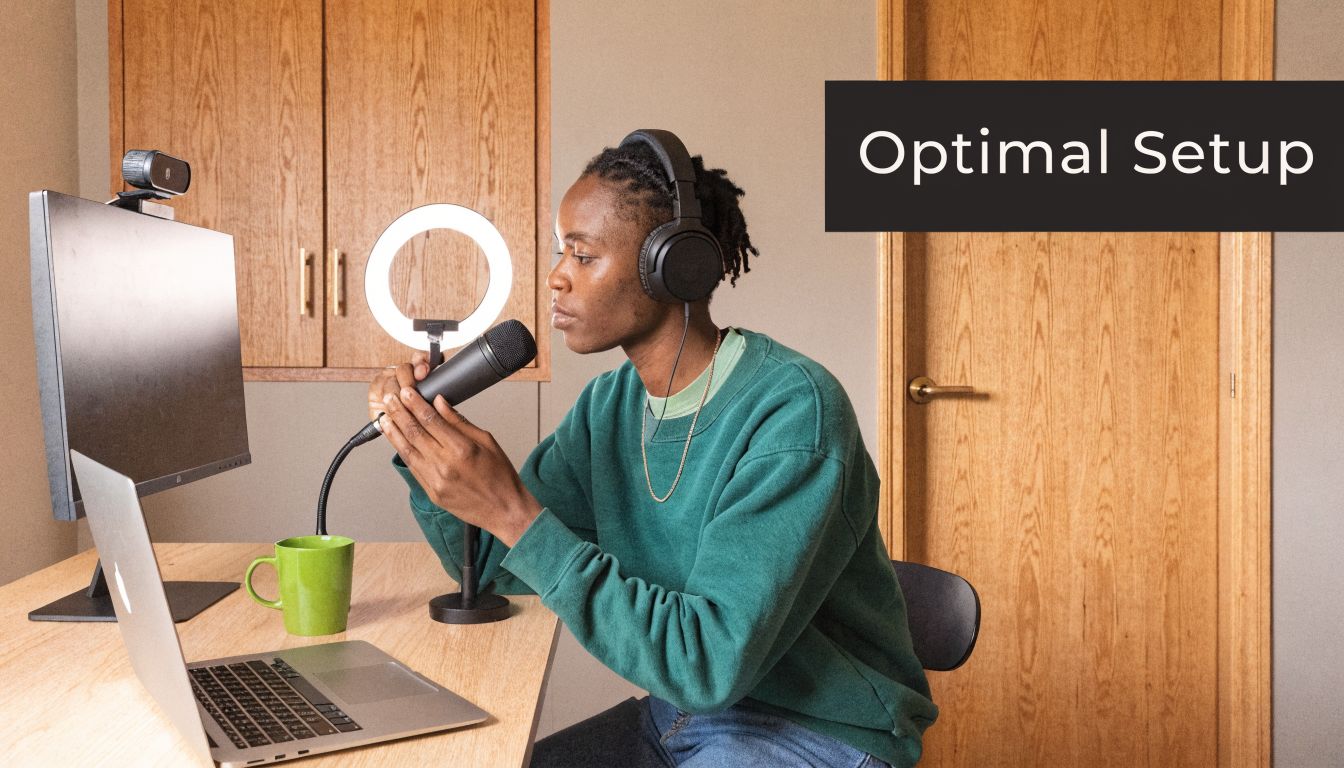
Build a clean recording environment
Start with audio. Laptop microphones are fine for quick internal updates, but they often pick up keyboard noise, room echo, and fan hum. A USB microphone or a decent headset usually gives you a more controlled result. Record a test clip and listen for three problems: low volume, peaking, and background noise. If your voice sounds harsh, move the mic slightly off-center rather than talking directly into it. Your webcam setup matters less than people think, but it still shapes credibility. Face a window or a soft light source. Keep the background neutral. Remove movement behind you if you’re sending the video externally. For internal messages, a normal office background is fine as long as it isn’t distracting. Then clean the screen itself.
- Close irrelevant apps so app-switching doesn’t expose unrelated work.
- Hide bookmarks and messy desktop icons if they add visual noise.
- Turn on do not disturb before every take, not just high-stakes recordings.
- Increase cursor visibility if your recorder supports it. Tiny cursor movements get lost fast. If you’re recording on macOS and want a broader view of capture options, this guide on how to record screen on Mac is a useful companion.
Choose the right recording mode
The three common modes are simple, but the choice affects how the message lands.
| Mode | Best use | Trade-off |
| **Screen + Cam** | Product walkthroughs, onboarding, client updates | More personal, but also more visual clutter |
| **Screen Only** | UI demos, bug reports, process tutorials | Cleaner focus, less human presence |
| **Cam Only** | Status updates, leadership messages, introductions | Stronger face-to-face tone, no software context |
Screen + Cam works when trust and explanation matter equally. If you’re walking a customer through a new feature or welcoming a new teammate, your face helps carry nuance. Screen Only is usually the best choice for support, QA, and product marketing reviews. The interface stays central. The viewer doesn’t split attention between your webcam bubble and the product. Cam Only is underrated. It works well when the screen adds nothing and the message depends on tone.
A good recording mode isn’t the one with the most features. It’s the one that leaves the least room for confusion.
Inside the app, check preferences before your first real take. Confirm the right microphone, camera, and screen source. Look at quality settings too. Higher quality can make text sharper, but it may also create larger files or slower processing depending on the platform. If there’s a setting like “show control menu,” decide whether the on-screen controls will help you pause and restart, or whether they’ll distract from the capture area.
Mastering the Art of the Screen Recording
A common pitfall is pressing record too early and talking too much. A strong recording feels guided, even when it’s informal.
Record with intention
Open only the windows you need. Place them in the order you’ll use them. If you know you’ll compare two screens, arrange them before recording so you aren’t fumbling mid-sentence. Then speak as if you’re guiding one person, not presenting to a crowd. That usually fixes pace on its own. A reliable structure looks like this:
- Start with context. State what the viewer is looking at and why it matters.
- Show the action. Move through the workflow in sequence.
- Narrate the cursor. Say what you’re clicking before or as you click it.
- Close with a next step. Tell the viewer what decision or action should follow. If you lose your place, pause. Short pauses are easier to trim than a rambling recovery. If your recorder offers restart controls, use them aggressively on the opening line. The first sentence carries more weight than the rest because it determines whether the viewer relaxes into the video or braces for confusion. A few habits help immediately:
- Zoom your browser or app UI if text looks small at normal scale.
- Move the cursor with purpose rather than circling aimlessly.
- Leave half a beat after major actions so the viewer can catch up.
- Avoid apologizing live for mistakes that can be trimmed later.
When I record demos for product review, I assume the viewer will watch while multitasking. That changes how I speak. Fewer side comments, more signposting, cleaner clicks.
Later in the process, a visual walkthrough can help reinforce the mechanics:
Use light editing as triage
Not every recording needs a full edit pass. Most shared videos improve dramatically from a small set of fixes. Think of editing as triage for clarity:
- Trim the dead air at the beginning while you settle into position.
- Cut the stumble in the middle if it interrupts comprehension.
- Remove the wandering ending after your real point is already made.
- Add a CTA or follow-up note when the video needs a decision, reply, or link click. This isn’t about making the video cinematic. It’s about removing friction. If the viewer has to work to understand your point, they’ll postpone the response or miss the message entirely. The same principle shows up in older loom technology. The Jacquard loom, patented in 1804, used punched cards to automate complex pattern weaving and later spread widely enough that 7,000 to 8,000 Jacquard looms were operating in Lancashire by the 1820s, according to this brief history of weaving. Better systems don’t just add capability. They reduce manual effort in repetitive work. Good screen recording habits do the same.
Quick Edits for a Polished Final Cut
Recording is only half the job. The edit determines whether the video feels deliberate or accidental.
Trim for trust
The first cuts should be obvious. Remove the moment where you’re still finding the right tab. Cut the tail where you reach for the stop button. If you made a wrong click in the middle and recovered, split around it and take it out.
Those edits do more than improve pace. They signal competence. A viewer is more likely to trust the content when the video starts cleanly and ends with intent.
Use a quick post-record checklist:
| Edit decision | Keep it when | Cut it when |
| **Opening small talk** | It adds warmth for a known colleague | It delays the point |
| **A mid-video mistake** | It helps explain a real edge case | It distracts from the main path |
| **Long pauses** | You’re letting the UI load and need the proof | You were thinking out loud |
| **Natural ending** | It ends right after the call to action | It trails off into silence |
Thumbnail selection matters too. A random freeze-frame can make even a good recording look sloppy. Choose a frame with readable UI and a clear focal point. If the platform lets you add a title, make it specific. “Checkout flow issue on mobile Safari” is better than “Quick video.”
Control access before you send
Editing isn’t just visual. It’s also about controlling what version of the message people can see and who can see it. For internal communication, broader link access can be fine if the content is routine and low-risk. For anything client-facing, sensitive, or still under review, use the most restrictive setting that doesn’t create friction for the intended viewer. That may mean limiting access to specific people, requiring sign-in, or protecting the link with a password when the platform offers it. A few practical trade-offs are worth calling out:
- Public or broadly accessible links are fast, but easier to forward.
- Restricted sharing protects context, but can slow review if stakeholders hit permission walls.
- Password protection is useful for external review cycles where sign-in isn’t realistic.
- Workspace-only access keeps internal libraries cleaner when teams produce lots of training material.
Editing lens: the final cut isn’t just what stays in the timeline. It’s also what stays visible, searchable, and shareable.
If your video includes roadmap details, customer data, sales numbers, or internal tooling, review it once from the recipient’s perspective before you hit send.
Sharing Securely and Collaborating with Your Team
A recording becomes useful when it enters a system. Shared in the wrong way, it disappears into chat history or creates feedback chaos. Shared well, it becomes part of a repeatable workflow.
Match the share setting to the audience
Think in audience tiers rather than generic “share” behavior. For internal team updates, speed usually matters most. A link in Slack, Notion, or a project ticket works well when the topic is lightweight and the audience already understands the context. For cross-functional reviews, naming and placement matter more. Put the video in the project doc, product brief, or sprint ticket where decisions already happen. That way comments stay attached to the work instead of splitting across tools. For client and prospect communication, control matters most. Limit accidental forwarding, review the thumbnail and title, and make sure the opening seconds don’t reveal unrelated tabs, names, or private notifications. A practical way to decide:
- Use open internal sharing for routine process updates and low-risk explainers.
- Use controlled workspace sharing for onboarding libraries and team resources that need structure.
- Use restricted external sharing for customer walkthroughs, proposal support, and anything tied to commercial conversations.
Turn feedback into a workflow
Comments and emoji reactions are useful, but only if you decide what they mean. Without a rule, they become ambient noise. Set a few team norms:
- Comments are for specific questions or corrections.
- Emoji reactions are for acknowledgment, not approval.
- If a video requests a decision, the deadline and owner belong in the description or message around the link.
- If a recording explains a repeatable workflow, store it in a shared library instead of leaving it buried in chat. Captions fit into this workflow too. They help people watch in quiet offices, noisy homes, or between meetings with audio off. They also make videos easier to skim later when someone needs one detail rather than a full rewatch. Some weaving disciplines rely on precise control to avoid drift. In heddle loom weaving, using pedals to lift frames can produce a 25% speed gain versus hand-lifted rigid heddles, and production benchmarks cited in this learning-the-loom article describe how structured setup improves consistency. The parallel in team video is straightforward. Clear conventions reduce waste.
A shared video library only helps when people can trust what they’ll find there. Good titles, captions, and access rules matter more than volume.
Pro Tips for Professional Demos and Tutorials
Short internal recordings and polished external assets have different standards. If you want a video to work for onboarding, customer education, launch support, or sales enablement, treat the recording like a reusable asset from the start.
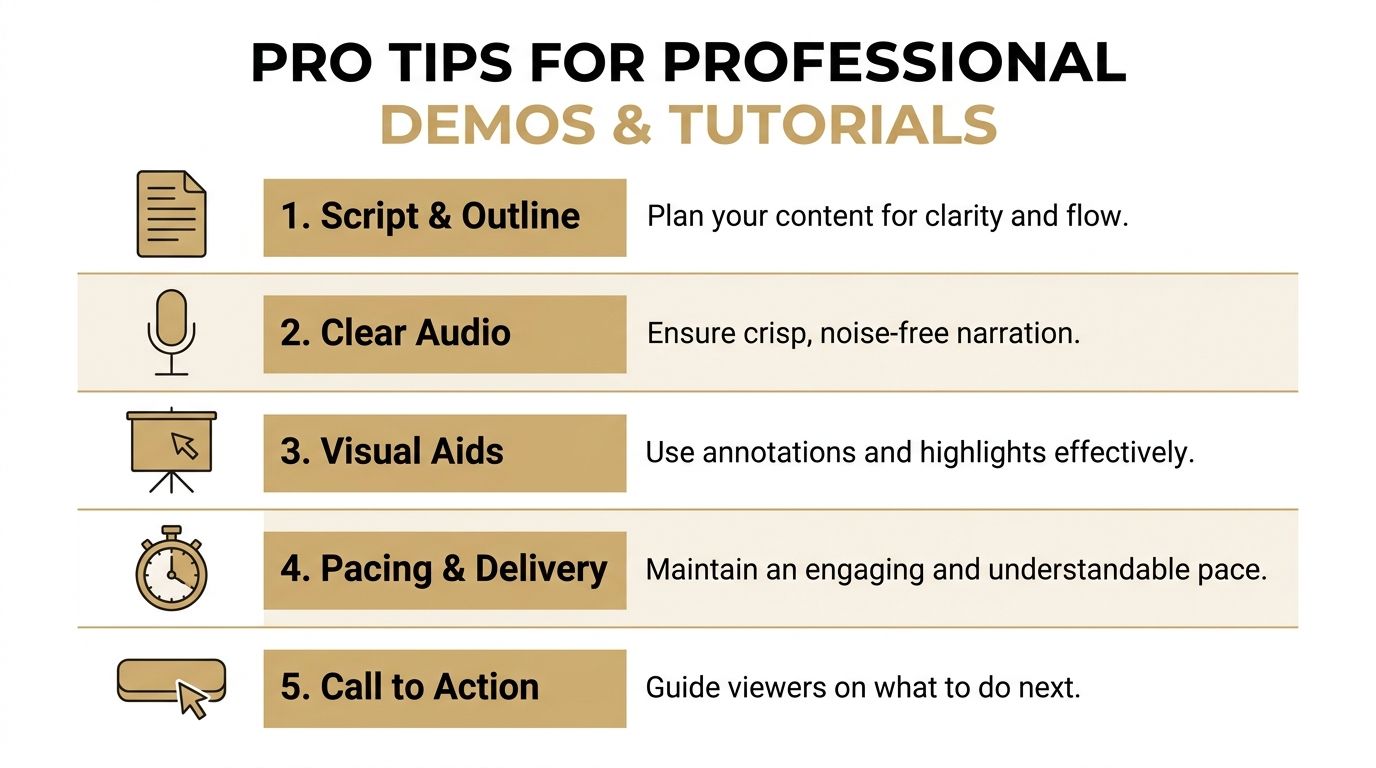
Make the recording reusable
The first shift is planning for reuse instead of speed. That means removing references that will age badly, such as “today,” “this morning,” or “as you can see in Slack.” It also means focusing the script on a stable workflow instead of temporary chatter. For demos and tutorials, this sequence works well:
- Open with the outcome. What will the viewer be able to do after watching?
- Show the product in a clean state. Use a prepared account, sample data, and named examples that won’t create privacy issues.
- Use annotation tools sparingly. Draw only when attention needs redirecting.
- End with a clear next action. Start trial, review docs, complete setup, or contact support. If you’re evaluating whether a lightweight recorder is enough for your use case, this comparison of Camtasia vs Loom is useful for thinking through the trade-offs between quick communication and more produced tutorials. Captions deserve more attention than they usually get. They improve accessibility, make silent viewing practical, and help teammates scan for the right segment later. If the platform generates them automatically, review names, product terms, and feature labels before sharing externally.
Fix the issues that make videos feel amateur
Most unpolished recordings fail in a few predictable ways. The pacing is uneven. The speaker rushes simple steps and slows down during confusion. Fix it by rehearsing the action path once without recording. The cursor lacks intent. It wanders, circles, or moves before the narration catches up. Fix it by speaking the destination first, then moving. The screen is visually noisy. Too many tabs, too much browser chrome, too many side panels. Fix it by collapsing anything that doesn’t serve the story. The audio sounds distant. Even a strong video loses force when the voice sounds like it’s bouncing around the room. Use a closer mic position and choose a quieter environment. The ending is weak. A lot of videos end without ceremony. Add a final sentence that tells the viewer exactly what to do next. Here’s a practical troubleshooting table for common recording issues:
| Problem | Likely cause | Fast fix |
| **Audio and video feel out of sync** | System strain or unstable capture session | Close heavy apps and re-record the segment |
| **Processing takes too long** | Large file, high resolution, or long capture | Break long videos into shorter modules |
| **Viewer can’t follow the interface** | Small UI or rushed navigation | Increase zoom and slow cursor movement |
| **Annotations feel messy** | Too many highlights at once | Use one callout per point |
| **Background noise distracts** | Room echo, fans, keyboard, street noise | Change location or use noise control tools |
A lot of creators overuse visual emphasis. Drawing tools, spotlight effects, and animated callouts help when they isolate one important action. They hurt when they compete with your narration. Keep them attached to moments of decision, not every click. There’s a useful lesson in craft traditions too. On beginner-friendly looms, guidance around precise angles and straight edges is often incomplete, and a projected 2025 weaving forum analysis described a high share of unresolved “angle issues” posts in the prior year, according to this article on weaving angles and waves. Screen demos fail in a similar way when creators know the mechanics but not the precision habits. The viewer doesn’t need more motion. The viewer needs steadier guidance.
Answer the questions people usually ask too late
A few practical answers save a lot of rework.
- Should you script everything? No. Script the opening, key transitions, and closing CTA. Bullet the middle.
- Should you re-record or edit around mistakes? Re-record if the mistake changes trust or clarity. Edit if the core explanation is still strong.
- Should webcam stay on the whole time? Only if your presence adds value throughout. For product-heavy demos, less is often cleaner.
- Should one video cover everything? Usually not. Short focused modules are easier to update and easier for viewers to revisit. There’s also a stability lesson from physical loom work. One discussion of portable weaving noted that tension and setup stability are often underexplored, while a projected 2025 Etsy trends reference in that source described rising interest in portable weaving and raised concerns about “bounce” during shedding in user questions, as discussed in this video reference about loom setup. The screen-recording equivalent is simple. Stable setup beats clever recovery. Prepare the environment so you don’t have to fight it on camera.
The most professional demos usually look calm. Calm comes from preparation, not personality.
Frequently Asked Questions About Using a Loom
| \[object Object\] | \[object Object\] | \[object Object\] |
| **What’s the best mode for a product walkthrough?** | **Screen + Cam** works well when your face adds trust and explanation. **Screen Only** is often better when the UI needs full attention. | Choose based on whether the viewer needs your presence or just the product. |
| **How long should a screen recording be?** | Long enough to complete one job cleanly. Shorter focused videos are easier to rewatch and easier to update. | Split broad topics into separate recordings when possible. |
| **Do I need to edit every recording?** | No. Trim the start, trim the end, and cut obvious mistakes. That’s usually enough for internal communication. | Save deeper editing for reusable demos and tutorials. |
| **Should I use captions?** | Yes, especially for training, onboarding, and external sharing. They help with accessibility and quiet viewing. | Review auto-generated captions for names and product terms. |
| **How should I share sensitive videos?** | Use the most restrictive option that still lets the intended viewer access the content easily. | Review the title, thumbnail, and visible screen details before sending. |
| **What if I need something beyond basic async messages?** | A lightweight recorder is great for quick updates. More demanding teams may want stronger editing, framing, and export control. | This roundup of [Loom alternatives](https://www.smoothcapture.app/blog/loom-alternatives) can help you compare options. |
If your team records product demos, tutorials, launch assets, or client walkthroughs regularly, Smooth Capture is worth a look. It gives macOS teams tighter control over recording, editing, captions, cursor effects, device framing, and polished exports without stretching the workflow across multiple tools.
Ready to create stunning app demos?
SmoothCapture makes it easy to record your screen with 3D device frames, cinematic cursor effects, and professional editing tools.