How to Record Video on Macbook Air: Record Video on MacBook
You've probably hit this exact moment: you need a quick demo for a feature walkthrough, a bug reproduction for engineering, or a short onboarding clip for a customer. The MacBook Air in front of you can do the job right now. The harder part isn't starting the recording. It's choosing a workflow that won't create cleanup work later.
That's the main distinction with how to record video on macbook air. One path is fast and built in. It's good for quick internal videos, simple tutorials, and one-off screen captures. The other path is more deliberate. It matters when the video is customer-facing, needs cleaner audio, or has to look polished enough for a launch, help center, or App Store asset.
Apple gives every MacBook Air user a solid baseline. QuickTime Player has been the standard built-in solution for Mac users since the early 2000s, and because it's integrated into macOS, there's nothing extra to install according to Avast's overview of Mac screen recording. That matters because it removes setup friction. You can open the laptop, record, trim, and send.
The rest comes down to judgment. For a rough internal clip, built-in tools are usually enough. For repeatable team production, they stop being enough much faster than generally expected.
Table of Contents
- Your First MacBook Air Video Recording
- Instant Recording with macOS Built-in Tools
- Fine-Tuning Your Capture Quality
- Level Up with Webcam Overlays and Your iPhone
- Quick Edits and Smart Exports from QuickTime
- When to Upgrade to a Professional Workflow
Your First MacBook Air Video Recording
The first decision is simple. Are you recording information or are you producing an asset?
If you're sending a teammate a fast explanation, use the built-in tools and move on. If the video will live in a product launch, onboarding flow, sales process, or support library, treat capture more carefully from the start. Re-recording because of weak audio or a messy frame wastes more time than spending two extra minutes on setup.
A MacBook Air is well suited to quick video work because the basics are already there. Open QuickTime Player, or call up the Screenshot toolbar, and you can capture your screen without installing anything. That convenience is why it remains the default starting point for most Mac users.
Here's the practical approach:
- Internal explanation: prioritize speed, not polish.
- Customer-facing demo: prioritize audio, framing, and a clean ending.
- Reusable training video: prioritize consistency so future clips match.
- Marketing or launch footage: prioritize edit flexibility from the start.
Practical rule: If you'd be embarrassed to leave the first take untouched, don't rely on a bare-minimum recording workflow.
For most product managers, the best first move is to record one short clip with the built-in tools before changing anything else. That tells you whether the default path is enough for the job. If it is, great. If it isn't, the weak point usually shows up fast: muddy audio, no webcam treatment, awkward trimming, or too much manual editing after capture.
Instant Recording with macOS Built-in Tools
When you need something recorded in the next minute, macOS gives you two reliable entry points.
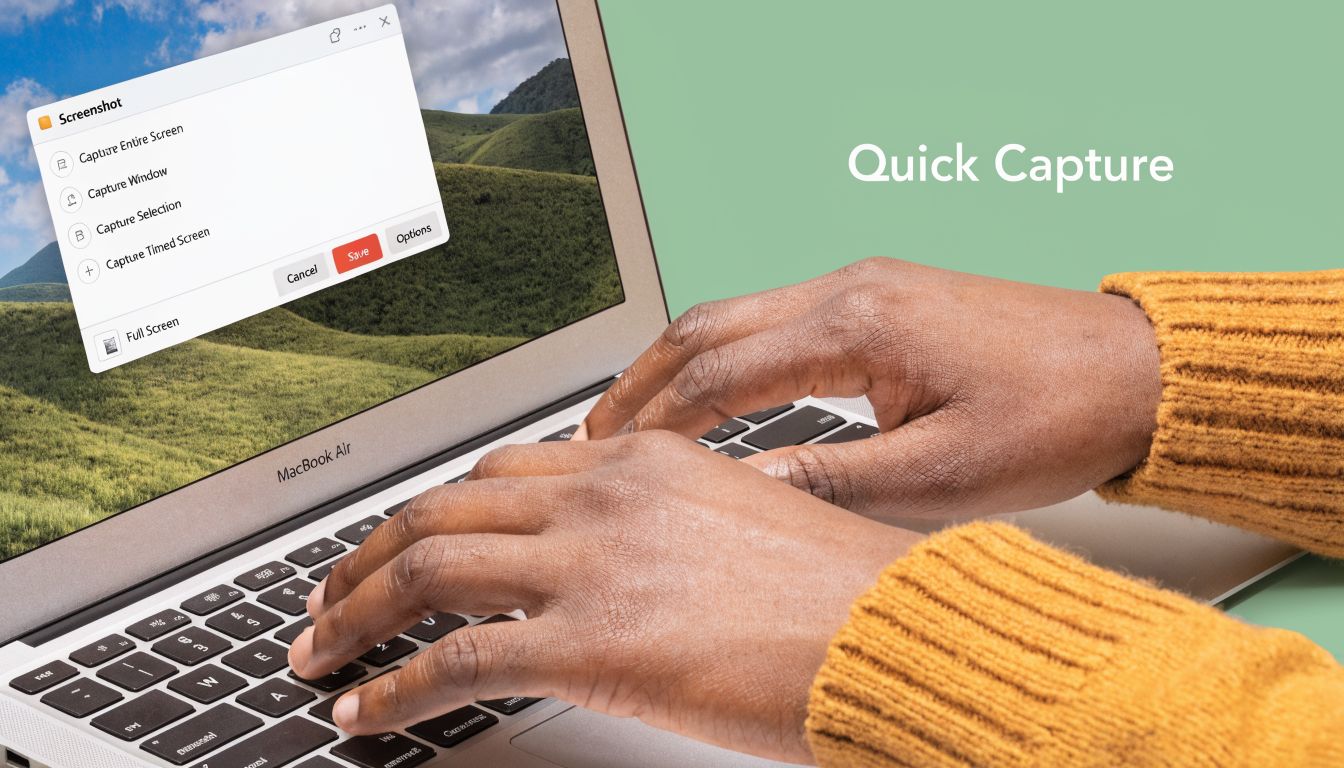
Use the Screenshot toolbar when speed matters
Press Shift + Command + 5. That opens the Screenshot toolbar built into macOS, a shortcut covered in Avast's guide to screen recording on Mac. You'll see controls for capturing the full screen or a selected portion.
For most product demos, the selected portion option is better. It keeps attention on the app window instead of your whole desktop, menu bar, and stray notifications.
A clean fast workflow looks like this:
- Close visual clutter like chat apps, email, and extra browser tabs.
- Press Shift + Command + 5 and choose the record option you need.
- Set the frame around the product area you want people to watch.
- Check Options for microphone input if you want narration.
- Hit Record and keep your mouse movements deliberate.
- Stop the recording from the menu bar when you're done.
If you want a deeper walkthrough of native capture methods, Smooth Capture has a useful guide on how to record your Mac screen.
Use QuickTime when you want a saved recording workflow
QuickTime Player is better when you want a slightly more deliberate process and an obvious file-based workflow. Open QuickTime Player, then go to File > New Screen Recording. You can record the whole display or drag to choose a region.
QuickTime feels old-fashioned in a good way. It doesn't try to do too much, so there's less to fight with when all you need is a dependable screen capture.
A few habits make the output noticeably better:
- Record one window when possible: It looks cleaner than a full desktop.
- Narrate with intent: Short internal demos benefit from concise voiceover more than perfect visuals.
- Pause before speaking: Give yourself a second at the start and end so trimming is easier later.
Here's a quick visual walkthrough before you try it yourself:
A screen recording becomes easier to edit when the frame is intentional before capture, not fixed after.
The built-in tools are enough for bug reports, team handoffs, and rough walkthroughs. They start to strain when you need stronger audio control, better webcam treatment, or consistent branding across many videos.
Fine-Tuning Your Capture Quality
The default recording is usually usable. It's rarely presentation-ready.
Pick the right microphone before you hit record
In QuickTime Player, the options menu lets you choose your microphone and recording quality. That sounds minor, but it changes whether your video feels casual, clean, or sloppy. MacKeeper's QuickTime recording guide notes that you can access those options directly before recording.
If you have a quiet room and need a quick internal clip, the built-in microphone is fine. If the recording is customer-facing, use an external mic if you have one. Better audio does more for perceived video quality than a sharper screen capture.
Use this rule of thumb:
| Situation | Microphone choice | Practical outcome |
|---|---|---|
| Fast internal demo | Built-in mic | Good enough if the room is quiet |
| Tutorial for customers | External USB mic | Voice sounds clearer and more controlled |
| Screen plus app audio | Planned input selection | Fewer surprises after recording |
If your work includes tutorials with narration, it's worth spending time on mastering video performance and audio before you worry about visual polish.
For Mac users who need app or system sound as part of the recording, Smooth Capture explains the setup trade-offs in its guide to capturing sound from a Mac computer.
Avoid the two problems that ruin usable footage
QuickTime is straightforward, but two issues come up often on a MacBook Air.
The first is audio desync. MacKeeper notes that this can sometimes be improved by disabling noise reduction features in the options flow. If your voice starts drifting against the screen actions, stop troubleshooting the edit first and recheck your capture settings.
The second is thermal throttling during long sessions on fanless MacBook Air models. Long recordings can lead to dropped frames. The simplest fix is operational, not technical: record in shorter 5-minute segments, which MacKeeper specifically recommends in its recording guide.
Field note: Long takes feel efficient while recording, but short segments are usually faster to salvage and easier to replace.
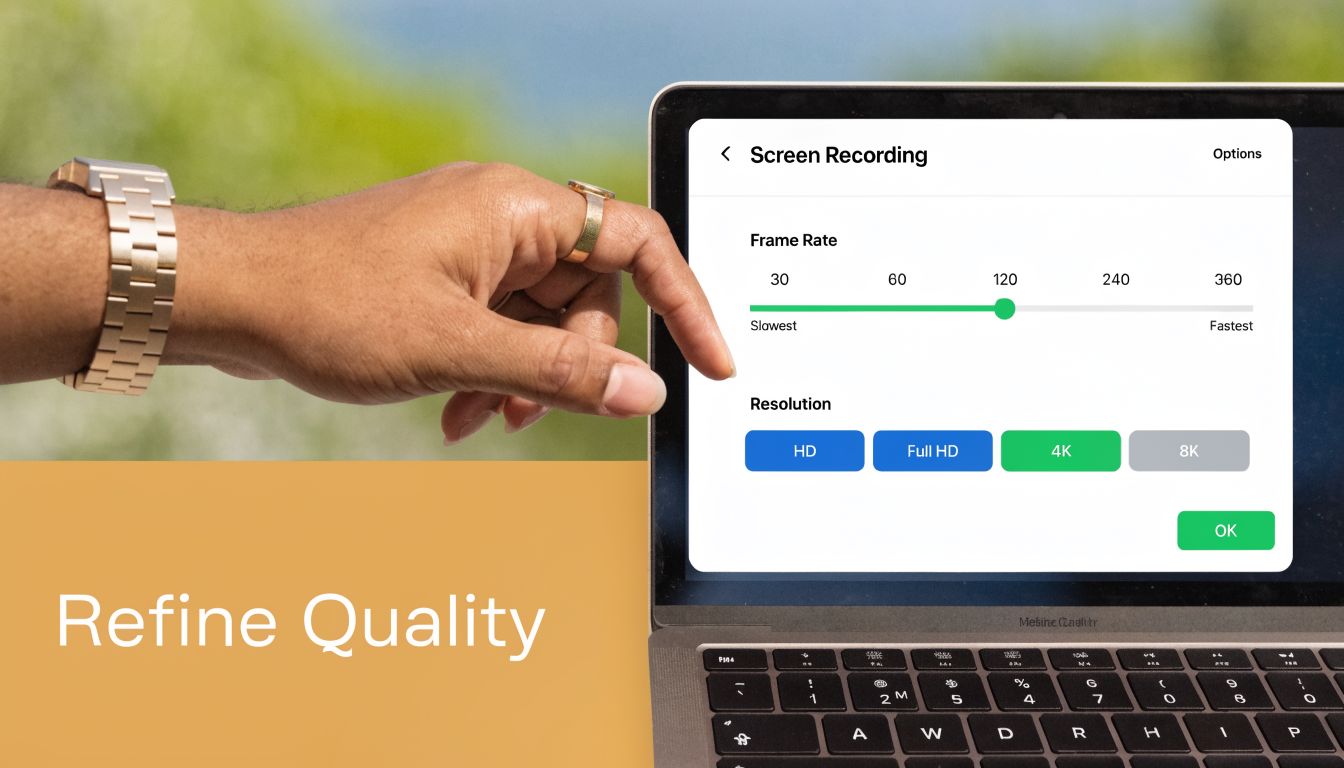
Know what quality settings change
QuickTime gives you basic quality choices, and that's enough for many jobs. What matters is matching quality to purpose.
Use higher quality when interface details matter, such as tiny UI labels, dashboards, or product settings. Use a lighter setting when the video is headed to Slack, email, or quick review and no one needs pixel-perfect text.
A practical checklist before recording:
- Check frame content: Remove notifications and desktop distractions.
- Choose the mic intentionally: Don't leave the wrong input active from a previous session.
- Keep sessions shorter: It reduces the chance that performance drifts midway through.
- Test a ten-second clip: Watch and listen before committing to the full take.
That tiny test clip saves more time than almost any other habit in video production.
Level Up with Webcam Overlays and Your iPhone
A pure screen recording explains a workflow. A screen recording with a face often explains intent better.
Add your face when context matters
If you're demoing a feature, training a customer, or sending a founder update, a webcam layer helps. Viewers read tone faster when they can see you, and that matters for onboarding, persuasion, and explanation-heavy content.
On a MacBook Air, the simplest built-in approach is to use QuickTime Player's New Movie Recording for your webcam and pair it with a screen recording workflow. That isn't a polished picture-in-picture system by itself, but it can work for basic clips if you're comfortable combining pieces later.
QuickTime's movie recording flow is practical:
Open QuickTime Player.
Choose File > New Movie Recording.
Select the FaceTime HD Camera if it isn't already active.
Choose the microphone you want.
Record your camera segment or talking-head intro.
This works well for intros, outros, or short commentary clips that you'll combine with your screen footage afterward.
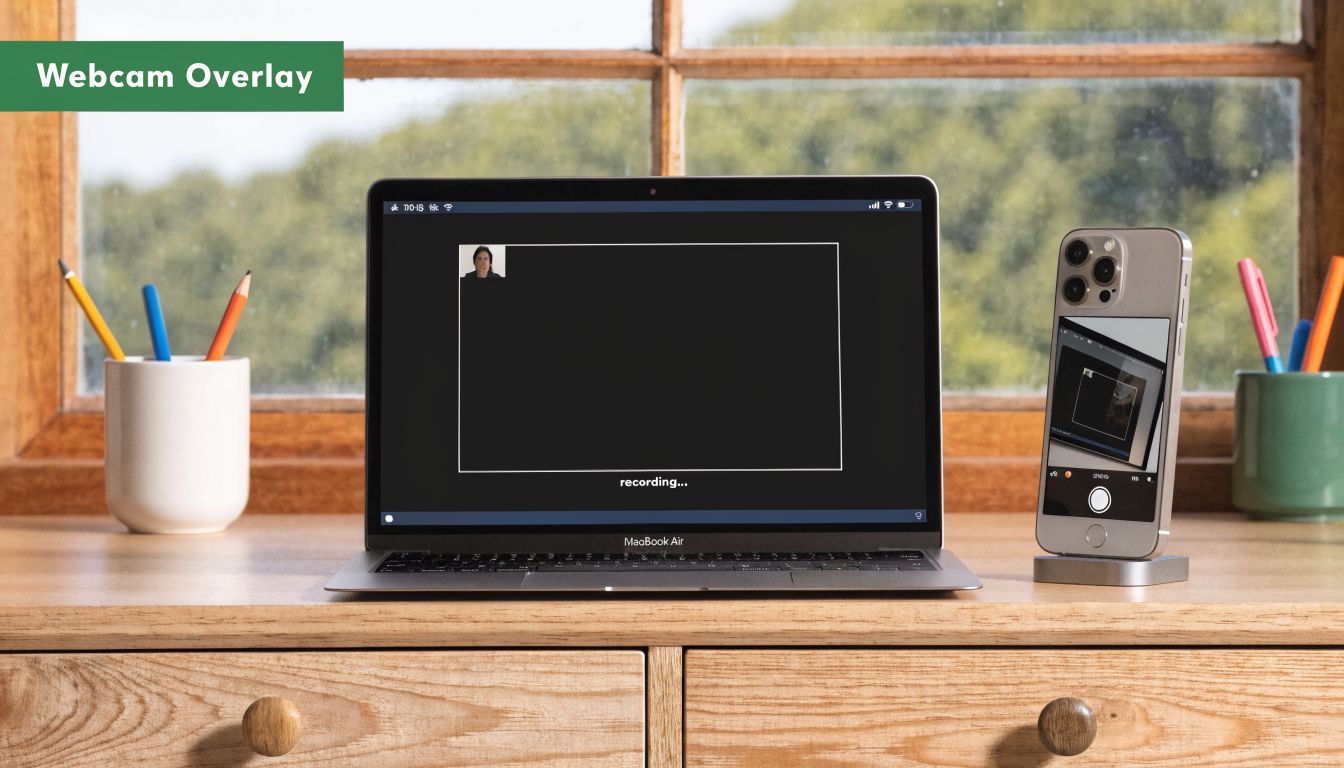
Use Continuity Camera for a cleaner talking head
When the built-in webcam looks flat, your iPhone is the easiest upgrade. The Mac ecosystem gives you Continuity Camera, which lets the iPhone act as a webcam for your Mac workflow.
That matters because the iPhone camera generally looks better than the MacBook Air camera in real use. For product demos, founder explainers, and customer training, the improvement is obvious without needing a separate camera setup.
Use it like this:
- Position the iPhone at eye level: Your video looks more direct immediately.
- Stabilize the mount: Don't prop it loosely against a mug and hope for the best.
- Match the shot to the purpose: Head-and-shoulders works for instruction. Closer framing works for announcements.
- Record the screen and webcam with intent: Don't add your face just because you can. Add it when your delivery matters.
Showing your face is useful when the video needs trust, emphasis, or personality. It's unnecessary when the task is purely mechanical.
For a quick internal issue reproduction, skip the webcam. For launch videos, tutorials, and async communication with customers, the human layer usually earns its place.
Quick Edits and Smart Exports from QuickTime
Recording is only half the work. The last minute before and after the action is where most roughness lives.
Trim first, then decide if you need a real editor
QuickTime's built-in Trim function handles the most common cleanup task. Open the recorded file, choose Edit > Trim, then drag the yellow handles to remove dead space at the beginning or end.
That single step makes a video feel planned instead of improvised. It removes the mouse drift before you start speaking and the awkward pause after you finish.
Use QuickTime for edits when the changes are simple:
- Cut the setup pause: Remove the seconds before your first meaningful action.
- Delete the messy ending: Most recordings stop too late.
- Keep the clip focused: If the middle needs major restructuring, QuickTime starts to feel limiting.
If you need a separate walkthrough for trimming and simple changes, Smooth Capture published a practical guide on editing video in QuickTime Player.
For users who end up with MP4 files from other workflows, this Vatis Tech guide to trimming MP4 videos is also useful.
Export for the destination, not just the highest setting
QuickTime's Export As menu is enough for straightforward delivery. The right export choice depends on where the video is going and how it will be reviewed.
A simple decision table works well here:
| Destination | Export approach | Why it works |
|---|---|---|
| Slack or email review | Smaller preset | Faster upload and easier review |
| Help center or training | Clear HD export | Keeps UI readable without oversized files |
| Public video platform | Higher-quality export | Preserves detail for broader distribution |
The common mistake is exporting once and using that file everywhere. That creates friction fast. The version that's fine for a public upload may be annoying to share internally, and the compressed internal review file may look too soft for customer-facing content.
Export settings should follow distribution. A review file and a publish file don't need to be the same thing.
QuickTime does enough when your finish line is simple: trim, export, send. It becomes awkward when you need clip rearrangement, layered audio, branded framing, or multiple output formats from one capture session.
When to Upgrade to a Professional Workflow
The built-in tools start strong because they remove friction. Then the friction comes back later.
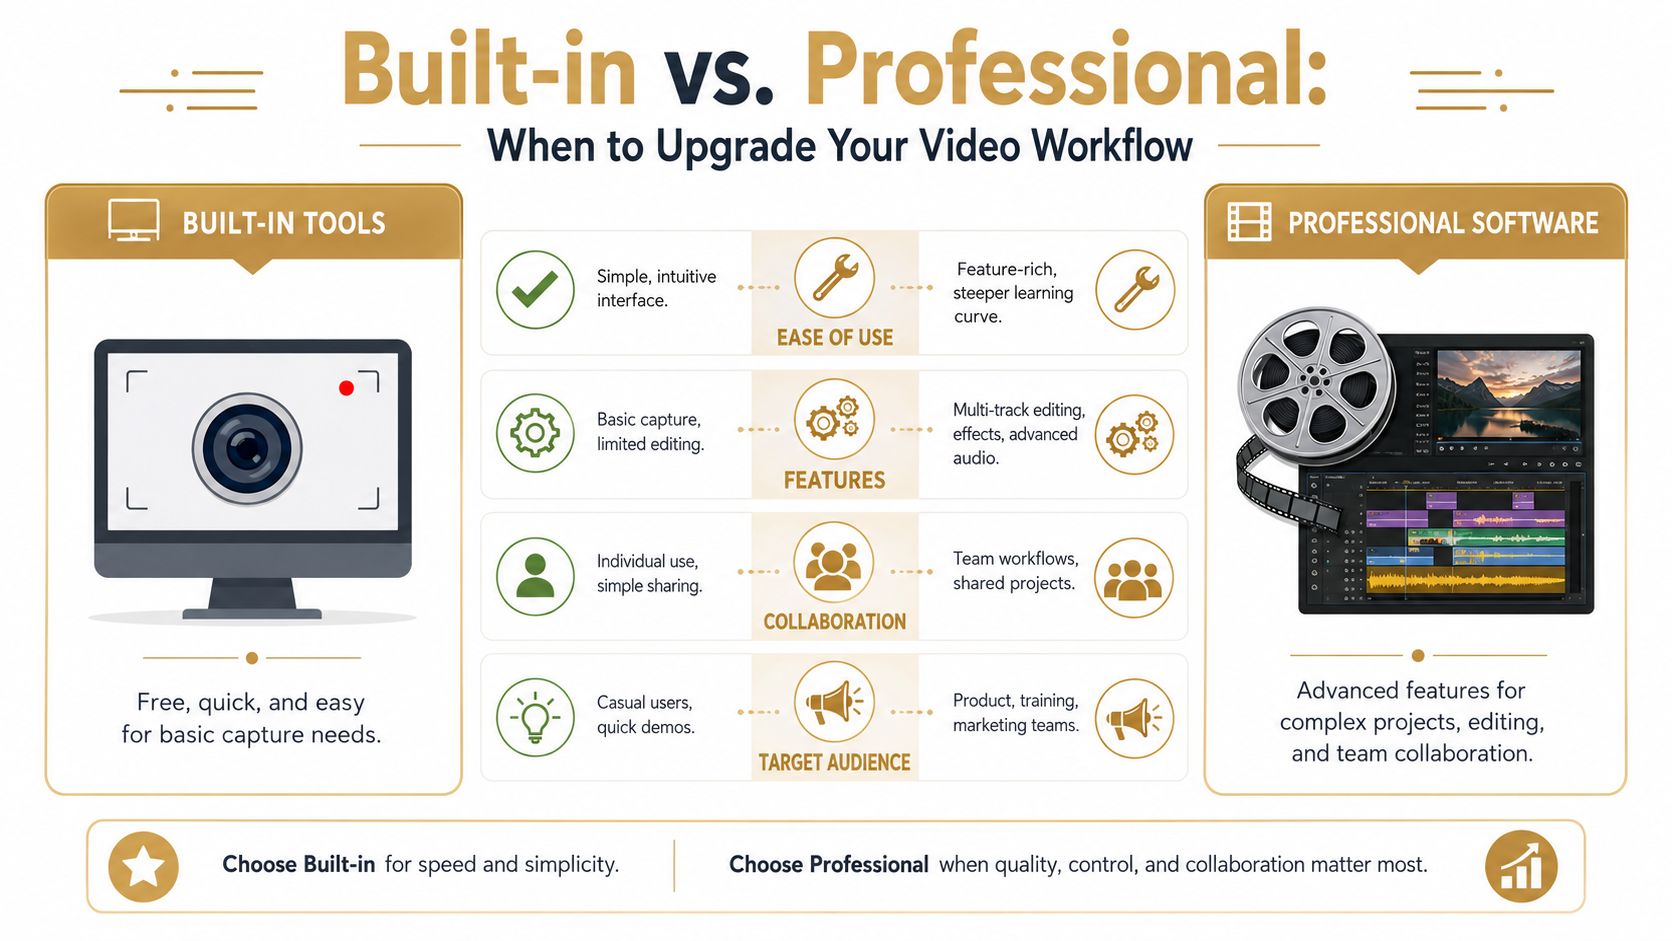
The built-in stack is good until audio and consistency matter
QuickTime and the Screenshot toolbar are good at capture. They are not built for repeatable production. That distinction matters if your team ships demos, onboarding clips, release videos, support explainers, or social cut-downs every week.
The biggest breaking point is audio control. Built-in macOS tools lack native multi-track audio capabilities, real-time level monitoring, and advanced noise reduction, which forces professional users toward other tools or more involved post-production, as described in Zapier's guide to recording yourself on a Mac.
That limitation changes the whole workflow. Once you care about voice quality, app audio, webcam balance, consistency across episodes, or recovering a flawed take, the built-in path stops saving time.
You can see the difference clearly:
| Need | Built-in tools | Professional workflow |
|---|---|---|
| Quick one-off recording | Strong fit | Often unnecessary |
| Audio monitoring | Limited | Better control |
| Multi-track editing | Not native | Standard capability |
| Reusable branded outputs | Manual | Much easier |
| Team repeatability | Fragile | More consistent |
What changes when a team records video every week
The issue isn't just missing features. It's accumulated labor.
A product manager can absolutely record a rough feature walkthrough in QuickTime. But if that same team needs polished launch assets, support videos in multiple aspect ratios, cursor emphasis, zooms, webcam placement, subtitles, and clean exports, basic tools create a chain of extra tasks.
That's the point where teams usually move to a dedicated screen recording and editing workflow. Tools in that category give you things the built-in stack doesn't handle well: multi-track timelines, better cursor treatment, cleaner webcam overlays, reusable backgrounds, and more direct export control.
One option in that category is Smooth Capture, a native macOS screen recording and editing app built for product demos, onboarding videos, client walkthroughs, and launch assets. Its workflow includes timeline editing, multi-track audio, cursor effects, automatic zoom, webcam overlays, device frames, subtitle generation on device, and exports aimed at business use cases like App Store previews and social formats.
That doesn't mean every team needs more software immediately. It means teams that publish often should compare the hidden cost of patching together free tools against a workflow built for repeat use.
A free workflow is only free when the cleanup time stays small.
A simple decision rule
Stay with built-in tools when all of these are true:
- The video is short
- The audience is internal or temporary
- One audio source is enough
- Basic trimming will finish the job
Upgrade when any of these become normal:
- You need consistent audio across many videos
- You need webcam plus screen plus app sound without awkward workarounds
- You're producing assets for customers, prospects, or the App Store
- Your team keeps re-editing the same kinds of videos
- You need one recording turned into multiple deliverables
For a solo founder or PM, that threshold often arrives sooner than expected. The first few recordings feel easy. The tenth recording reveals the pattern. If each video needs manual repair, awkward exports, and separate cleanup passes, the bottleneck isn't your laptop. It's the workflow.
If your team records product demos, tutorials, or launch videos regularly, Smooth Capture is worth evaluating as a more structured macOS workflow. It handles recording and editing in one place, which is useful when QuickTime is no longer enough but a full traditional editor feels heavier than the job requires.
Ready to create stunning app demos?
SmoothCapture makes it easy to record your screen with 3D device frames, cinematic cursor effects, and professional editing tools.