iTunes Error 0xE80000A Solved: A 2026 Mac Guide
You plug in your iPhone a few minutes before a recording session. Finder or the old iTunes stack should see it immediately. Instead you get the message: “iTunes could not connect to this iPhone. An unknown error occurred (0xE80000A).” If you’re trying to capture an app demo, record onboarding footage, or mirror a device for production work, this error is more than annoying. It breaks momentum. It can also send you into the wrong troubleshooting path, because the message sounds vague enough to suggest everything from a bad cable to a dead phone. In practice, it’s usually narrower than that. This error is most often a trust and communication problem between macOS and the iPhone, not a sign that your device is permanently damaged. The fastest fix is usually the one that rebuilds that trust relationship cleanly, but it’s worth ruling out the obvious first so you don’t burn time on unnecessary resets.
What Is iTunes Error 0xE80000A and Why Does It Happen
This error shows up when your Mac and iPhone fail the trust handshake that allows data access over USB. The phone may still charge. It may even appear briefly in Finder. But the secure pairing needed for backup, restore, sync, or screen capture doesn’t complete. That’s why the failure feels inconsistent. You can have a phone that powers on, a cable that charges, and a Mac that sees something connected, yet the session still dies the moment the system needs authenticated access. The issue became widely visible around 2017, alongside iOS 11. Analysis of user reports found that 65% of cases involved outdated iTunes versions, and updating resolved 80% of those issues, based on the referenced analysis of forum reports in this review of the 2017 wave of 0xE80000A problems. For Mac users today, the wording still points to the same underlying pattern even though device handling has moved more into Finder and system services. A stale trust record, corrupted device pairing data, or a broken mobile-device process can all produce the same symptom.
Practical rule: If the phone charges but won’t pair, think trust failure first, hardware failure second.
That matters for creators because this error tends to appear at the worst time. It often shows up right before a live capture, after an iOS update, after changing cables, or after reconnecting a device that hasn’t been used on that Mac in a while. The good news is that the fix path is usually straightforward. Start with the physical layer. Then reset trust. Then inspect the background services that manage iPhone connections on macOS.
Start with These Quick Physical Checks
The fastest wins are still physical. Before you reset files or touch Terminal, confirm the connection itself is clean.
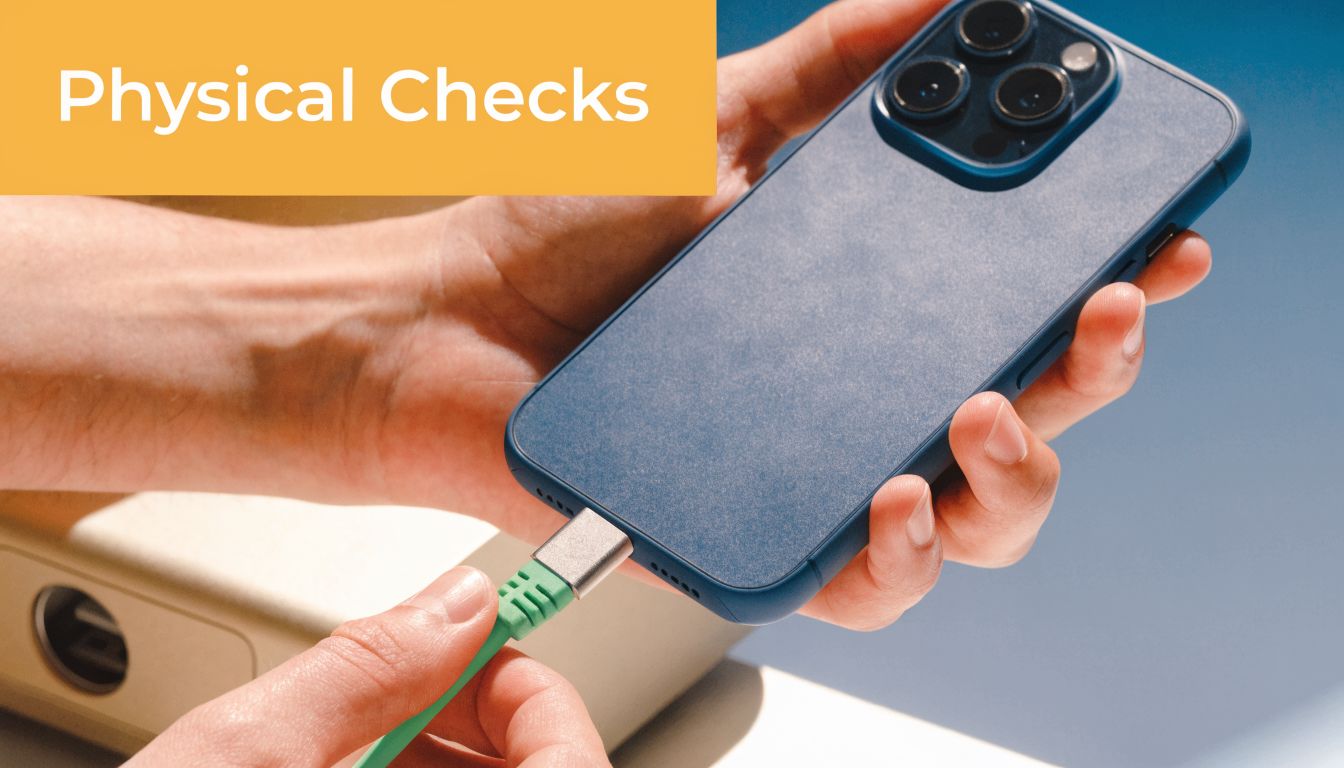
Check the cable before you touch software
A surprising number of 0xE80000A cases start with a cable that still charges but no longer handles stable data. According to diagnostic logs and forum data, worn or non-MFi certified Lightning cables can cause up to 25% of connection failures that lead to errors like 0xE80000A. The same source notes that a force-quit and replug routine resolves the issue in under 5 minutes for 75% of users in aggregated reports from this iMobie troubleshooting guide. Use this checklist:
- Inspect the connector ends: Look for bent tips, loose housings, fraying near the strain relief, or dirt packed into the phone-side connector.
- Use an Apple or MFi-certified cable: Cheap cables often pass power and fail data.
- Avoid hubs for the first test: Connect directly to the Mac, especially if you’re preparing for a production capture.
- Access the iPhone fully: Don’t leave it on the lock screen and assume trust will pop up correctly. If you regularly package recordings with a polished device look later, this is also a good time to separate capture reliability from visual styling. Record cleanly first. Add presentation polish after. That workflow is easier if you handle framing in post, such as with approaches discussed in adding a device frame to screen recordings.
Swap the port and clear the connection state
Don’t just unplug and replug into the same setup. Change one variable at a time.
- Try a different USB port on the Mac.
- Disconnect the phone.
- Quit Finder if it’s hanging on the device.
- Reconnect and watch for the trust prompt.
- If nothing changes, restart both the iPhone and the Mac. A simple restart matters because it clears the current USB session state. On a busy work machine, especially one that has mirrored devices repeatedly, the connection layer can get stuck in a half-recognized state. Later in the process, if you need a visual walkthrough of the basic connection cleanup routine, this short clip is useful:
If the phone still won’t pair after these checks, stop cycling cables forever. Move to the trust reset. That’s the step that fixes the largest share of stubborn cases.
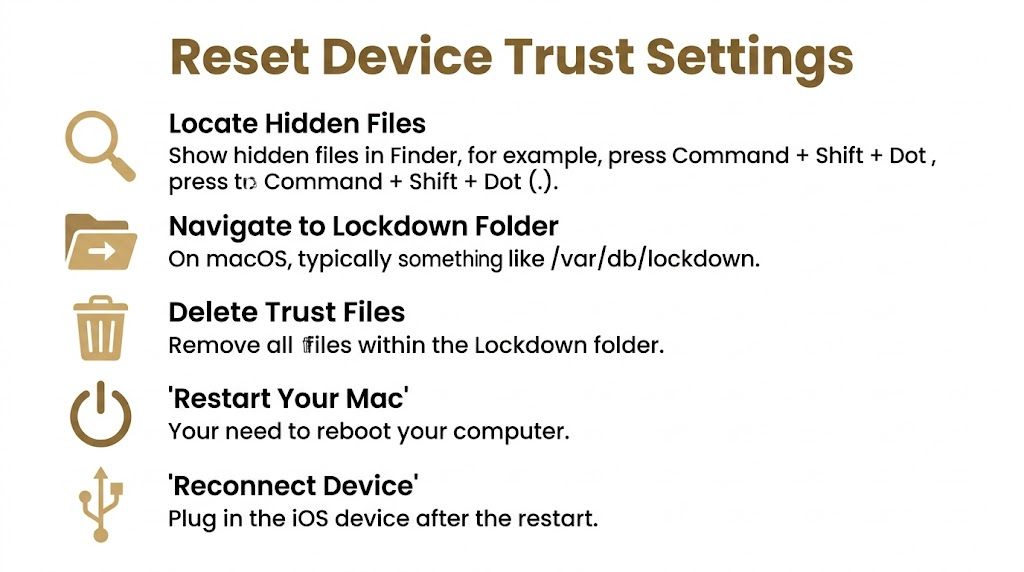
Reset Your Mac's Device Trust Settings
When the quick checks fail, I stop thinking about ports and start thinking about pairing data. macOS stores device trust information in a Lockdown folder. If those records go bad, the iPhone and Mac stop recognizing each other properly.
On the Windows side, resetting the Lockdown folder has an 85-90% success rate on the first attempt and can be done in under 5 minutes, while a full iTunes reinstall can take over 30 minutes, according to this Help Desk Geek walkthrough of the Lockdown reset method. The same principle carries over on Mac. Rebuild trust first because it’s faster and less disruptive than reinstalling broader components.
Why trust data breaks
Trust records get stale after OS updates, interrupted sync sessions, permission glitches, and device swaps. The symptom is simple. The phone appears connected, but Finder never reaches a stable authenticated session. For people recording iPhone or iPad footage on Mac, this is one reason USB capture can feel random. The hardware hasn’t changed. The trust record has. If your workflow depends on direct iOS recording, this is also why it helps to use tools built around native device capture on macOS, such as setups described on this iOS and iPad recording feature page.
Delete the broken trust relationship. Don’t try to negotiate with it.
How to reset the Lockdown folder on macOS
Use Finder or Terminal. Terminal is faster and cleaner. Option 1. Use Finder
Disconnect the iPhone.
In Finder, choose Go > Go to Folder.
Enter:
/var/db/lockdownMove the contents of that folder to Trash. You may be asked for an administrator password.
Restart the Mac. Option 2. Use Terminal Open Terminal and run:
sudo rm -rf /var/db/lockdown/*
Then restart the Mac. A few notes:
- Remove the contents of the folder, not necessarily the folder itself.
- Keep the phone disconnected until the Mac has restarted.
- After reboot, reconnect the iPhone, access it, and tap Trust when prompted.
What should happen after the reset
If the reset worked, macOS will generate new pairing files. Finder should recognize the device as if it were connecting for the first time on that Mac. Use this quick validation table:
| Sign | What it means |
| You see **Trust This Computer** on iPhone | Pairing data was rebuilt |
| Finder shows the device normally | USB communication is healthy again |
| The phone only charges and no prompt appears | Another service layer is still stuck |
| The prompt appears but pairing still fails | Move to service inspection |
If you don’t get a trust prompt after the reset, don’t repeat the same deletion step over and over. The next likely culprit is the macOS process layer.
Inspect macOS System Services and Drivers
This is the part generic guides usually rush past. The trust files can be fine, but the service handling iPhone communication can still be hung.
Existing troubleshooting guides often treat error 0xE80000A reactively and don’t say much about preventing connection failures during long sessions. That leaves a gap for professional users who need a stable USB link for extended recording work, as noted in this Microsoft Answers discussion about the missing prevention guidance.
Check the process layer first
On macOS, the key service to think about is usbmuxd. That’s the daemon that manages USB multiplexing for iPhone and iPad communication. Start here:
- Open Activity Monitor
- Search for
usbmuxd - Confirm it’s running
- If Finder is stuck, also check whether Finder itself is frozen around the device session If the process is missing or behaving oddly, restart the Mac before doing anything more invasive. On macOS, a reboot is often the cleanest way to restart the entire Apple mobile-device stack without manually touching protected components. You can also relaunch Finder:
- Hold Option
- Right-click the Finder icon in the Dock
- Choose Relaunch That clears a surprising number of half-broken device sessions.
Use Terminal and Console to isolate the failure
If you need more signal, use Console. Connect the iPhone, open Console, and filter for terms like:
usbmuxdMobileDevicelockdowntrustUSBYou’re looking for patterns, not a single magic line. Repeated permission failures, repeated disconnects, or immediate session termination after connect all point to a Mac-side service problem rather than a cable problem. You can also sanity-check whether macOS sees the USB device at all:
system_profiler SPUSBDataType
If the device appears in the USB tree but Finder still won’t establish a usable session, your problem is higher up the stack.
A charging phone with no stable Finder session usually means the physical layer is alive and the session layer is broken.
What to change for longer recording sessions
For production work, I’d make three practical adjustments:
- Keep macOS updated: Apple often folds mobile-device fixes into normal system updates.
- Remove unnecessary security interference: If you run aggressive endpoint security tools, test once with them temporarily relaxed according to your org’s policy.
- Use one known-good direct connection path: Same Mac, same cable type, same port family when possible. If your team records repeat tutorials on Mac, it also helps to standardize the surrounding workflow. A stable screen recording process on the host machine reduces the number of variables when an iPhone connection starts failing. A good baseline setup looks a lot like the production habits described in this guide on recording screen on Mac. If the service layer still won’t behave after a clean trust reset and reboot, move to recovery steps that rebuild the broader Apple connection environment.
Advanced Recovery for Your Production Workflow
When quick checks, trust reset, and service inspection all fail, assume you’re dealing with a deeper software problem or a device-specific quirk. At that point, the job isn’t just “fix the error.” It’s “get the recording session back on schedule with the least risk.”
Rebuild the Apple connection stack
On modern macOS, the old “reinstall iTunes” advice doesn’t map cleanly the way it did on Windows. Instead, use a recovery sequence that rebuilds the Apple connection environment indirectly:
- Update macOS fully and restart.
- Try the device on another Mac if one is available. This separates device-specific failure from host-specific failure fast.
- Test with another iPhone or iPad on the same Mac.
- Remove stale trust from the iPhone side by resetting Location & Privacy if the device keeps refusing a fresh trust prompt.
- Check Finder behavior in Safe Mode if you suspect a third-party conflict. This is also where Console becomes worth the effort. If you keep seeing immediate USB attach and detach events, think cable or port stability. If the device stays attached but trust fails repeatedly, think permissions or pairing corruption. A lot of teams lose time here by trying random combinations in random order. Don’t. Change one variable, test, and log the result.
Plan for device variability
One gap in existing guides is that they don’t explain how 0xE80000A may differ across iPhone, iPad, and iPod models. That lack of model-specific analysis leaves creators without a clear view of which devices are more likely to fail during recording sessions, as noted in this review pointing out the missing device-by-device guidance. That missing data has a practical implication. You shouldn’t assume every device in your studio behaves the same way under the same capture setup. For production teams, that means:
- Keep a backup device ready for critical shoots.
- Don’t update every recording device on the same day.
- Validate one “known good” capture device after any macOS or iOS update.
- If one device starts failing repeatedly while another works on the same Mac and cable, stop blaming the host machine alone. Here’s the trade-off I’d make. If the footage is due today, switch devices and keep the project moving. If you have breathing room, isolate the failing unit methodically and fix it after the delivery window. That sounds obvious, but a lot of recording time gets burned trying to make one stubborn phone cooperate when another device could finish the session immediately.
Error 0xE80000A FAQs and Prevention
Once you’ve fixed itunes error 0xe80000a, the next job is keeping it from coming back in the middle of a recording block.
Common questions
**Will resetting the Lockdown folder delete my iPhone data?**No. It removes local trust records on the Mac. You’ll need to reconnect and trust the computer again.
Is this always a cable issue?
No. Cables are common and worth checking first, but trust corruption and background service failures are often the underlying cause when the error won’t go away.
**Does this only affect iPhones?**No. Similar pairing and communication failures can affect iPads and iPod touch devices too. The exact behavior by device family isn’t well documented in most guides, which is part of why the issue remains frustrating for creators.
**What’s the rough Windows equivalent of the main fix?**Resetting the Lockdown folder and restarting the Apple mobile-device service is the closest equivalent. On Mac, the same logic applies even though the files and tools are different.
If the same Mac, same cable, and same port work with one device but not another, stop treating it as a generic system problem.
Prevention habits that reduce repeat failures
You won’t eliminate every pairing problem, but you can make them less likely.
- Use one trusted cable set: Retire cables that charge unreliably, feel loose, or only work at certain angles.
- Approve updates intentionally: Don’t stack a macOS update and an iOS update right before a shoot unless you’ve left time to test.
- Reconnect before the session starts: Verify Finder sees the device and the trust state is healthy before opening your recording workflow.
- Avoid unnecessary USB complexity: Hubs, adapters, and mixed dongle chains increase the number of failure points.
- Watch for early warning signs: Delayed trust prompts, Finder hanging on device load, or intermittent mount behavior usually show up before a full failure.
- Document your known-good setup: If your team shares Macs and phones, write down the exact device, cable, adapter, and OS combination that works reliably. The biggest mistake is treating this error as a one-off annoyance. For professional recording work, it’s an operational reliability issue. The teams that avoid repeated disruption are the ones that standardize their setup, test before they record, and rebuild trust immediately when the first signs appear. If your team records iPhone, iPad, and Mac workflows regularly, Smooth Capture is built for that kind of repeatable production work. It handles native macOS recording, iOS device capture over USB, editing, device frames, subtitles, and polished exports in one workflow, which makes it easier to spend less time fighting setup problems and more time shipping clean videos.
Ready to create stunning app demos?
SmoothCapture makes it easy to record your screen with 3D device frames, cinematic cursor effects, and professional editing tools.