How to Record Screen on Mac: 5 Methods for 2026
Whether you are creating a tutorial, recording a software demo, capturing a video call, or saving gameplay footage, knowing how to record screen on Mac is one of the most useful skills you can have. macOS has solid built-in screen recording tools, and there are excellent third-party apps that go further with features like system audio capture, cursor effects, and device frames.
This guide covers every method available in 2026 -- from the free tools Apple ships with every Mac to professional recording apps that handle audio, editing, and export in one place. By the end, you will know exactly which approach fits your workflow and how to get started in under a minute.
Method 1: The Screenshot Toolbar (Shift-Command-5)
The fastest way to record screen on Mac is the Screenshot toolbar, available on every Mac running macOS Mojave or later. No downloads, no setup -- just a keyboard shortcut.
How to use it:
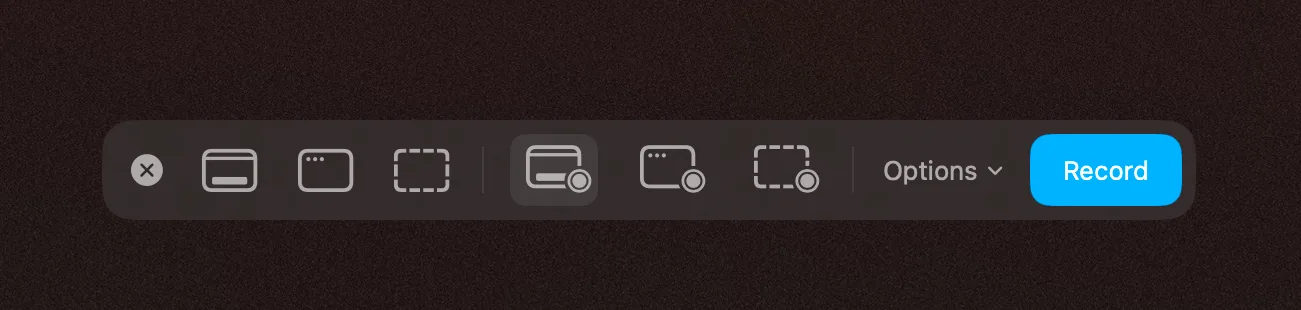
- Press Shift-Command-5 on your keyboard. A floating toolbar appears at the bottom of your screen.
- Choose between Record Entire Screen (the fourth icon) or Record Selected Portion (the fifth icon). If you choose a selected portion, drag the handles to define the area you want to capture.
- Click Options to choose where to save the file, set a countdown timer, decide whether to show mouse clicks, and select a microphone for audio input.
- Click Record. The toolbar disappears and recording begins immediately (or after the countdown if you set one).
- To stop recording, click the Stop button in the menu bar (the square icon in a circle), or press Command-Control-Esc.
The recording is saved as a .mov file to your chosen location (Desktop by default). You can preview it immediately using Quick Look by pressing Space on the file, or open it in QuickTime Player for basic trimming.
Limitations: The Screenshot toolbar records microphone audio only -- it cannot capture system audio (the sound playing from apps, games, or browser tabs) without additional software. There are also no annotation tools, cursor effects, or editing features beyond basic trimming.
Method 2: QuickTime Player
QuickTime Player has offered screen recording since long before the Screenshot toolbar existed, and it remains a reliable option. On modern macOS versions, QuickTime actually opens the same Screenshot toolbar under the hood, but launching it from the app gives you a slightly different workflow that some users prefer.
How to use it:
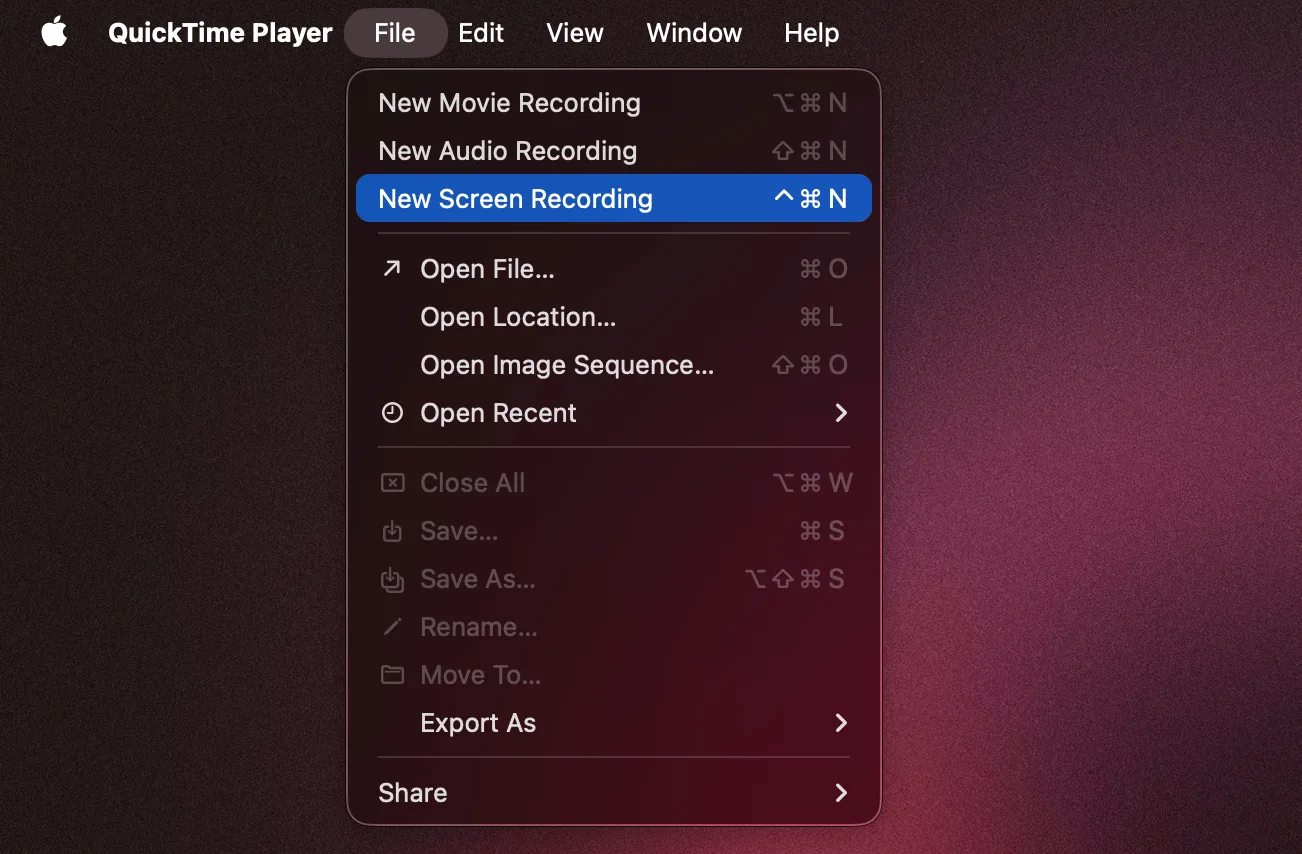
- Open QuickTime Player from the Applications folder or Spotlight (Command-Space, then type "QuickTime").
- In the menu bar, click File > New Screen Recording. The Screenshot toolbar appears.
- Select your recording area, configure options, and click Record -- exactly the same as Method 1.
The advantage of starting from QuickTime is that the recording opens directly in the QuickTime Player window when you stop, making it easy to trim the beginning and end (Edit > Trim) before saving. If you need a quick edit without installing anything else, this workflow is convenient.
Like the Screenshot toolbar, QuickTime cannot record system audio natively. It supports microphone input only.
How to Record Screen on Mac with Audio
One of the most common questions about screen recording on Mac is how to capture audio -- specifically system audio, not just your microphone. This distinction matters because macOS treats them very differently.
Recording Microphone Audio
Recording your voice alongside a screen recording is straightforward with the built-in tools. When you open the Screenshot toolbar (Shift-Command-5), click Options and select your microphone under the Microphone section. You can choose the built-in microphone, an external USB mic, or a Bluetooth headset. The audio from your selected microphone will be embedded in the recorded .mov file.
This works well for narrated tutorials, walkthroughs, and presentations where your voice is the primary audio source.
Recording System Audio (Internal Sound)
Capturing system audio -- the sound coming from apps, browser tabs, games, and video calls -- is where things get more involved. macOS does not provide a built-in way to record internal audio with the Screenshot toolbar or QuickTime. This is a deliberate design choice by Apple for privacy and DRM reasons, but it is frustrating when you need to capture app sounds, music, or a video call.
There are two main approaches to solve this:
Option A: Install a virtual audio driver. Free tools like BlackHole (open source) or Loopback (paid, by Rogue Amoeba) create a virtual audio device that routes your system audio to an input that screen recorders can capture. The setup process involves:
- Installing BlackHole (the 2-channel version works for most users).
- Opening Audio MIDI Setup (built into macOS) and creating a Multi-Output Device that combines your speakers and the BlackHole virtual device.
- Setting that Multi-Output Device as your system audio output.
- In the Screenshot toolbar or QuickTime, selecting BlackHole as the microphone input to capture the routed system audio.
This works, but the setup is fiddly. You need to switch your audio output back when you are done recording, and some users run into issues with audio latency or volume levels.
Option B: Use a third-party screen recorder with built-in system audio capture. Several Mac screen recording apps handle system audio natively, without requiring virtual audio drivers. They hook into macOS audio at a lower level and capture internal sound alongside your screen recording. This is the simplest path if you regularly need to record screen on Mac with sound.
Method 3: Third-Party Screen Recording Apps
The built-in macOS tools cover basic screen recording well, but if you need system audio, cursor effects, annotations, device frames, or editing capabilities, a third-party app is the way to go. Here are the most popular options in 2026:
OBS Studio (Free, open source). OBS is the go-to free option for advanced screen recording and live streaming. It supports multiple audio sources (including system audio with a plugin), scene composition, and virtually unlimited configuration. The trade-off is complexity -- OBS has a steep learning curve and an interface designed for power users and streamers rather than people who just want a quick screen recording.
ScreenFlow ($169, one-time). A long-standing Mac favorite that combines screen recording with a full video editor. ScreenFlow captures system audio natively and offers a timeline editor for trimming, transitions, annotations, and callouts. It is well suited for tutorial creators and course producers.
CleanShot X ($29 one-time or $8/month). Primarily a screenshot tool, CleanShot X also offers screen recording with internal audio capture. It is lighter than full video editors and popular with developers and designers who want fast, polished captures without a heavy editing workflow.
Smooth Capture (one-time purchase). Built specifically for developers and product teams on macOS, Smooth Capture records your screen with cinematic cursor effects, auto-zoom on clicks, and real-time 3D device frames that wrap your recording in an iPhone, iPad, or MacBook mockup as you record. It also supports recording a physical iOS or iPad device directly via USB, which is useful for app developers creating demo videos. The built-in timeline editor lets you trim, cut, and export without switching to a separate app.
Each of these tools solves problems that the built-in macOS tools do not. The right choice depends on whether you need streaming (OBS), full video editing (ScreenFlow), quick captures (CleanShot X), or a developer-focused recording workflow with device frames and cursor effects (Smooth Capture).
How to Screen Record on MacBook Air
If you are wondering how to screen record on MacBook Air specifically, the good news is that every method described above works identically on a MacBook Air, MacBook Pro, iMac, Mac mini, and Mac Studio. macOS does not restrict screen recording features by hardware model.
The one thing to keep in mind with a MacBook Air is performance. The M1, M2, and M3 MacBook Air models handle screen recording smoothly thanks to their hardware video encoders. However, if you are recording at high resolution (such as capturing a 6K external display) while simultaneously running demanding apps, you may notice the fan-less MacBook Air throttling under sustained load. For most typical screen recordings -- capturing a single app window, a browser tab, or your full built-in display -- a MacBook Air handles the task without any issues.
To start recording on a MacBook Air, press Shift-Command-5, choose your recording area, and click Record. The steps are exactly the same as on any other Mac.
How to Stop Screen Recording on Mac
Stopping a screen recording on Mac is straightforward, but the method depends on how you started:
- Screenshot toolbar or QuickTime: Click the Stop Recording button in the menu bar at the top of your screen. It looks like a square inside a circle. Alternatively, press Command-Control-Esc to stop immediately.
- OBS Studio: Click the Stop Recording button in the OBS controls panel, or use your configured hotkey.
- Other third-party apps: Most screen recording apps place a stop button in the menu bar or support a global keyboard shortcut that you can customize in the app settings.
A common problem is not being able to find the stop button. When you start a screen recording with the Screenshot toolbar, the entire toolbar disappears to stay out of the way. The only visual indicator is a small stop icon in the menu bar. If you have many menu bar icons, it can be easy to miss. The keyboard shortcut Command-Control-Esc is the most reliable way to stop if you cannot locate the button.
Tips for Better Screen Recordings
Recording your screen is easy -- creating a recording that looks professional takes a bit more thought. Here are practical tips that apply regardless of which tool you use.
Close unnecessary apps and notifications. Before you hit Record, enable Do Not Disturb (Focus mode) to prevent notification banners from popping up mid-recording. Close apps you do not need so that accidental window switches or sounds do not interrupt your capture.
Plan your actions before recording. Do a dry run of whatever you are going to demonstrate. Know exactly which windows you will open, which buttons you will click, and what you will say if narrating. Rehearsing once saves you from recording multiple takes.
Use a clean desktop. If your recording captures the full screen or desktop, remove or hide desktop icons and close extra windows. A cluttered desktop is distracting and unprofessional. Consider using a clean, neutral wallpaper for the duration of the recording.
Record at native resolution. Avoid scaling your display to a non-native resolution before recording. Recording at native resolution produces the sharpest output. If you need the final video at a specific size, scale it down in post-production rather than recording at a lower resolution.
Move your cursor deliberately. Quick, jerky mouse movements are hard for viewers to follow. Move your cursor at a steady, moderate pace and pause briefly on buttons or menu items before clicking. This makes the recording much easier to follow, especially for tutorial content.
Use cursor highlighting or zoom effects. If your recording tool supports cursor effects -- such as click highlights, ripple animations, or auto-zoom on click -- enable them. These visual cues help viewers track where your mouse is and what you are interacting with. Tools like Smooth Capture offer cinematic cursor effects and automatic zoom that follow your clicks, making it easy to create polished recordings without manual editing.
Trim the beginning and end. Almost every screen recording starts with a few seconds of setup (finding the Record button, switching windows) and ends with a scramble to stop recording. Trim those parts out. Even the built-in QuickTime trimming tool handles this well.
Frequently Asked Questions
Can I record my screen on Mac for free?
Yes. Every Mac includes free screen recording tools. Press Shift-Command-5 to open the Screenshot toolbar, or use QuickTime Player (File > New Screen Recording). Both are completely free and require no downloads. They record your screen as a .mov file with optional microphone audio. For system audio capture, you would need a free tool like BlackHole as an add-on, or a third-party screen recorder.
Why is there no sound in my Mac screen recording?
The most common reason is that no microphone was selected in the recording options. Open the Screenshot toolbar (Shift-Command-5), click Options, and make sure a microphone is selected -- not "None." If you are trying to capture system audio (sounds from apps or browsers), the built-in tools do not support this. You need either a virtual audio driver like BlackHole or a third-party recorder that captures system audio natively.
Where are my screen recordings saved on Mac?
By default, macOS saves screen recordings to your Desktop. You can change this location in the Screenshot toolbar: press Shift-Command-5, click Options, and choose a different save location under the "Save to" section. Options include Desktop, Documents, Clipboard, Mail, Messages, Preview, or any custom folder you specify.
How long can I record my screen on Mac?
There is no built-in time limit for screen recordings on Mac. The recording will continue until you stop it manually or your Mac runs out of available storage space. A typical 1080p screen recording uses roughly 100-200 MB per minute depending on screen content, so a 256 GB drive with 50 GB free can hold approximately four to eight hours of recording. Keep an eye on available disk space for longer sessions.
Can I record a specific app window instead of the full screen?
Yes. When you open the Screenshot toolbar (Shift-Command-5), select the "Record Selected Portion" option and drag the selection rectangle to cover just the app window you want. While macOS does not offer a true single-window recording mode (the selection is a fixed rectangle, not window-aware), you can resize and position the selection precisely around any window. Third-party tools often provide true window-capture modes that automatically track and crop to a specific window.
Screen recording on Mac is built into the operating system, so getting started takes nothing more than a keyboard shortcut. For basic captures with microphone audio, Shift-Command-5 does the job. When you need system audio, cursor effects, device frames, or editing tools, a dedicated app saves time and produces more polished results. Whatever you are recording -- a bug report, a product demo, or a tutorial -- the right setup makes the difference between a recording that gets the point across and one that looks truly professional.
Ready to level up your screen recordings? Download Smooth Capture to record with cinematic cursor effects, 3D device frames, and a built-in editor -- or check out the pricing to find the right plan for your workflow.
Ready to create stunning app demos?
SmoothCapture makes it easy to record your screen with 3D device frames, cinematic cursor effects, and professional editing tools.