How to Screen Record TikTok With Audio & No Watermark
You’ve probably done this already. A TikTok clip surfaces in your team chat, someone says “we should reference this in the launch deck,” and ten minutes later you’ve got a messy screen capture with a notification banner across the top, uneven audio, and no clean way to turn that vertical clip into something usable for a demo, tutorial, or client deliverable. That’s the gap between casually saving a TikTok and screen recording TikTok for professional use. The recording itself is easy. The hard part is getting clean audio, avoiding quality loss, staying on the right side of platform rules, and ending up with an asset you can reuse across formats.
Why Professionals Screen Record TikTok
Teams don’t screen record TikTok because they want a souvenir. They do it because TikTok has become part of the research stack. Product marketers capture feature explainers posted by competitors. Agencies save trend references for client pitches. Support and education teams pull examples of user behavior, onboarding patterns, and short-form teaching formats they want to study or adapt. That matters because TikTok isn’t a niche platform people check occasionally. Users globally spend an average of 95 minutes per day on TikTok, the highest screen time among social apps, according to TikTok screen time data compiled here. If your team works in video, product education, or social strategy, that volume of attention makes TikTok impossible to ignore. A quick screen grab is rarely enough for business use. You need stable framing, clean audio, and a source file that won’t fall apart when you crop, annotate, or place it inside a device mockup for a deck or explainer. If your end goal is a more polished presentation, it helps to see how teams add a device frame to screen recordings after capture so the raw clip feels intentional instead of improvised.
Practical rule: Record for reuse, not just reference. The extra minute you spend on cleaner framing and audio saves far more time in editing.
There’s also a strategic reason to take screen recording seriously. Native TikTok downloads aren’t always available, the built-in save options aren’t always suitable for internal workflows, and sometimes you need to capture the full viewing context, including captions, overlays, or interaction cues. In those cases, the best method depends on what you’re making next, not just what device is in your hand.
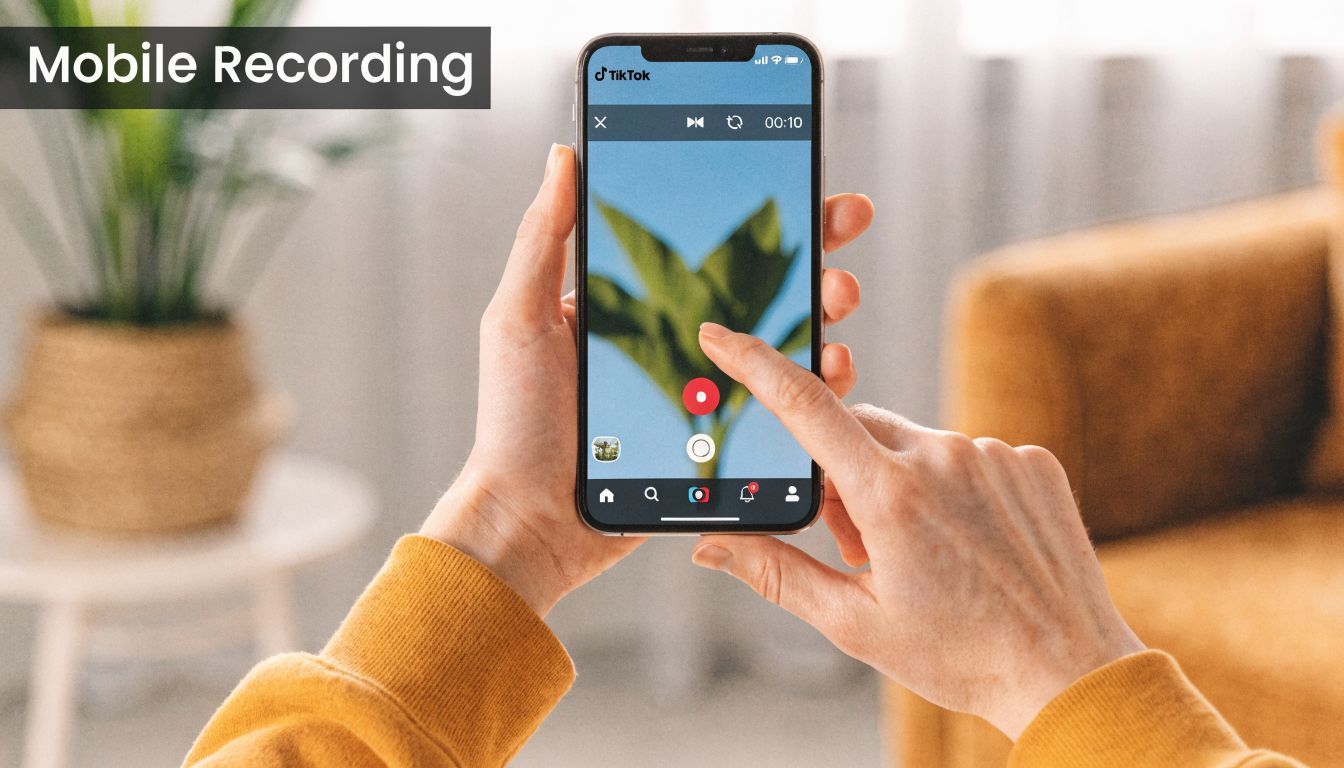
Recording TikTok on Mobile Devices for iOS and Android
Mobile recording is still the fastest way to screen record TikTok when you need something immediately. It’s useful for capturing trends in the app environment, preserving the mobile UI, or grabbing reference clips during review sessions when you’re away from your desk.
 The trade-off is control. Phones are convenient, but they’re easier to sabotage with notifications, accidental gestures, and audio routing issues. If the clip matters, prep the device before you hit record.
Recording on iPhone and iPad
On iPhone and iPad, use the built-in Screen Recording control from Control Center. If it isn’t already visible, add it in Settings so you’re not searching for it mid-session. Open TikTok, find the video, and pause it at the first frame you want to capture. Before recording, do three things:
- Turn on Do Not Disturb: This prevents banners, message previews, and call interruptions from contaminating the take.
- Set screen brightness manually: Auto-brightness shifts can make a clip look uneven if you’re recording in changing light.
- Check audio behavior: If you need the TikTok audio, test a short capture first. iOS usually makes this simple, but you still want to confirm the result before recording a full sequence. Once you’re ready, start the recorder from Control Center, wait for the countdown, switch back to TikTok, and press play immediately. Stop the recording a beat after the video ends so you have room to trim cleanly. For teams that also capture iPhone and iPad flows over USB for cleaner production work, it’s worth reviewing dedicated iOS and iPad recording workflows, especially when you need something more stable than an on-device screen recording.
Recording on Android
Android can be excellent for this, but audio is where people get burned. Internal audio capture depends on the recorder, OS version, and device manufacturer. The strongest path is the native Screen Recorder on Android 14+, where you can enable internal audio routing before capture. According to this Android TikTok recording guide, Android-to-TikTok screen recording relies on internal audio routing because of platform restrictions, and native recording on Android 14+ reached a 92% success rate in XDA Developers tests across 1,000 devices. The same source notes results drop on older Android versions and on some manufacturer skins, including EMUI and HarmonyOS. Use this workflow:
- Open Quick Settings and long-press Screen Record so you can inspect the options instead of starting blind.
- Enable internal audio if your device supports it. If you only allow microphone input, you’ll get room noise instead of the original track.
- Set the target resolution and frame rate before you record. Higher settings are useful only if the phone can sustain them without stuttering.
- Open TikTok, pause on the first frame, then record and resume playback right away. Later in the process, a visual walkthrough can help if you’re troubleshooting setup or timing:
What usually goes wrong on mobile
Most failed mobile captures fall into a few predictable categories.
- Audio is missing: On Android, this usually means the recorder used the microphone instead of internal audio.
- The clip starts late: Users hit record, then fumble back to TikTok and miss the opening beat.
- A notification ruins the take: This is the classic mistake. Silence the phone first.
- The phone gets hot during longer sessions: Once the device throttles, dropped frames become obvious.
If the clip is important enough to edit, it’s important enough to do a short test recording first.
Mobile is best for fast capture and app-native context. It’s not the best choice when you need the cleanest source file, exact cropping, or desktop-grade editing flexibility.
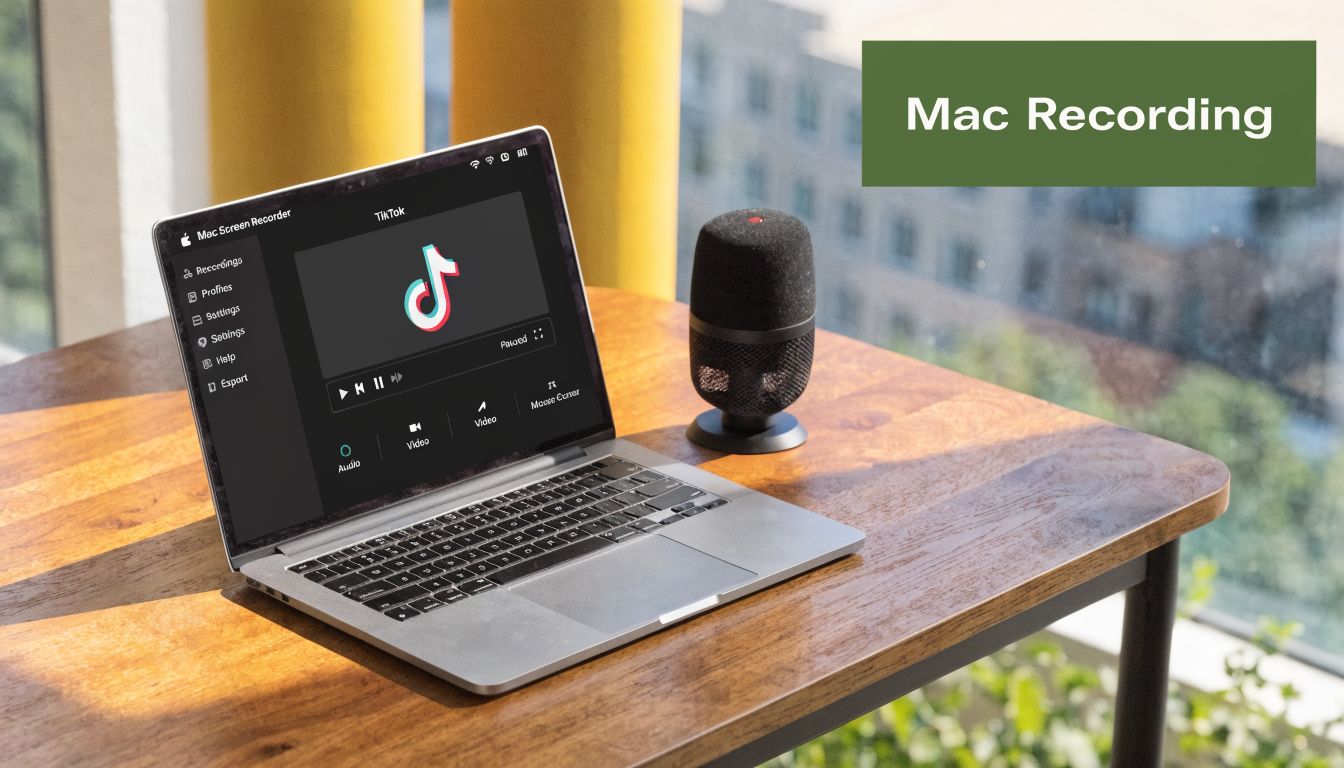
The High-Fidelity macOS Screen Recording Method
Desktop recording is the better method when the capture is headed into a deliverable. If you’re making a client presentation, internal training module, ad concept, or polished product walkthrough, macOS gives you tighter framing, more predictable audio, and better exports.
Why desktop capture is cleaner
The biggest win is precision. You can isolate only the TikTok player area, avoid the surrounding browser clutter, and capture a file that’s already closer to your delivery frame. That matters when you’re cutting for social, presentations, or documentation. Benchmark data from 500+ captures showed that region selection produced 40% smaller file sizes than full-screen recording, averaging 150MB versus 250MB per 60-second clip, according to this macOS TikTok recording breakdown. Smaller files aren’t just easier to store. They’re faster to move through review and easier to repurpose without trimming away dead desktop space.
A reliable macOS setup
The most dependable setup uses TikTok in a desktop browser plus either QuickTime Player or a dedicated screen recorder, paired with a virtual audio driver such as BlackHole if you need system audio routed cleanly. Use this sequence:
- Open TikTok in Safari or Chrome: Go to the exact video and let it fully load.
- Pause at the first clean frame: This avoids a messy start with buffering or UI shifts.
- Choose region capture: Frame only the video area, not the whole display.
- Route system audio properly: If your recorder doesn’t capture app audio natively, use BlackHole so the output is clean and not re-recorded through the room.
- Record, then resume playback immediately: Timing matters. Don’t leave a long dead section at the top.
- Trim the tail before export: Leave enough room for clean edits, then remove stray UI moments. If you want a broader walkthrough of desktop capture options, including audio setup, this guide to a Mac screen recorder with audio covers the core decisions well. A couple of workflow choices make an outsized difference:
| Choice | Better option | Why it works |
| Capture area | Region | Less cleanup after recording |
| Audio source | System audio routing | Cleaner than mic pickup |
| Playback source | Desktop browser | Easier to frame and manage |
| Finish point | A beat after the clip ends | Cleaner trimming |
Capture only what you intend to use. Every extra browser tab, dock icon, and menu bar element becomes editing debt.
When this method is the wrong choice
Desktop isn’t always right. If you specifically need the in-app TikTok environment, including native mobile gestures or interface behavior, a browser capture can feel too sterile. It also won’t help if the use case depends on how TikTok behaves inside the phone app. Still, when the goal is a polished asset, macOS is the standard I’d trust first. It’s easier to keep consistent, easier to edit later, and much less likely to leave you fixing preventable quality problems in post.
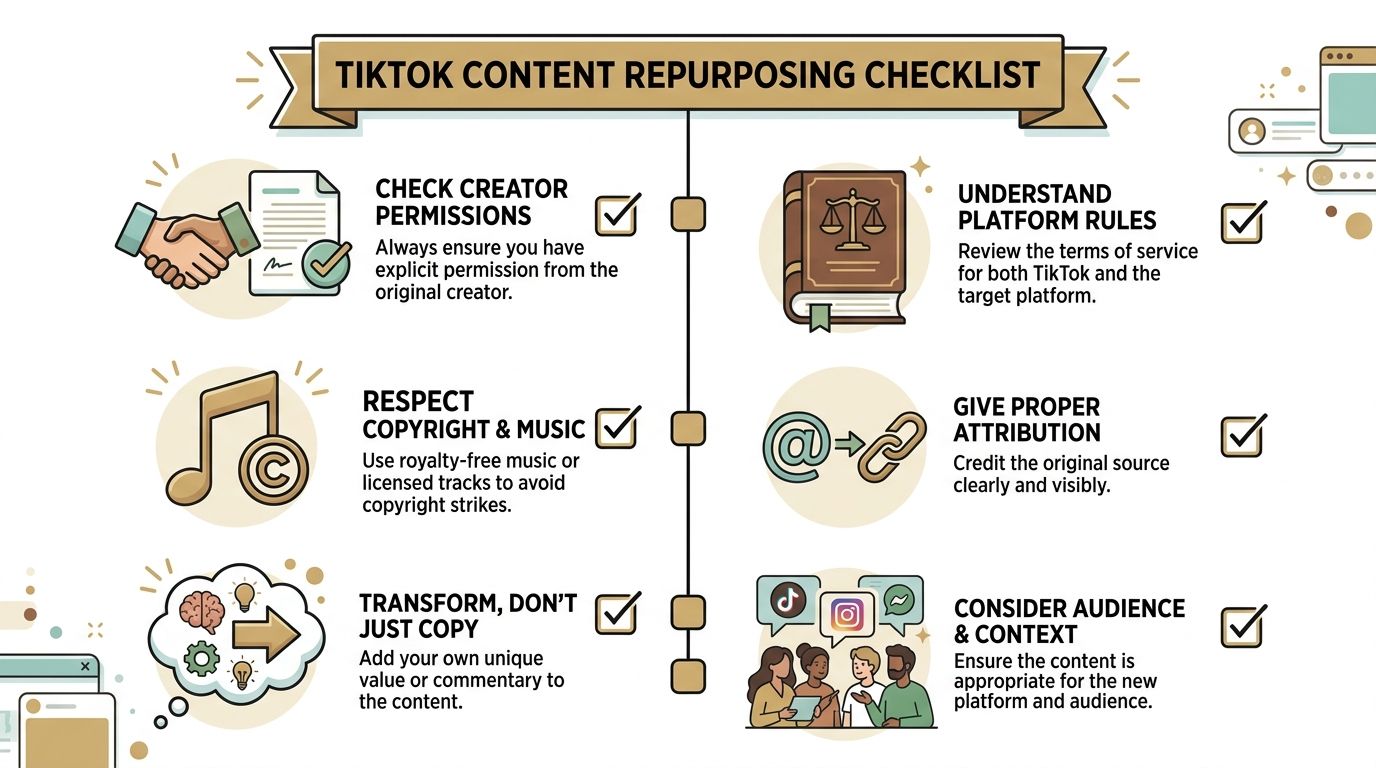
Navigating the Rules of Repurposing TikTok Content
Technical tutorials usually stop at “here’s how to capture the video.” That’s not enough for a business workflow. The more important question is whether your team should use that recording, where, and under what conditions.
Most “screen record TikTok” tutorials skip that part. 67% of search results for the keyword provide step-by-step instructions without mentioning copyright, creator rights, or platform violations. At the same time, TikTok’s Terms of Service prohibit unauthorized recording and redistribution of creator content. That gap creates real exposure for marketers, agencies, founders, and support teams who assume that if a clip is easy to capture, it’s safe to reuse.
Low-risk and high-risk use cases
Not every use of a screen-recorded TikTok carries the same risk. The context matters. Lower-risk use cases usually include internal review and reference work:
- Trend research: Saving a clip so your team can discuss pacing, hooks, or structure internally.
- Competitive analysis: Reviewing how another brand presents a feature or campaign.
- Your own content archive: Recording your own TikToks when you need a backup or an alternate edit path.
- Approved collaborations: Using creator material when permission is already documented. Higher-risk use cases are the ones that trigger concern fastest:
- Using a creator’s video in paid marketing without permission
- Reposting a recorded clip as if it were your own
- Removing branding or context to disguise the origin
- Republishing music or visuals you don’t have rights to use commercially This isn’t just about legal exposure. It’s also about how your brand operates. Teams that build repeatable content systems need a standard that editors, marketers, and account managers can apply without guessing.
A practical review process
A simple review process catches most problems before they become expensive or embarrassing.
- Identify who owns the content. If it’s not your team, assume you need permission unless the use is strictly internal.
- Separate reference from redistribution. Internal study is different from public posting.
- Check the music layer. Even if a visual use feels acceptable, the audio may create a rights issue.
- Document approvals. If a creator said yes, keep the record where the team can find it.
- Ask whether the new use adds value or just copies. If the answer is “it’s basically the same clip,” slow down.
A clean capture does not equal a clean right to publish.
The safest default is simple. Record freely for internal analysis. Pause before external use. If the recording will appear in marketing, client work, or public-facing content, get permission or replace it with original material that delivers the same point without borrowing someone else’s asset.
The Pro Workflow From Capture to Polished Asset
A raw TikTok recording is rarely the final deliverable. Teams usually need a reference clip for strategy, a cleaned-up excerpt for a deck, a vertical cut for social, and a wider version for documentation, sales enablement, or a launch page. That’s where most workflows break. The capture is easy. The format conversion is not.
Emerging data shows 41% of TikTok content creators now repurpose short-form video across multiple platforms, which creates a production bottleneck when one source has to feed both vertical and horizontal outputs. The practical problem is obvious to anyone who edits regularly. A clip framed for 9:16 often looks cramped or awkward when dropped into a wider canvas, and teams waste time re-recording instead of reusing.
Start with the end format
The best editors decide the destination before they start cutting. If the TikTok capture will live in more than one place, treat the recording as a source asset, not a finished video. That changes the workflow:
- Keep the cleanest original recording you can
- Trim only obvious dead space at first
- Preserve room for reframing
- Avoid baking in unnecessary overlays too early If your next step is ideation rather than finishing, AI tools can help teams create viral short-form videos from longer material or turn rough concepts into faster iterations. That’s most useful before the fine edit, not after.
Turn a raw capture into something publishable
Once the clip is in your editor, the job is to make the viewer focus on the right thing. I’d approach the edit in this order: First, clean the timing. Remove the hesitation at the start, any pause at the end, and all the wasted seconds where nothing changes on screen. Next, decide what part of the original TikTok frame matters. Sometimes the caption and UI context are important. Sometimes they’re clutter. If the point is a product interaction or an on-screen teaching moment, crop tighter. Then add visual structure. A vertical social clip can stay close to the original framing, but a horizontal tutorial usually needs help. That may mean placing the capture inside a phone frame, adding background treatment, or using zooms so the center of attention doesn’t get lost in empty canvas. Subtitles are often worth the effort, especially if the clip will be viewed without sound in review docs, async updates, or social feeds. If the spoken content matters, style the captions so they support scanning instead of covering the entire visual. A useful internal checklist looks like this:
- Hook clarity: Does the first moment still make sense after trimming?
- Focus control: Can a viewer tell where to look without effort?
- Context: Is the TikTok interface necessary or distracting?
- Audio usability: Does the clip rely on music, speech, or both?
- Brand fit: Will this look acceptable in a client deck or launch asset?
Good repurposing feels designed for the new context, not copied from the old one.
Export once and deliver multiple versions
Disciplined editing truly pays off. From one capture, you can produce a vertical version for social review, a horizontal version for internal documentation, and a cleaner excerpt for product marketing collateral, as long as you haven’t trapped yourself with a destructive crop too early. For vertical output, preserve the energy of the original. Keep pacing tight, leave room for captions, and avoid shrinking the source so much that it looks like a tiny phone floating in a tall frame. For horizontal output, don’t just center the vertical video on a blank background and call it done. Use the extra space intentionally. Add titles, supporting text, zoomed callouts, or a composited device presentation so the canvas feels purposeful. The common mistake is treating multi-format delivery like a resize problem. It’s an editorial problem. Each export needs its own framing logic, even if both come from the same source recording.
Frequently Asked Questions About Recording TikToks
A few edge cases come up every time teams try to screen record TikTok for work.
Does TikTok notify creators when you screen record
As of the verified guidance provided for this article, TikTok does not alert creators to screen recordings. That makes recording technically easy, but it doesn’t change the legal or ethical considerations covered earlier. No notification doesn’t mean no restrictions.
Can you record TikTok Live
You can technically record what appears on your screen, including live content, but the risk is higher because live video often includes more contextual, time-sensitive, or personal material. For internal note-taking or review, teams should be cautious. For any public reuse, get explicit permission.
How should you handle watermarks
If you’re using TikTok’s own saved video workflows, watermarks are part of the platform context and often shouldn’t be stripped casually. If you’re evaluating cleanup options for adjacent tools and social workflows, it helps to review safe Captivate Us watermark solutions so your team thinks in terms of compliant handling instead of cosmetic removal for its own sake. A good working rule is this:
- Keep platform identifiers when the clip is only for reference or internal review.
- Use original source files when the content belongs to your team.
- Avoid removing marks from someone else’s content for public-facing reuse unless you have clear rights and a legitimate reason.
What file format should you save in
For editing, save the highest-quality version you can reasonably manage. On desktop workflows, that usually means an edit-friendly master before you make distribution exports. For delivery, use the format your platform or team process expects. In practical terms:
- Use a higher-quality master for editing: This gives you more room for crops, subtitles, and reframing.
- Export lighter files for sharing: Review links, deck embeds, and chat approvals don’t need oversized files.
- Match orientation to destination: Vertical for short-form social, wider layouts for tutorials and presentations. If the recording is headed into repeated reuse, the master file matters more than the first quick export.
Is it better to record on mobile or desktop
Use mobile when you need authentic app context or a fast capture. Use desktop when the clip is heading into a deliverable and quality matters. If you’re unsure, ask what happens next. Reference use favors convenience. Production use favors control.
Should you crop out the TikTok UI
Only if the UI doesn’t help the point you’re making. For research, commentary, and trend analysis, the interface can provide useful context. For product demos, tutorials, and presentation assets, it often distracts from the message. If your team records screens often and wants cleaner results without bouncing between capture, reframing, subtitles, device mockups, and exports, Smooth Capture is worth a look. It’s built for polished product videos, onboarding assets, client walkthroughs, and social cut-downs on macOS, with native recording, fast editing, multi-format exports, and a workflow that’s much closer to how production teams work.
Ready to create stunning app demos?
SmoothCapture makes it easy to record your screen with 3D device frames, cinematic cursor effects, and professional editing tools.