10 Best Zooming Video Software Tools (2026)
You’re probably in one of two situations right now. You either recorded a product demo and realized the important click is tiny, or you’re editing a tutorial and spending too much time manually punching into the screen just to keep viewers oriented. That’s the primary function of zooming video software. It doesn’t just enlarge the frame. It directs attention. A good zoom effect makes a walkthrough feel intentional. A bad one makes the video feel jumpy, cheap, or confusing. The tricky part is that “zooming video software” covers very different kinds of tools. Some are full non-linear editors built for precise keyframing. Some are screen recorders that automate focus. Some are browser editors that favor speed over control. That difference matters more than feature lists suggest. If you make onboarding videos every week, you probably don’t want to hand-keyframe every cursor move. If you’re cutting launch videos or brand work, you may want exact easing, motion curves, and layered animation control. If your team works across devices and just needs a quick punch-in for social clips, a cloud editor may be enough. This guide gets to the point and compares the tools that come up in real workflows. If you also want a broader editing roundup, this 2026 video editing software comparison is a useful companion.
1. Smooth Capture
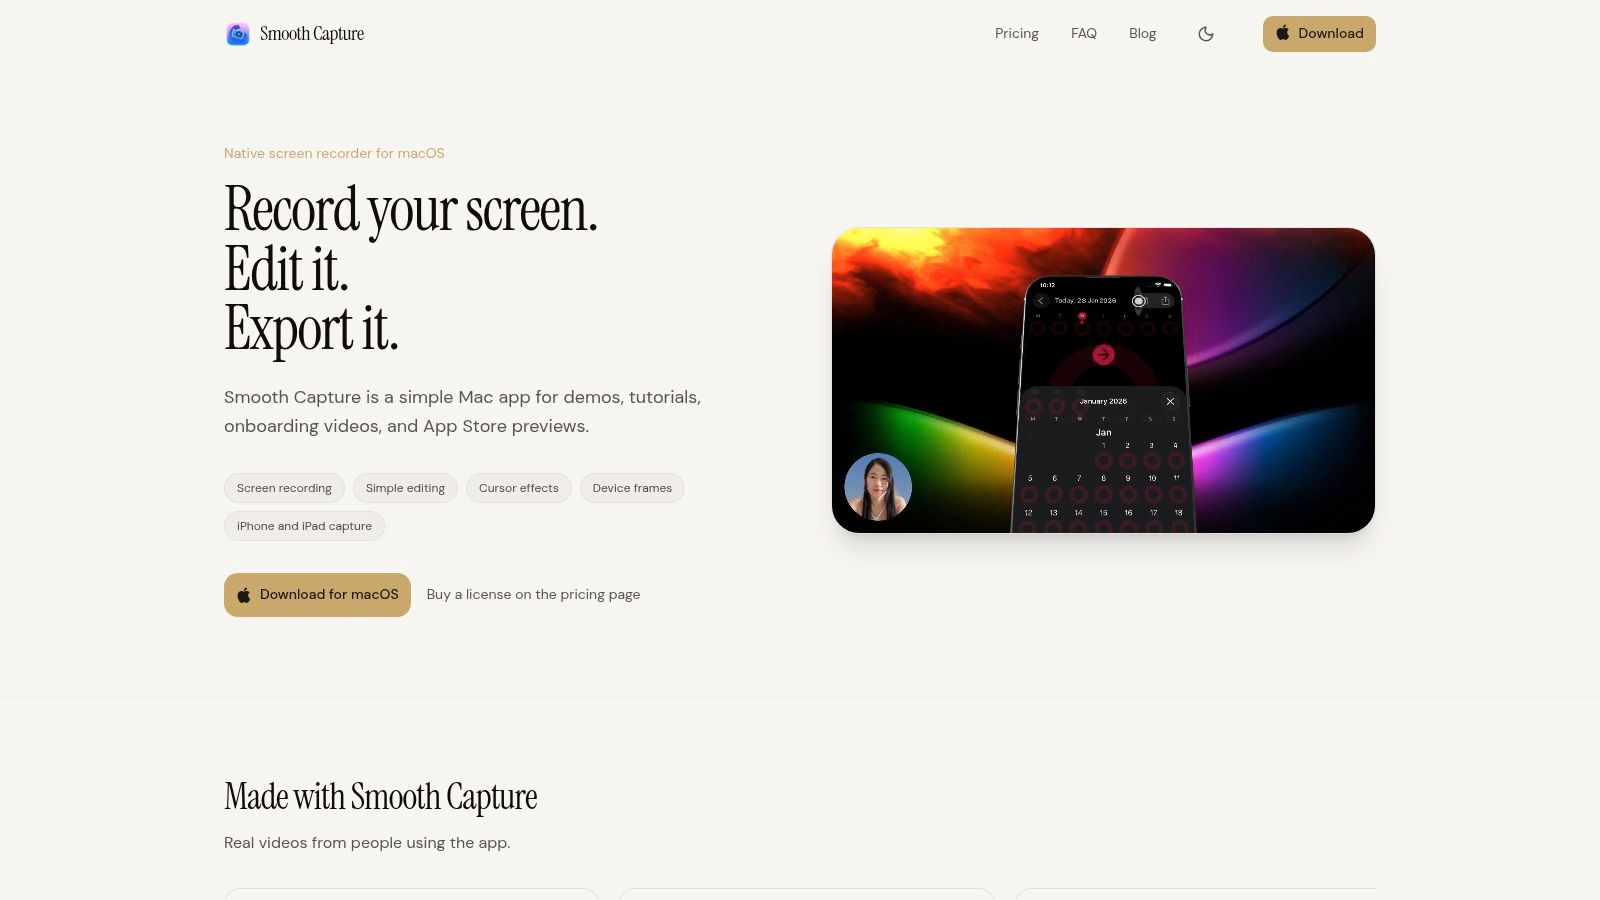 Smooth Capture is the most workflow-focused option here for Mac users who make product demos, onboarding videos, App Store previews, and client walkthroughs regularly. It’s built as a native macOS app, so recording, editing, and export stay local instead of bouncing through browser tabs or cloud uploads. That matters when you’re iterating on lots of short videos and don’t want lag between capture and delivery.
The zoom tools are the reason it belongs at the top of a list about zooming video software. You get automatic zoom with focus detection, plus lens and magnify effects that are usable in real business videos instead of just flashy edits. Add smooth cursor interpolation, click ripples, and cursor autoplay, and the result is clearer interaction without having to animate every move by hand.
Smooth Capture is the most workflow-focused option here for Mac users who make product demos, onboarding videos, App Store previews, and client walkthroughs regularly. It’s built as a native macOS app, so recording, editing, and export stay local instead of bouncing through browser tabs or cloud uploads. That matters when you’re iterating on lots of short videos and don’t want lag between capture and delivery.
The zoom tools are the reason it belongs at the top of a list about zooming video software. You get automatic zoom with focus detection, plus lens and magnify effects that are usable in real business videos instead of just flashy edits. Add smooth cursor interpolation, click ripples, and cursor autoplay, and the result is clearer interaction without having to animate every move by hand.
Why it stands out
Smooth Capture also solves a problem most editors ignore. Screen zooms often look disconnected from the device context. Here, you can pair zoom moves with 3D device frames and angle presets for iPhone, iPad, and Mac, plus direct iOS capture over USB for pixel-accurate app demos. If your team ships launch assets often, that combination is more useful than a giant effects library. The editor is practical, not bloated. You can trim, split, rearrange, add multiple audio tracks, keyframe motion, replace backgrounds, add smart webcam overlays, and generate on-device karaoke-style subtitles using Apple’s Speech framework. If you produce App Store creative, the App Store preview video guide from Smooth Capture is worth reading because it aligns closely with how the app is built.
Practical rule: If your video starts as a screen recording and ends as a polished deliverable, dedicated capture software usually beats a general-purpose editor.
How to create zoom effects in Smooth Capture
The cleanest workflow is to record first, then use auto zoom where the viewer needs guidance and manual keyframes where you need more control. That hybrid approach looks better than forcing every moment into automation.
- Use auto zoom for interface navigation: Let focus detection handle routine cursor-led movement in tutorials and walkthroughs.
- Use lens or magnify for emphasis: These effects work well for dense UI, pricing pages, settings panels, and small controls.
- Pair zooms with cursor styling: Smooth cursor motion and click ripples make the zoom feel motivated instead of arbitrary.
- Add device framing last: For iPhone and iPad demos, frame and angle choices should support the action, not compete with it. The trade-off is simple. Smooth Capture is macOS-only, and projects are local rather than cloud-collaborative. For Mac-based teams shipping polished demos repeatedly, that’s usually a strength, not a limitation. Use it if you want speed, repeatability, and better-looking screen zooms without building a post-production pipeline around every tutorial. You can try it directly on the Smooth Capture website.
2. Adobe Premiere Pro
 Premiere Pro is still the obvious pick when you need exact control and you already live in the Adobe ecosystem. It’s not specialized screen-recording software. It’s a full editor for people who want to decide exactly how every zoom starts, eases, lands, and interacts with titles, motion graphics, and layered assets.
That level of control is both the strength and the friction. You can build beautiful zooms with Scale and Position keyframes, add custom easing, stack masks, and round-trip into After Effects when the move gets more complex. But if your only goal is to make a software tutorial clearer, Premiere often feels like using a full post suite for a problem a dedicated recorder could solve faster.
Premiere Pro is still the obvious pick when you need exact control and you already live in the Adobe ecosystem. It’s not specialized screen-recording software. It’s a full editor for people who want to decide exactly how every zoom starts, eases, lands, and interacts with titles, motion graphics, and layered assets.
That level of control is both the strength and the friction. You can build beautiful zooms with Scale and Position keyframes, add custom easing, stack masks, and round-trip into After Effects when the move gets more complex. But if your only goal is to make a software tutorial clearer, Premiere often feels like using a full post suite for a problem a dedicated recorder could solve faster.
Best fit
Premiere makes the most sense for marketing teams cutting mixed-format campaigns. If your zoomed screen recording sits next to interviews, b-roll, social variants, and paid ad creative, keeping everything in one timeline is efficient. It’s also a practical choice when the zoom is part of a broader motion design language. You can match push-ins across footage types instead of making the screen segment feel separate.
How to zoom in Premiere Pro
A solid Premiere workflow starts with nested clips or adjustment layers when the project gets crowded. That keeps your zoom timing easier to revise later.
- Set your first frame: Place keyframes on Scale and Position where the move begins.
- Create the destination framing: Move forward in time, increase Scale, then reposition the frame.
- Refine the motion: Apply easing so the zoom doesn’t slam in and out.
- Check sharpness at export size: Screen recordings can soften quickly if you push in too far.
Smooth zooms in Premiere usually fail for one reason. Editors zoom because they can, not because the viewer needs help seeing something.
The downside is familiar. Premiere takes longer to learn, and subscription pricing won’t appeal to everyone. If you need a pro editor for broad commercial work, it’s excellent. If you just want fast instructional zooms, it’s overkill for a lot of teams. You can find it on the Adobe Premiere Pro product page.
3. Apple Final Cut Pro
Final Cut Pro sits in a useful middle ground. It’s a real professional NLE, but on modern Macs it feels faster and lighter than many editors expect. If you like magnetic timeline editing and want zoom control without the overhead of a heavier post-production environment, it’s a strong option.
For zooming video software specifically, Final Cut is good at straightforward push-ins, reframes, and animated interface callouts. It doesn’t automate attention the way a dedicated recorder can, but it makes manual work fast when you know what you’re doing.
Where Final Cut works best
Final Cut works especially well for Mac-based creators cutting tutorials, launch videos, review content, and polished app demos. It’s a good fit when your footage mix includes screen capture, talking head segments, graphics, and voiceover. The other advantage is performance. On Apple hardware, scrubbing and rendering tend to stay responsive even as projects grow. That lowers friction when you’re adjusting many small zooms across a longer tutorial.
How to zoom in Final Cut Pro
Most zoom work in Final Cut starts with Transform controls and keyframes. The process is simple, but the quality comes from restraint and timing.
- Enable Transform controls: Adjust scale and position directly in the viewer.
- Set start and end keyframes: Keep the move short and motivated by a click, panel change, or UI state.
- Use plugins sparingly: Third-party push-in effects can speed things up, but too many add visual inconsistency.
- Preview with audio on: A zoom often feels better when it lands with narration or a click cue. Final Cut’s trade-off is platform lock-in. It’s macOS-only, and some teams prefer the broader plugin culture and collaboration habits around other editors. Still, if you’re committed to Apple hardware and want strong manual zoom control, it’s one of the best-balanced choices on this list. The official home is the Apple Final Cut Pro page.
4. Blackmagic Design DaVinci Resolve
 Resolve is what I recommend when someone wants one application that can grow with them. It handles editing, color, VFX, and audio in a single environment, and it gives you two ways to approach zooms. You can use Dynamic Zoom for quick punch-ins or build custom moves with standard keyframes when precision matters.
That makes it more flexible than many creator-first editors. It also means there’s more interface to learn.
Resolve is what I recommend when someone wants one application that can grow with them. It handles editing, color, VFX, and audio in a single environment, and it gives you two ways to approach zooms. You can use Dynamic Zoom for quick punch-ins or build custom moves with standard keyframes when precision matters.
That makes it more flexible than many creator-first editors. It also means there’s more interface to learn.
Why editors choose Resolve
Resolve is attractive because it doesn’t force a weak starter setup. The free version is already highly capable, and if your work expands into color finishing, compositing, or more advanced audio cleanup, you won’t need to switch platforms immediately. It’s also one of the better fits for mixed teams because it runs on Windows, macOS, and Linux. If your company doesn’t standardize on one operating system, that matters.
Resolve rewards editors who think in stages. Rough cut first, then reframing, then polish. If you try to perfect every zoom while still assembling the edit, the software feels slower than it is.
How to zoom in DaVinci Resolve
For fast screen-demo work, Dynamic Zoom is the shortcut. For branded or more controlled videos, custom keyframes on the Edit page are usually cleaner.
- Use Dynamic Zoom for quick emphasis: It’s useful when you need a simple push-in without fussing over many controls.
- Switch to manual keyframes for exact framing: That’s better for UI-heavy tutorials and repeated motion language.
- Watch edge detail: Interface clips can reveal softness fast when cropped aggressively.
- Finish the move before color and titles: Reframing late can force unnecessary cleanup. The trade-off is complexity. Resolve can feel like several applications living under one roof. If you want depth and room to grow, that’s a benefit. If you just need to highlight a button in a tutorial, a dedicated recorder or simpler editor will be faster. You can download it from the DaVinci Resolve product page.
5. TechSmith Camtasia
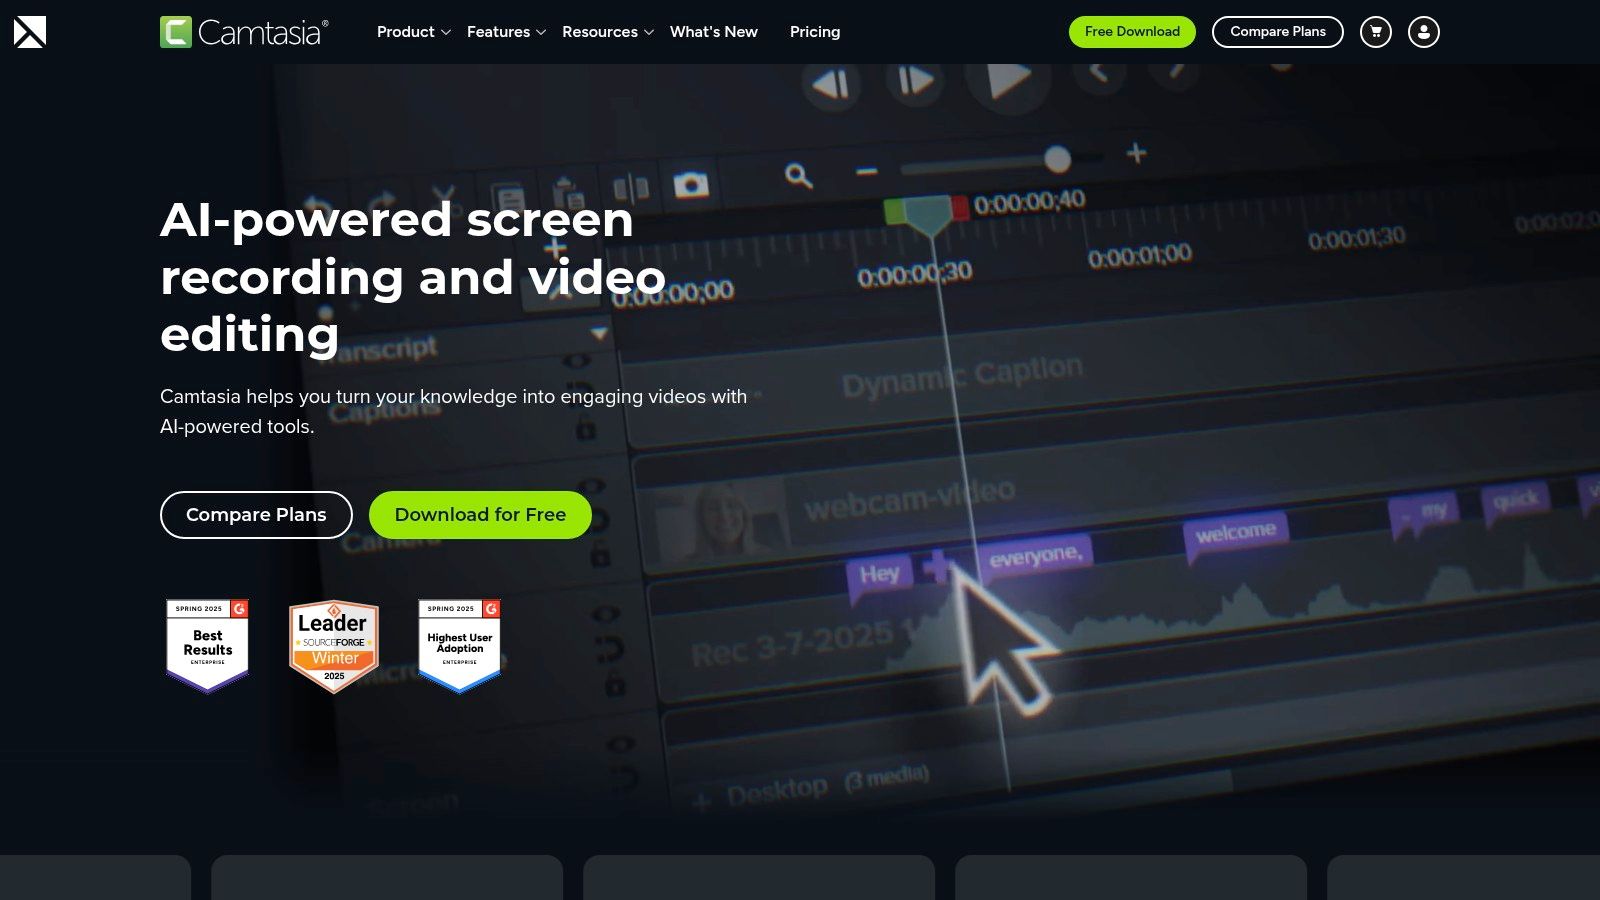
Camtasia has been a default answer for tutorial makers for years because it understands the actual job. Record the screen. Clean it up. Zoom where the learner’s eye should go. Add callouts and cursor treatment. Export. That’s why it still earns a place near the top for instructional zooming video software.
Its biggest advantage is that zooms are part of the teaching workflow, not an effect buried inside a bigger editor. Zoom-n-Pan and SmartFocus reduce the amount of manual animation needed for software demos and training videos.
Why Camtasia stays popular
Camtasia is effective when speed matters more than cinematic polish. Training teams, internal enablement groups, and support teams often don’t need motion design flexibility. They need repeatable output that’s easy to revise. That’s also why it gets compared so often with lighter tools and async recorders. If you’re weighing that trade-off, this Camtasia vs Loom comparison is useful context because it shows where edited instructional content differs from quick communication.
How to zoom in Camtasia
The practical move in Camtasia is to let the software do part of the work. SmartFocus is useful when your screen activity follows a logical path, and manual Zoom-n-Pan works better when you need tighter framing.
- Start with SmartFocus: Let it generate a rough pass for obvious emphasis points.
- Replace weak auto decisions manually: Tighten framing around dense interface moments.
- Combine zooms with cursor effects: Camtasia’s cursor tools help the move feel instructional rather than decorative.
- Keep zoom durations short: Long drifting push-ins make tutorials feel sluggish. Camtasia’s limitations are real. It doesn’t offer the creative depth of Premiere, Final Cut, or Resolve, and power users can hit the ceiling quickly. But for teams producing explainers and tutorials at volume, it’s still one of the fastest routes from recording to clear delivery. The product page is the TechSmith Camtasia website.
6. Telestream ScreenFlow
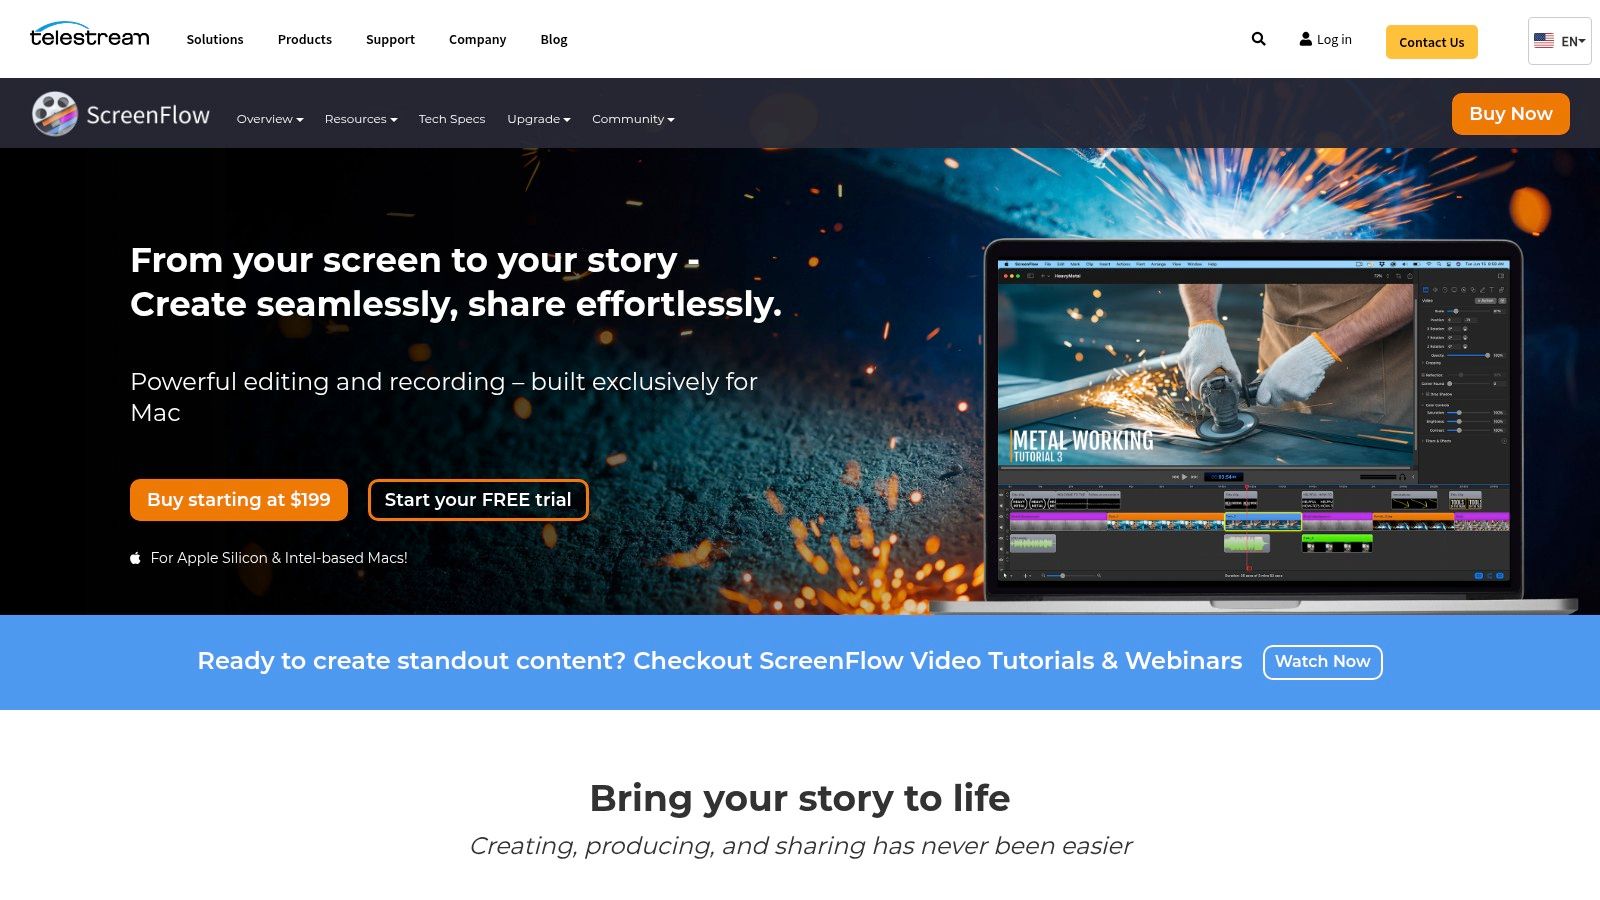 ScreenFlow has long appealed to Mac users who want more editing control than a lightweight screen recorder but less overhead than a full NLE. That balance still holds. It captures screen, camera, and audio cleanly, and it gives you enough timeline control to build polished tutorials without feeling buried in post tools.
Its zoom workflow is straightforward. You keyframe scale and position, combine that with callouts and annotations, and build a clean screencast without leaving the app.
ScreenFlow has long appealed to Mac users who want more editing control than a lightweight screen recorder but less overhead than a full NLE. That balance still holds. It captures screen, camera, and audio cleanly, and it gives you enough timeline control to build polished tutorials without feeling buried in post tools.
Its zoom workflow is straightforward. You keyframe scale and position, combine that with callouts and annotations, and build a clean screencast without leaving the app.
Where ScreenFlow fits
ScreenFlow is a practical choice for educators, app reviewers, consultants, and Mac-based software teams. It also remains useful for mobile app demos because of iOS device capture support. If you’re comparing dedicated Mac screencast tools directly, this ScreenFlow alternative comparison helps clarify where newer workflows differ, especially around interaction polish and production speed.
How to zoom in ScreenFlow
The best ScreenFlow edits tend to be simple. You don’t need fancy motion design to make a tutorial readable.
- Add a video action where attention changes: Place it just before the viewer needs to focus.
- Scale in moderately: Small punch-ins usually look more professional than dramatic zooms.
- Use annotations with restraint: Labels and highlights should support the zoom, not crowd it.
- Reuse styles when making series content: Consistency matters in training libraries. ScreenFlow’s main downside is scope. It’s polished, but the broader ecosystem around it is smaller than what you get with larger editing platforms. For Mac users who want a focused screencast editor with a familiar timeline, it still holds up well. You can check it out on the Telestream ScreenFlow page.
7. Descript
 Descript approaches zooming from the opposite direction of traditional editors. It starts with transcript-driven editing, then layers visual refinement on top. That makes it especially attractive for talking-head videos, interviews, webinars, and tutorial content where the spoken structure matters more than a conventional timeline-first workflow.
For zooming video software, Descript is good when the zoom supports a verbal beat. If the presenter says “look at this section,” adding a quick animation is easy. If you need frame-accurate choreography across lots of screen interactions, it’s less satisfying than a dedicated screencast editor.
Descript approaches zooming from the opposite direction of traditional editors. It starts with transcript-driven editing, then layers visual refinement on top. That makes it especially attractive for talking-head videos, interviews, webinars, and tutorial content where the spoken structure matters more than a conventional timeline-first workflow.
For zooming video software, Descript is good when the zoom supports a verbal beat. If the presenter says “look at this section,” adding a quick animation is easy. If you need frame-accurate choreography across lots of screen interactions, it’s less satisfying than a dedicated screencast editor.
What Descript does differently
Descript’s speed comes from text-based rough cutting. Remove a sentence, and the media updates with it. That’s a huge time-saver for content marketers and solo creators who care more about publishing velocity than post-production nuance. Its integrated recording, captions, filler-word cleanup, and multicam-friendly workflow also make it attractive for teams repurposing long-form content into shorter assets. That’s where it often beats heavier software in day-to-day usefulness.
How to add zooms in Descript
The best use of zoom in Descript is selective. A few clear push-ins are better than trying to animate every change in frame.
- Cut the script first: Don’t animate before the spoken structure is stable.
- Add zooms at meaning shifts: Use them when the speaker changes topic or points to a visual detail.
- Keep the framing generous: Descript works better with simple, readable motion than highly custom moves.
- Review social crops manually: Vertical derivatives can change how a zoom reads.
If your edit starts with the transcript, use a tool that respects that. Fighting a timeline for a dialogue-heavy video wastes time.
Descript isn’t the best fit for editors who want granular motion control, and traditional power users may find its abstraction limiting. But for webinar clips, narrated explainers, and talking-head tutorials, it’s efficient and easy to keep moving. The main product site is Descript, and this overview of Descript features for marketing teams gives more context on how teams use it.
8. CapCut
 CapCut is one of the easiest tools on this list to pick up fast. If your output is mostly short-form content, social cutdowns, product teasers, or creator-style explainers, it gives you quick zoom controls without forcing you into a heavy editing environment.
Its strength is accessibility across desktop, web, and mobile. That’s useful when ideas move between a laptop edit, a phone revision, and a fast approval loop.
CapCut is one of the easiest tools on this list to pick up fast. If your output is mostly short-form content, social cutdowns, product teasers, or creator-style explainers, it gives you quick zoom controls without forcing you into a heavy editing environment.
Its strength is accessibility across desktop, web, and mobile. That’s useful when ideas move between a laptop edit, a phone revision, and a fast approval loop.
Why creators pick CapCut
CapCut is built around speed, templates, and creator habits. You can add keyframed scale changes, captions, effects, and social-friendly formatting quickly, which makes it a strong choice for teams making lots of variations. It’s also helpful for people who aren’t trained editors. The interface encourages experimentation, and most basic zoom moves are easy to understand without deep post knowledge.
How to zoom in CapCut
CapCut handles punch-ins well when you keep the move clean and don’t overcomplicate the frame.
- Set keyframes around the moment of emphasis: Short timing works best for social pacing.
- Use moderate scale changes: Over-zooming makes screen content feel low quality fast.
- Match zoom rhythm to captions: The motion should support the line, not distract from it.
- Check exports on phone screens: CapCut edits often look different on mobile than on a desktop preview. The main trade-off is consistency. CapCut is fast, but advanced workflows can feel a little loose compared with pro editors, and teams sometimes run into quirks around keyframes or cross-device behavior. For quick social-first zooming video software, though, it’s one of the most practical options. The official site is CapCut.
9. VEED.IO
 VEED is for teams that don’t want to install anything and don’t want editing to become a specialist task. Open the browser, upload the clip, apply a zoom effect, add subtitles, and publish. That simplicity is the whole pitch.
It works best when the zoom is a fast production choice, not a highly crafted motion decision. Marketing teams making ads, testimonials, snippets, and social clips often prefer that trade.
VEED is for teams that don’t want to install anything and don’t want editing to become a specialist task. Open the browser, upload the clip, apply a zoom effect, add subtitles, and publish. That simplicity is the whole pitch.
It works best when the zoom is a fast production choice, not a highly crafted motion decision. Marketing teams making ads, testimonials, snippets, and social clips often prefer that trade.
When VEED makes sense
VEED is useful for distributed teams because almost anyone can jump in from any operating system. If approvals, quick revisions, and lightweight collaboration matter more than deep edit control, it’s a sensible pick. Its built-in subtitles, translation tools, and team workspace features also make it a practical content operations tool, not just an editor. That broad utility is why many non-video teams stick with browser-based platforms.
How to apply zoom effects in VEED
VEED’s zoom workflow is simple by design. That’s good when you need output quickly.
- Use presets first: They’re usually faster than dialing every setting manually.
- Adjust duration carefully: Browser editors can make long zooms feel sluggish.
- Pair with subtitles: Zoom plus text is often enough for a strong social cutdown.
- Avoid over-layering effects: Too many web-based elements can make the final result feel canned. The downside is obvious. Browser performance depends on your connection and the browser itself, and power users will hit limits quickly. But for no-install editing and fast team access, VEED is convenient and easy to hand off. The platform lives at VEED.IO.
10. Wondershare Filmora
 Filmora is often the right answer for people who want smoother-looking edits than a barebones app can provide, but don’t want to learn a full professional editor. Its Pan & Zoom tools, presets, templates, and drag-and-drop workflow make it approachable for non-editors who still want presentable motion.
That ease matters when zoom is only one piece of the job. A lot of users need titles, background music, transitions, and a few motion touches, not a deep post-production system.
Filmora is often the right answer for people who want smoother-looking edits than a barebones app can provide, but don’t want to learn a full professional editor. Its Pan & Zoom tools, presets, templates, and drag-and-drop workflow make it approachable for non-editors who still want presentable motion.
That ease matters when zoom is only one piece of the job. A lot of users need titles, background music, transitions, and a few motion touches, not a deep post-production system.
Where Filmora is strongest
Filmora fits creators, small businesses, educators, and in-house teams who need polished videos without heavy training. It’s especially useful when one person handles capture, editing, packaging, and export. The software gives enough control for standard punch-ins and Ken Burns style moves while keeping the interface friendly. That’s why it continues to appeal to users moving up from simpler tools.
How to zoom in Filmora
Filmora’s Pan & Zoom feature is the fastest starting point. It’s more forgiving than manual animation if you’re still learning.
- Choose the start and end frames clearly: The viewer should understand exactly what changed.
- Use presets as a base: Then tweak them instead of building every move from scratch.
- Combine with simple titles: A short label plus a zoom can clarify a feature quickly.
- Don’t stack too many style effects: Filmora gives plenty of options, and that’s sometimes the problem. Filmora’s limitation is ceiling, not usability. Complex pipelines, advanced finishing, and deeper collaborative workflows are better served elsewhere. But if you want an approachable editor that makes zoom effects easy to apply, Filmora does the job well. The official site is Wondershare Filmora.
Top 10 Zooming Video Software Comparison
| Product | Key features | Quality & UX ★ | Unique / Strength ✨ | Target audience 👥 | Price & Value 💰 |
| 🏆 **Smooth Capture** | Native macOS capture + fast timeline; 3D device frames; iOS USB capture; on‑device karaoke subtitles | ★★★★★ Fast GPU‑accelerated preview/export; low friction | ✨ 3D device frames, pixel‑accurate iOS USB capture, on‑device subtitles, smart webcam overlays | 👥 Product teams, marketing, support, agencies, indie devs | 💰 Free trial + 30‑day money‑back; license on site |
| Adobe Premiere Pro | Pro NLE; keyframeable Scale/Position; tight Adobe ecosystem | ★★★★★ Industry standard; granular control, steeper learning curve | ✨ Advanced keyframing & After Effects round‑trip | 👥 Professional editors, agencies, broadcast | 💰 Subscription‑only; premium cost |
| Apple Final Cut Pro | Mac‑optimized NLE; magnetic timeline; native keyframing | ★★★★★ Extremely fast on Apple silicon; smooth scrubbing | ✨ Native Apple performance; rich plugin ecosystem; one‑time buy option | 👥 Mac‑based pros & creators | 💰 One‑time purchase (or Apple Creator Studio extras) |
| Blackmagic DaVinci Resolve | Full post suite (Edit/Color/Fusion/Fairlight); Dynamic Zoom | ★★★★★ Powerful tooling; steeper multi‑page workflow | ✨ Best‑in‑class color, free tier, Studio upgrade for AI/FX | 👥 Colorists, post houses, cross‑platform teams | 💰 Free tier; Studio one‑time license for advanced features |
| TechSmith Camtasia | Screen recorder + timeline; Zoom‑n‑Pan & SmartFocus; cursor effects | ★★★★ Very fast for tutorials; easy UI | ✨ SmartFocus auto‑zoom and tutorial‑focused tools | 👥 Trainers, educators, support teams | 💰 Annual subscription (as of 2025) |
| Telestream ScreenFlow | Mac recorder/editor; iOS capture; scale/position keyframes | ★★★★ Streamlined capture‑to‑deliverable on Mac | ✨ Built‑in templates for recurring tutorials; iOS device capture | 👥 Mac screencasters, app demo creators | 💰 One‑time license; optional stock add‑on |
| Descript | Transcript‑driven editor + recorder; captions & multicam; zooms | ★★★★ Extremely fast text‑based edits; less timeline precision | ✨ Text‑first workflow, filler‑word removal, quick captions | 👥 Podcasters, interviewers, talking‑head creators | 💰 Freemium + paid tiers for advanced features |
| CapCut | Cross‑platform editor; keyframe zooms; AI tools & templates | ★★★ Fast for short‑form/social; occasional quirks | ✨ Social‑first templates; mobile + desktop parity | 👥 Short‑form creators, social teams | 💰 Free with in‑app Pro features; region/device pricing varies |
| VEED.IO | Browser editor; explicit Zoom UI; auto subtitles & translation | ★★★ Easy cross‑OS collaboration; web performance dependent | ✨ No‑install collaboration, web hosting/publishing | 👥 Remote marketing teams, non‑technical collaborators | 💰 Freemium; paid tiers unlock advanced/AI features |
| Wondershare Filmora | Creator‑friendly editor; Pan & Zoom module; motion presets | ★★★ Approachable for non‑editors; less granular than pro NLEs | ✨ Drag‑and‑drop Pan & Zoom presets and templates | 👥 Non‑editors, social creators, small teams | 💰 Paid or subscription options; asset add‑ons available |
Zoom In on Your Perfect Workflow
You record a product demo, then lose 20 minutes keyframing zooms just to keep the viewer’s eye on the right button. That usually means the tool does not match the job. The practical way to choose zooming video software is to sort it by workflow, not by marketing claims. Three buckets matter here. Pro NLEs for full post-production control. Dedicated screen recorders for tutorials and software demos. Cloud-based or creator-friendly editors for fast collaboration and quick turnaround. If zoom is one move inside a bigger edit, start with the pro NLEs. Premiere Pro gives teams broad format support, strong collaboration with Adobe apps, and precise keyframing. Final Cut Pro is faster on Apple hardware and stays efficient on long edits. DaVinci Resolve gives you the deepest finishing toolset if color, audio, and delivery all happen in one place. How to get the effect in this category is straightforward. Set scale and position keyframes, ease the motion, and add motion blur only if the shot needs a softer move. The trade-off is time. These tools give you precision, but every zoom usually needs manual decisions. If your videos begin as screen recordings, dedicated screencast tools are a better fit. Camtasia and ScreenFlow are built for callouts, cursor emphasis, and readable tutorial pacing. They remove a lot of the repetitive setup that slows down general-purpose editors. How to get the effect here is usually faster. Drop a zoom animation on the clip, adjust the focus area, then stack cursor highlights or click indicators to reinforce the action. The downside is ceiling. Once the project needs heavier brand motion, advanced compositing, or detailed finishing, you will feel the limits. Cloud-based and creator-friendly editors fit a different production style. Descript works well when the script or transcript drives the cut. CapCut is quick for short-form social edits. VEED is useful when contributors need browser access from different systems. Filmora sits in the middle, with easier controls than a pro editor and more structure than lightweight web tools. How to get the effect in this group depends on the app, but the pattern is similar. Apply a zoom preset or keyframe scale changes, then keep the move short so interface text stays legible. The trade-off is consistency. These tools are fast to adopt, but they are not always the strongest choice for dense product UI videos or repeatable training series. For macOS teams producing demos, onboarding videos, launch assets, and App Store previews on a regular schedule, Smooth Capture fills a specific gap. It combines local recording performance with timeline editing, keyframes, and screen-focused polish in one app. That includes automatic zoom with focus detection, lens and magnify effects, cursor smoothing, click ripples, device frames, background replacement, webcam overlays, and on-device subtitles. The value is simple. Less manual cleanup after capture, and fewer handoffs between tools. The demand for better video communication tools is real. Zoom grew from approximately 10 million daily meeting participants in December 2019 to more than 200 million by March 2020, according to Business of Apps' Zoom statistics roundup. Zoom also holds a 55.91% share of the global video conferencing software market as of 2026, with Microsoft Teams at 32.29%, according to AffiliateBooster's Zoom market statistics. More meetings and recorded presentations create more demos, walkthroughs, training clips, and internal explainers. Better zoom controls help those videos stay clear. Choose based on the work you do every week. Pro NLEs are right for editors who need frame-level control and broader finishing tools. Dedicated screen recorders are right for trainers, product marketers, and support teams who record software constantly. Cloud editors and creator tools are right for teams that prioritize speed, accessibility, and lighter edits. If you work on a Mac and need polished screen-based video without piling on extra steps, Smooth Capture is a strong fit to test first.
Ready to create stunning app demos?
SmoothCapture makes it easy to record your screen with 3D device frames, cinematic cursor effects, and professional editing tools.