Master How to Record YouTube Music on Mac in 2026
You’re editing a product demo on your Mac. The visuals are clean, the voiceover is solid, and the one missing piece is a short music bed or reference track that already exists on YouTube. Then the usual problems start. A browser tab won’t hand audio to your editor cleanly, a quick microphone workaround sounds cheap, and the “easy” rip tools create a mess you won’t trust in a client-facing asset. That’s why how to record youtube music matters more than most tutorials admit. For personal listening, almost any shortcut feels acceptable. For demos, onboarding videos, launch explainers, and internal training, it doesn’t. You need a recording path that preserves fidelity, stays in sync, and gives your team a repeatable workflow on macOS. This is the Mac workflow I’d use for professional capture. It avoids the low-grade tricks, keeps the signal clean, and treats legal risk like part of production, not an afterthought.
Why Recording YouTube Music for Projects is Tricky
Many users hit the same wall. They can hear the music perfectly through their Mac speakers, but getting that exact audio into a project file without room noise, level problems, or sync drift is harder than it should be.
 The reason is simple. macOS doesn’t encourage app-to-app audio routing in a way that feels obvious to non-audio people. So teams reach for bad substitutes. They record their speakers with an external mic, run a generic browser extension, or use a screen recorder that captures more than they need and leaves them cleaning audio after the fact.
That’s a production problem, not a convenience problem. If the music bed is thin, noisy, or slightly late against your edit, the entire video feels less polished. Viewers might not know why. They’ll still feel it.
Data from a 2025 State of Video Report shows 68% of video creators report audio sync issues as a top pain point, with 40% of their post-production time lost to fixing these problems. That tracks with real team workflows. Audio mistakes at capture stage tend to become editing chores later.
The reason is simple. macOS doesn’t encourage app-to-app audio routing in a way that feels obvious to non-audio people. So teams reach for bad substitutes. They record their speakers with an external mic, run a generic browser extension, or use a screen recorder that captures more than they need and leaves them cleaning audio after the fact.
That’s a production problem, not a convenience problem. If the music bed is thin, noisy, or slightly late against your edit, the entire video feels less polished. Viewers might not know why. They’ll still feel it.
Data from a 2025 State of Video Report shows 68% of video creators report audio sync issues as a top pain point, with 40% of their post-production time lost to fixing these problems. That tracks with real team workflows. Audio mistakes at capture stage tend to become editing chores later.
What goes wrong with the usual shortcuts
A few failure modes show up over and over:
- Mic-on-speaker recording: The microphone captures room reflections, keyboard taps, fan noise, and whatever else is happening around the desk.
- One-click rip tools: You may get a file, but you don’t get much control over what happened during capture or how that audio was processed.
- Loose screen recording setups: They often work for rough internal reference, not for assets that need clean mastering and predictable sync.
The fastest workflow is usually the one that creates the least repair work.
For Mac users doing real production work, the fix is a routed signal path. Send system audio into a recorder digitally, monitor it properly, record a clean take, then trim and export with intention. That’s the difference between “I got the sound” and “I got a usable asset.”
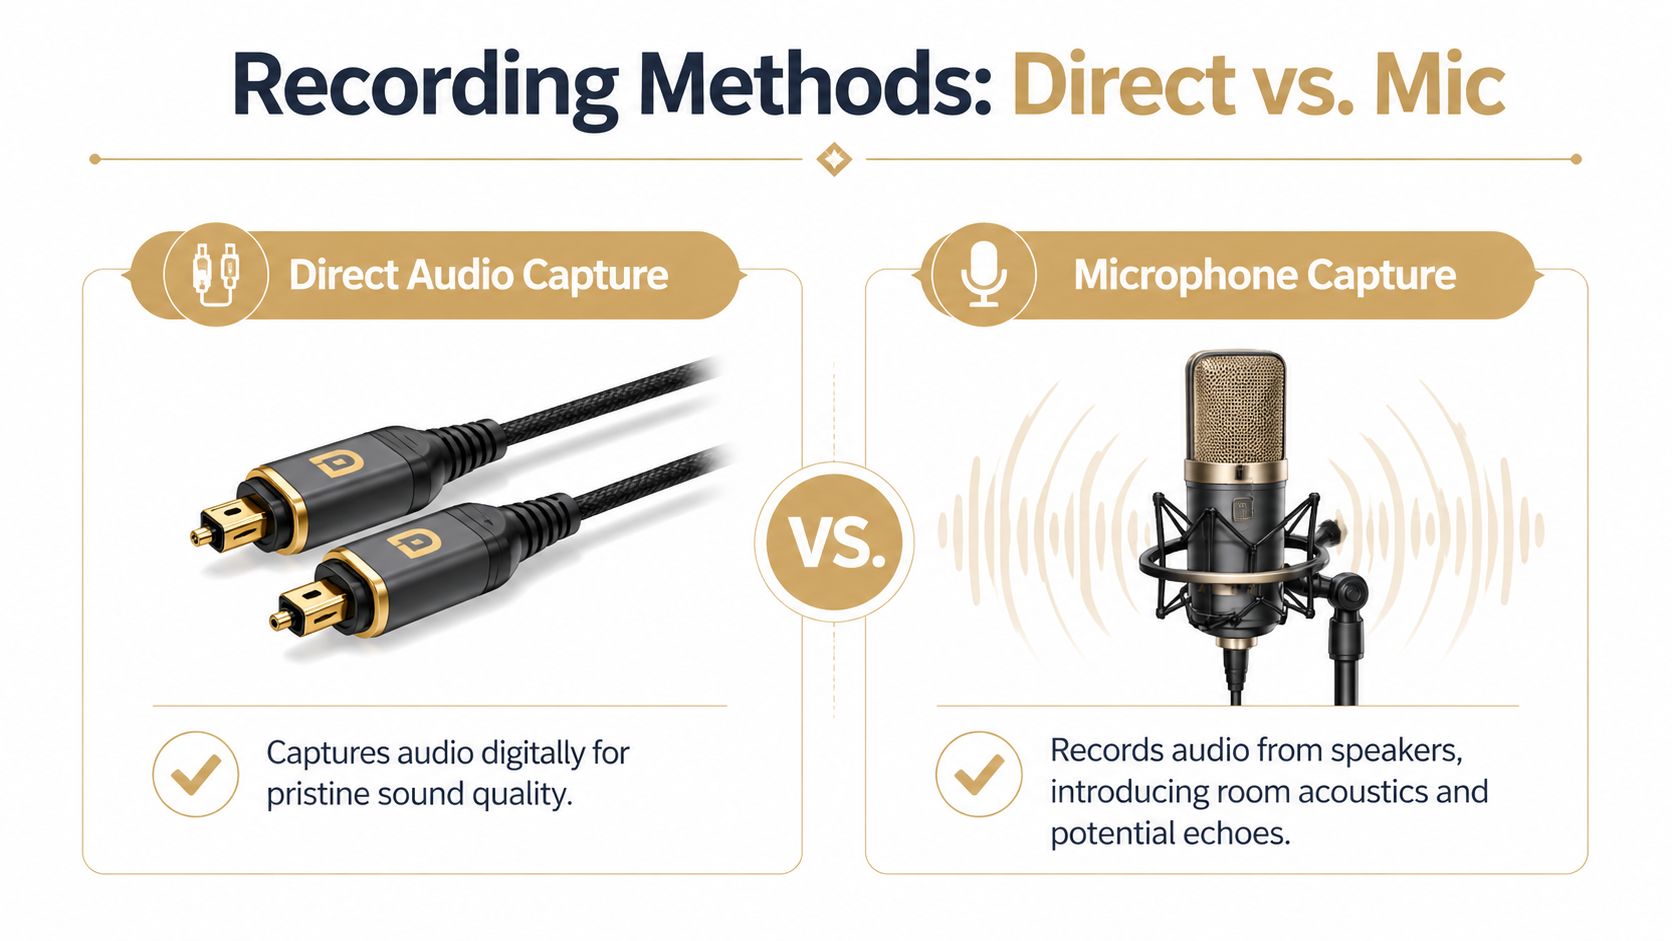
Choosing Your Recording Method Direct Audio vs Mic Capture
If you care about quality, there are really only two paths. You either capture the audio directly from the system, or you let a microphone re-record what your speakers play into the room.
Those aren’t equivalent options.
The side-by-side trade-off
| Method | What it captures | Strength | Main weakness |
| Direct audio routing | The system’s own audio stream | Clean, stable signal for editing | Requires setup on Mac |
| Mic capture | Sound coming out of speakers | Quick for rough reference | Picks up room tone and playback coloration |
Desktop solutions using direct audio routing are technically superior to mobile-style microphone capture because mic-based capture introduces environmental noise and frequency limitations that degrade audio quality. That’s the core decision.
When mic capture is still acceptable
There are a few situations where mic capture is fine:
- Rough internal review: You just need stakeholders to hear the concept.
- Fast annotation: You’re documenting timing or cues, not creating a final track.
- No setup access: You’re on a locked-down device and can’t install routing tools. For everything else, use direct routing. A lot of people looking up how to record youtube music are also comparing downloaders. That can be useful if you’re only trying to inspect or grab a source quickly. An AI-powered audio downloader can help with discovery or testing file options, but it doesn’t replace a controlled Mac capture workflow when you need predictable quality for editing.
Practical rule: If the audio will live in a customer-facing video, record the digital signal, not the room.
Mac teams also need to think beyond fidelity. Workflow matters. You want a setup that can be repeated by anyone on the team without reinventing the routing every time. If you’re evaluating broader recording tools around that workflow, this roundup of screen recording software for Mac is a useful companion read.
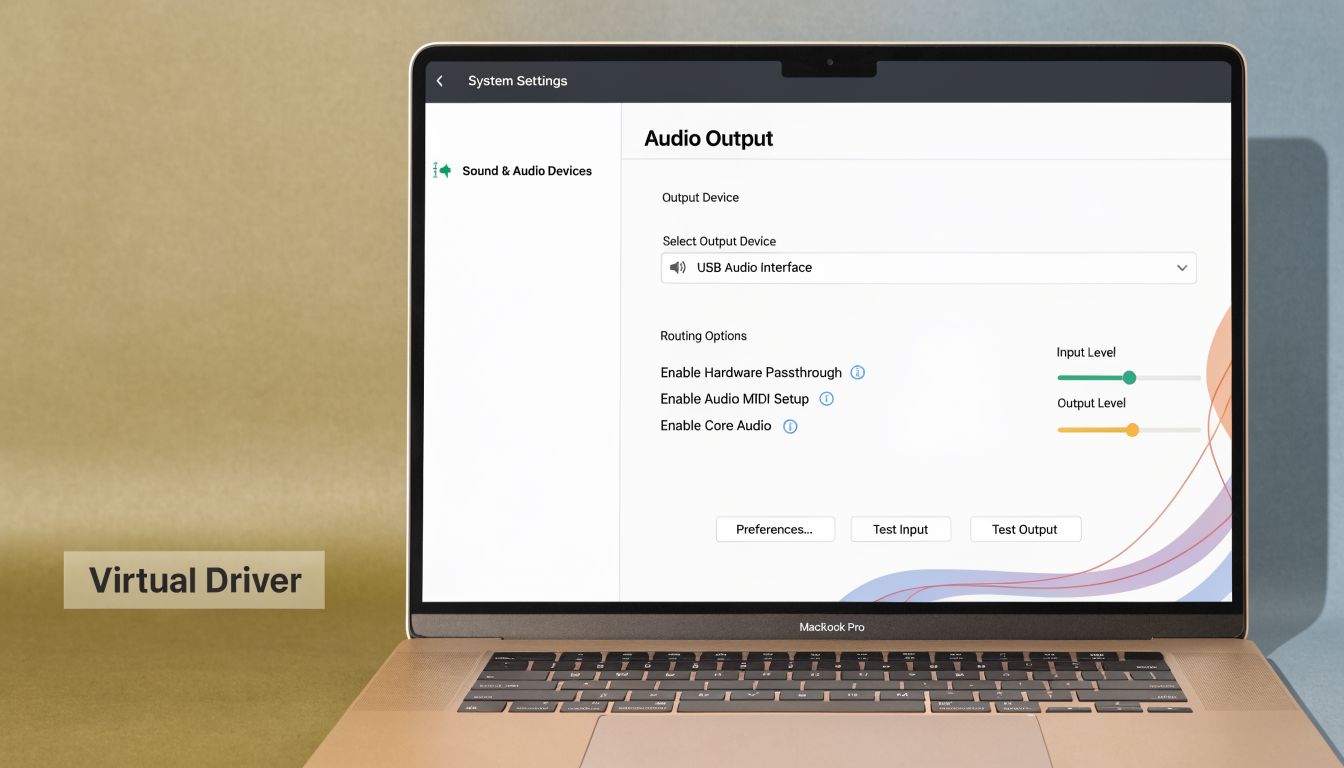
Installing a Virtual Audio Driver on Your Mac
On macOS, the clean way to capture YouTube audio is to create a virtual path between the browser and your recording app. The common tool for this is BlackHole, which acts like a digital audio cable inside the Mac.
 Exporting history is not the same as capturing sound. Google Takeout, launched in 2011, lets users export their full YouTube Music history in JSON format, but that offline export is not suitable for real-time audio capture for video projects. It’s useful for analysis. It’s not a recording chain.
Install the driver first
The exact download flow can change over time, but the process is straightforward:
- Download BlackHole from its official distribution page.
- Run the installer and allow the permissions macOS requests.
- Restart audio apps if they were open during install.
- Open Audio MIDI Setup on your Mac. Once BlackHole is installed, you’ll see it as an audio device.
Build a Multi-Output Device
This is the step people skip, then they wonder why they can’t hear playback while recording. In Audio MIDI Setup, create a Multi-Output Device that includes:
- Your normal listening output: Mac speakers, headphones, or interface
- BlackHole: The virtual destination your recording app will listen to That setup lets the browser send audio to both places at once. You can monitor what’s playing, and the recorder gets a clean digital feed. A few habits keep this stable:
- Match sample rates: Keep devices aligned if your setup allows it.
- Label devices clearly: Rename the multi-output path so teammates know what to select.
- Test with a short clip: Don’t discover routing problems during a long capture. If you want a visual walkthrough of the broader capture concept, this embed is a useful reference point:
Common Mac mistakes
Most failures come from one of these:
- Wrong system output selected: The browser is still sending audio to speakers only.
- Recorder input set to mic instead of BlackHole: The app records silence or room sound.
- No monitoring path: Audio reaches the recorder, but you can’t hear it, so you assume it failed.
- Notifications left on: A clean music take gets polluted by system sounds.
If you can hear playback and your recorder meter moves at the same time, the route is working.
Once this foundation is in place, Mac audio capture becomes routine instead of fragile. That’s what you want in a business environment.
How to Capture System Audio with Your Recorder
With routing in place, the next job is execution. Audacity is a good starting point because it’s accessible and exposes the controls you need.
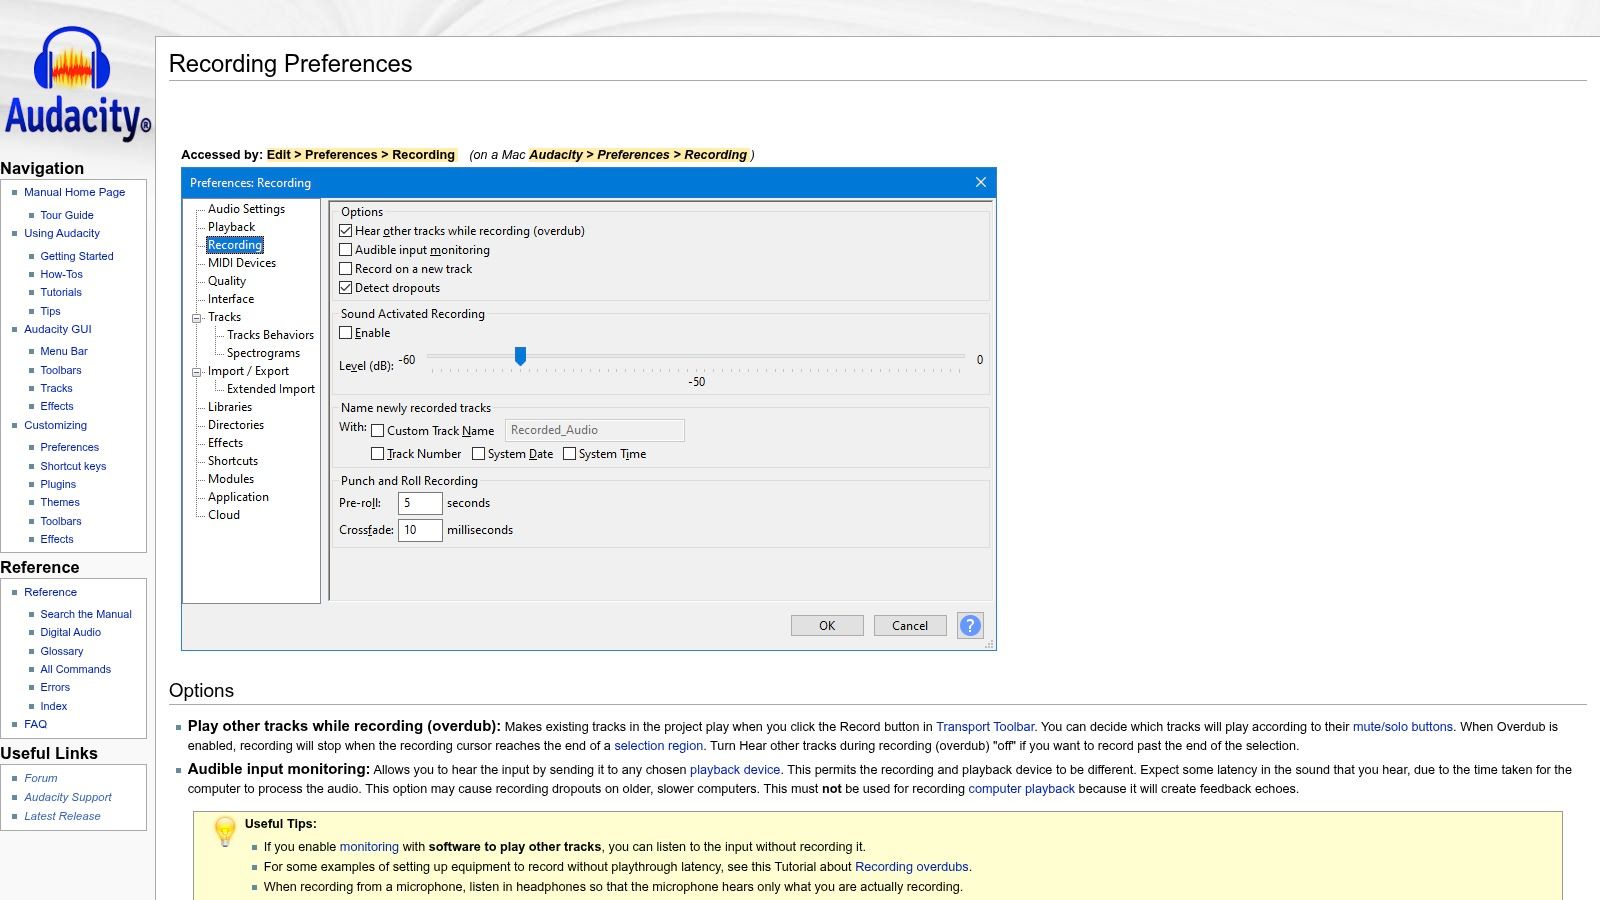
Set the correct input
In Audacity, choose your recording input as the virtual device you created, or the routed device path that includes BlackHole. Don’t leave it pointed at your MacBook microphone or external USB mic. Then confirm the input is Stereo. If your source is stereo and the recorder is set wrong, you’ll create unnecessary repair work before the edit even starts. If you’re also comparing tools that combine screen and audio capture on Mac, this guide to a Mac screen recorder with audio gives useful context on recorder choices.
Use a short preflight test
Don’t start with the full song or full sequence. Run a short clip first. Check three things:
- Meter activity: You should see a live waveform building while the video plays.
- Clean monitoring: No buzzing, doubling, or sudden level jumps.
- Silence between cues: If the source pauses, the recorded signal should pause cleanly too. Professionals achieve time efficiency. A 20-second test catches most setup mistakes.
Watch your levels in real time
To avoid irreversible distortion, audio levels should stay in the green-to-yellow range, and the standard workflow is to click record first, then immediately start the YouTube video so the system captures the full stream from the beginning. That advice sounds basic, but it matters. Distortion during capture can’t be fixed later in any convincing way. Here’s the level logic I use:
- Too hot: Back off system output or app playback level before recording again.
- Too low: Raise the source enough to get a healthy waveform, but don’t chase loudness.
- Peaks near red: Stop and reset. Don’t hope it will be fine in the mix.
Record first. Start playback second. That sequence prevents clipped openings and missing transients.
Keep the take clean
Before the final pass, strip the environment down:
- Turn on Do Not Disturb: Notification sounds ruin otherwise perfect captures.
- Close extra tabs and apps: Some apps steal audio devices or generate random sounds.
- Use a stable browser tab: Don’t scrub around or multitask during the take.
- Name the file immediately: Use project, cue, and version in the filename. A clean capture session should feel boring. That’s a good sign. No surprises, no recovery work, no mystery audio appearing halfway through.
If you get silence or glitches
Use this quick triage list:
- No waveform at all: Your recorder is listening to the wrong input.
- You hear playback but nothing records: System output isn’t routed into the virtual device.
- Clicks or pops: Another app may be fighting for the audio path.
- Doubled sound: You may be monitoring both direct playback and a second routed return. When the chain is correct, recording YouTube audio on a Mac is uneventful. That’s the standard worth aiming for.
Editing and Exporting Your Captured Audio
A raw capture is rarely ready for the timeline. Even a clean take usually has dead air at the front, a hard stop at the end, and level inconsistency that makes it sit awkwardly under voiceover.
Clean the edges first
Trim the start closely, but leave enough lead-in that the first transient isn’t chopped. Do the same at the tail so the file ends naturally instead of cutting off mid-decay. Then apply short fades where needed:
- Fade in: Useful if the capture starts abruptly and needs a smoother entry
- Fade out: Better than a hard stop when the music exits under narration
- Crossfades: Helpful if you’re joining sections or building a loop
Normalize for edit consistency
Normalization is less about “making it loud” and more about making it predictable in the edit. You want a file that enters Final Cut Pro, Premiere Pro, or another editor without forcing a lot of level correction just to begin cutting. If the track will sit under dialogue, leave yourself headroom. Background music that sounds great solo can still fight the voice once it’s in the mix.
Clean editing starts with restrained editing. Trim, fade, level. Don’t process the life out of the track.
Export the right file type
Pick the export format based on the job:
| Format | Best use | Trade-off |
| WAV | Editing, archiving, handoff to post | Larger file size |
| MP3 | Quick review, easy sharing | More compression |
For anything that’s going into a serious edit, I’d export a WAV master first and create lighter derivatives only when needed. If your team is comparing all-in-one production environments, this ScreenFlow alternative comparison is useful when deciding how much editing should happen inside the capture tool versus in a separate audio or video app. A small naming habit helps later. Include the source, purpose, and version in the filename. That keeps your asset library usable once projects pile up.
Legal Guardrails for Using YouTube Music in Projects
Recording audio successfully doesn’t give you blanket rights to use it. That distinction matters most in business work, where a clip can end up in a launch video, paid campaign, sales demo, or onboarding flow seen by thousands of people. A lot of “how to record youtube music” advice ignores that. It shouldn’t. As of 2026, YouTube’s Content ID flags over 92% of downloaded commercial audio tracks, which creates real risk for businesses using ripped audio in promo assets and is why on-device recording plus transformative editing matters.
What teams often get wrong
The common mistake is treating technical access like permission. If you can capture a song from a browser, that only proves the signal path works. It doesn’t prove you have a license or a strong fair use position. For business use, ask these questions first:
- Is this commercial or promotional? Risk rises fast when the asset supports marketing.
- Is the clip central or incidental? Background reference is different from a featured music bed.
- Did you transform the use? Commentary, instruction, critique, or analysis can change the context, but they don’t guarantee safety.
- Could you replace it with licensed music? If yes, that’s often the cleaner business decision.
Safer practical behavior
If your team must reference YouTube music in a tutorial or demo context, reduce exposure:
- Use short excerpts only when necessary
- Add instructional voiceover or analysis
- Avoid building the whole asset around the song
- Document why the clip is included This is less about gaming enforcement and more about acting like a responsible publisher. If a track is carrying the emotional weight of the video, license music instead of borrowing risk.
Frequently Asked Questions
Can I use this method for other streaming sites?
Yes. If the site plays through your Mac’s system audio, the same routing logic usually applies. The legal question is separate from the technical one.
Why not just use Google Takeout?
Takeout is for history export, not live audio capture. It’s useful for understanding listening data, not for pulling a clean track into an edit.
Is it legal to record YouTube music for a client demo?
It depends on how the clip is used, whether the use changes the original's purpose or character, and whether you have permission or a license. For promotional work, assume the bar is higher than it looks.
What if my recording has pops, glitches, or silence?
Start with the basics:
- Recheck the input device: Your recorder may have reverted to a microphone.
- Run a short test clip: Don’t troubleshoot on full takes.
- Shut down noisy apps: Background apps can interfere with capture.
- Confirm monitoring separately: Hearing audio isn’t proof that the recorder is receiving it.
How do I think about Content ID risk?
If your work touches monetized YouTube publishing, brand channels, or customer-facing promos, learn how rights and claims flow. This explainer on how to find Content ID royalty gaps is a useful starting point for teams that need a clearer business view of the issue.
What’s the simplest professional setup on Mac?
A virtual audio driver, a recorder like Audacity, Do Not Disturb turned on, a short test pass, and disciplined level monitoring. Simple beats clever. If your team records product demos, onboarding videos, and launch assets regularly, Smooth Capture is worth a look. It’s built for native macOS workflows, handles polished screen recording and editing in one place, and gives teams a faster path from raw capture to finished video without piling on extra tools.
Ready to create stunning app demos?
SmoothCapture makes it easy to record your screen with 3D device frames, cinematic cursor effects, and professional editing tools.