How to Record Audio From FaceTime: A Mac Guide for 2026
You start a FaceTime call, hit record on your Mac, and assume you’re covered. Then you play the file back and hear only your side, or no usable call audio at all. That’s the moment you realize FaceTime recording on macOS is less about pressing Record and more about understanding Apple’s audio routing rules. If you’re trying to figure out how to record audio from FaceTime with a professional result, there are really two paths. One is free, but technical: QuickTime plus a virtual audio driver like BlackHole. The other is an efficient app workflow that removes the setup overhead. Both can work. They just ask for very different trade-offs in time, friction, and reliability.
Why Recording FaceTime Audio on Mac Is So Complicated
The frustrating part is that your first instinct is reasonable. On macOS, Command + Shift + 5 looks like the obvious answer. It records your screen, and it can capture microphone input. So it feels like it should also record the full FaceTime conversation. It doesn’t work that way. On Mac, the built-in recording path doesn’t natively capture FaceTime’s internal call audio. Apple’s newer native recording workflow exists on iPhone, not macOS. Apple introduced native FaceTime audio call recording in iOS 18, with an audible announcement to both participants, and those recordings save to the Notes app with automatic transcription. That capability is limited to one-on-one audio calls on newer iPhones and is not available on macOS according to Apple’s FaceTime audio call tools documentation. That difference matters because it explains the weird split users keep running into:
| Platform | What works natively | Main limitation |
| **iPhone with iOS 18** | One-to-one FaceTime audio call recording | Not the same as Mac recording, and participant awareness is built in |
| **Mac** | Screen recording and mic capture | No native full-call internal audio capture |
What actually blocks most Mac recordings
Since macOS Mojave, Apple has offered a much better built-in screen recorder, but internal call audio still isn’t part of the default capture path. In practice, that means a normal recording attempt often gives you the visual call window and maybe your microphone, but not a clean recording of both sides of the conversation.
Practical rule: If your workflow depends on system audio from a FaceTime call, assume the stock Mac recorder alone won’t be enough.
That’s why there are really only two workable approaches on Mac:
- The free workaround: route audio through a virtual driver, then record it in QuickTime.
- The direct route: use a dedicated recording app that handles system audio capture more directly. The free method costs nothing and can deliver a solid result. The catch is setup complexity. The dedicated-app route is faster and easier to repeat, especially if you record calls, demos, or training content regularly.
Your Pre-Recording Checklist for Permissions and Consent
Before you touch QuickTime, BlackHole, or any recording app, get two things right: macOS permissions and participant consent. Most failed recordings come from one of those two issues.
Check macOS permissions first
On your Mac, the recording app needs permission to access the screen and microphone. If either is missing, you can end up with a silent file, a black screen, or a recording that starts but misses critical inputs. Use this quick checklist:
- Open System Settings.
- Go to Privacy & Security.
- Open Screen Recording and make sure your recording tool is enabled.
- Open Microphone and confirm the same app has access there too.
- Quit and reopen the app after changing permissions. If you’re comparing different Mac tools, this walkthrough on a Mac screen recorder with audio is useful because it shows where audio capture workflows usually break down on macOS.
Consent isn’t optional
Recording a call without informing the other person is where technical convenience turns into a legal and ethical problem. The safest operating rule is simple: tell everyone on the call before recording starts, and get a clear yes. You don’t need a script. A direct line works:
“I’d like to record this call for reference. Is that okay with you?”
That keeps things clear and reduces ambiguity later. If you’re recording a meeting from your phone instead of your Mac, this guide on how to record meeting on iPhone is also helpful because the consent logic is the same even when the technical steps differ.
A short pre-flight list
Run this every time before an important call:
- Confirm the app can record your screen: macOS blocks unapproved apps.
- Confirm the app can use your microphone: otherwise you may lose your voice track.
- Do a short test recording: thirty seconds is enough to catch routing mistakes.
- State the recording clearly: don’t assume prior consent still applies.
- Save to a known folder: scrambling for the file after the call creates avoidable risk. A lot of FaceTime recording problems feel technical at first. Many aren’t. They come down to missing permissions, no test file, or skipped consent.
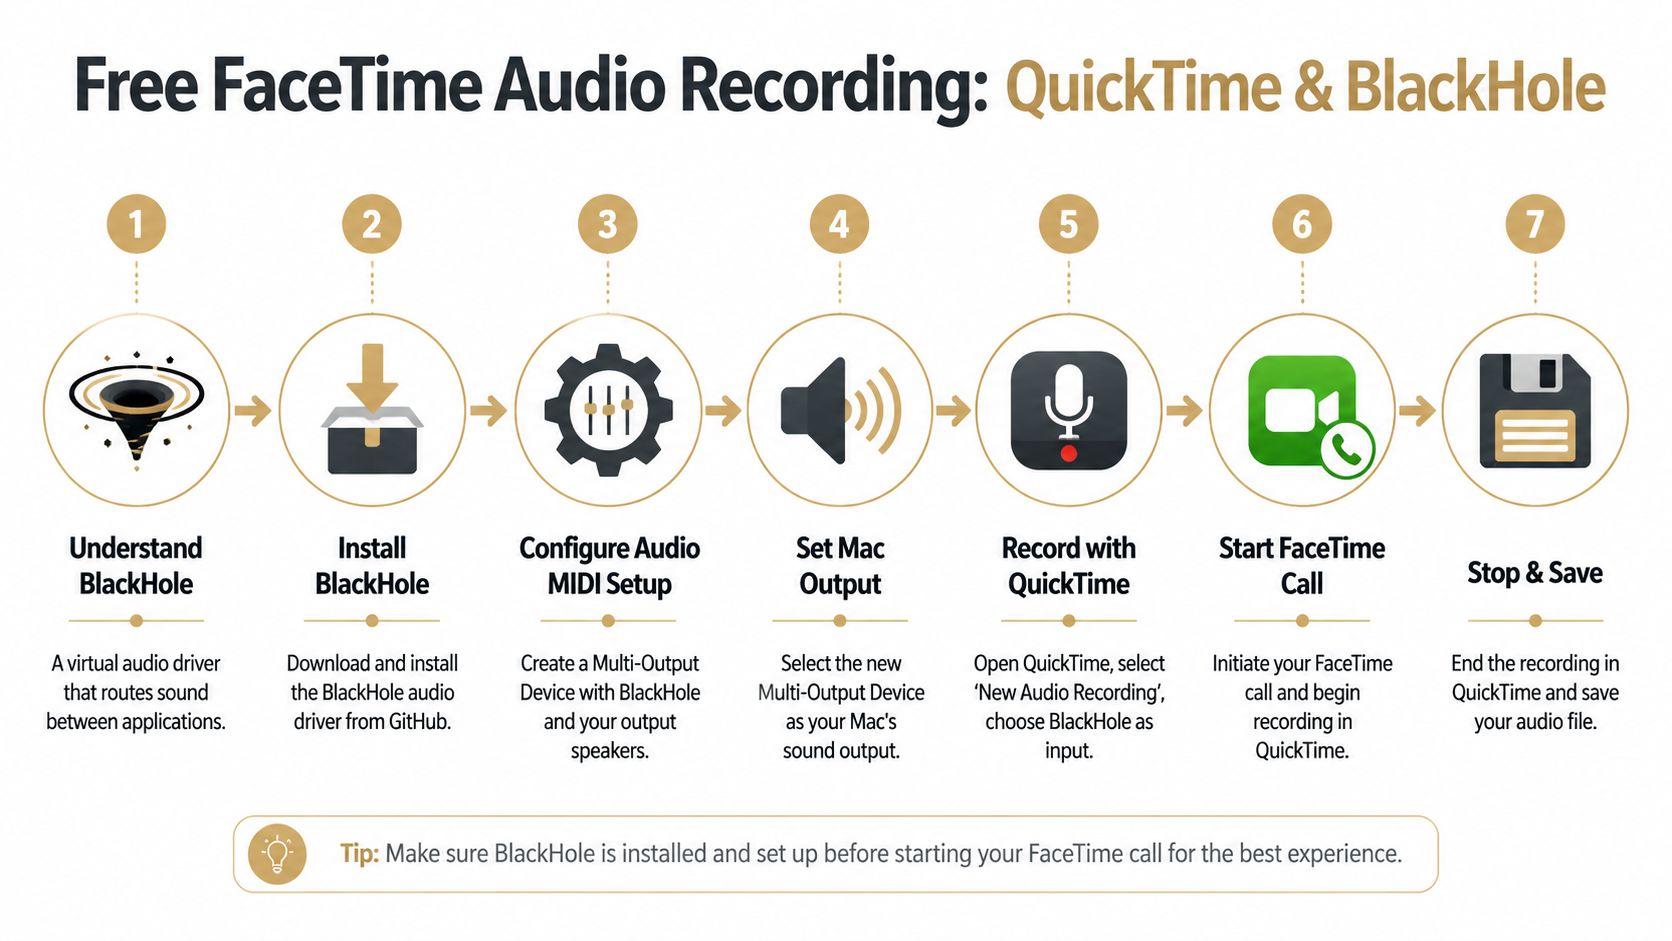
The Free Method Recording with QuickTime and BlackHole
If you want the no-cost path, this is the one most Mac users end up using. The logic is simple even if the setup feels fussy: you install a virtual audio driver, route FaceTime audio through it, and tell QuickTime to record that routed signal.
The reason this works is that macOS doesn’t hand FaceTime’s internal audio directly to the built-in recorder. You have to create a route for it.
Since macOS Mojave, the built-in screen recorder has captured 0% of internal system audio during calls, so users who need both sides of a FaceTime conversation have to route audio through a virtual driver such as BlackHole and create an Aggregate Device in Audio MIDI Setup, as outlined in this FaceTime recording guide. The same guide notes that BlackHole has been downloaded over 4.5 million times since 2020.
What each tool is doing
Before the steps, it helps to know the role of each component:
| Tool | Job |
| **BlackHole** | Creates a virtual audio path on your Mac |
| **Audio MIDI Setup** | Lets you combine devices so audio can be routed where you need it |
| **QuickTime Player** | Records the incoming audio source and, if needed, your screen |
BlackHole isn’t a recorder. QuickTime isn’t a router. Audio MIDI Setup isn’t optional if you want to monitor audio properly while recording. When users mix those roles up, setup gets confusing fast.
Step 1 install BlackHole
Download and install BlackHole from its official project page. During installation, macOS may ask you to approve system audio components. If it does, allow them and restart if prompted. Keep the versioning simple. Install one clean version and test it before changing anything else.
Step 2 create the audio device in Audio MIDI Setup
Open Audio MIDI Setup from Applications > Utilities.
Create a device that combines your normal output and BlackHole. Many guides refer to this as an Aggregate Device or a Multi-Output style setup. The point is the same: you want your Mac to send call audio both to your monitoring path and to the virtual driver so it can be recorded. Look for these ingredients:
- Your normal output device, such as built-in speakers or headphones
- BlackHole as the virtual destination
- Clock source and drift correction options if macOS shows them If you skip this step, you may record the call but not hear it live, or hear it live but fail to capture it.
The free method works best when you treat audio routing like signal flow, not like app settings. You’re building a path, not just toggling a checkbox.
Step 3 set your Mac audio output
Open System Settings > Sound and switch the Mac’s output to the device you just created.
This is the step people often forget. They configure QuickTime correctly, but the Mac is still sending FaceTime audio to the wrong output. The result is silence in the recording. Do a quick verification before the call. Play any short sound on the Mac and make sure you can still hear it.
Step 4 configure QuickTime
Open QuickTime Player. Then choose the recording mode that matches what you need. If you only need audio, use New Audio Recording. If you need the call window too, use New Screen Recording and make sure the chosen audio input is the BlackHole-related device you configured. For a more complete walkthrough of QuickTime behavior on Mac, this QuickTime screen recording guide is a good reference.
Step 5 place a short test call
Don’t use a real client call or interview as your first test. Call a colleague, another device, or a trusted contact and record a brief sample. Then check three things:
- Can you hear the other person in the file
- Can you hear yourself if you intended to capture your mic
- Did the recording save where you expected This method can produce a clean result, but it rewards precision. One missed routing choice can ruin an otherwise perfect call.
What works and what tends to go wrong
The upside is obvious. It’s free, flexible, and available with tools many Mac users already have. The downside is that there are several failure points:
| Common issue | Likely cause |
| You hear the call but the file is silent | QuickTime input source is wrong |
| The file has only one side of the conversation | Audio routing is incomplete |
| You can’t hear the call during recording | Output device wasn’t built correctly |
| Levels sound distorted | Input gain or source selection is off |
For occasional use, this workaround is absolutely viable. For repeated production work, it starts to feel expensive in a different currency: setup time, test time, and recovery time.
The Streamlined Method One-Click Recording with Smooth Capture
The biggest weakness of the free method isn’t audio quality. It’s repeatability. When you have to install a driver, build a custom audio path, verify monitoring, and test QuickTime before every important recording, the process becomes fragile.
That’s where a dedicated recording app changes the equation.
 With a tool designed for Mac recording workflows, the setup is much closer to what users expected from the beginning: choose your screen area, choose your microphone, enable system audio, and record. No virtual drivers. No Audio MIDI Setup detour. No rebuilding the same routing chain because a system setting changed after a restart.
Where the time savings actually come from
The advantage isn’t just “fewer clicks.” It’s fewer places for the workflow to fail. With the QuickTime and BlackHole route, you have to manage:
- the driver install
- the audio device setup
- the output switch
- the recorder input selection
- the test pass With a dedicated app, those steps collapse into a single interface. That matters if you’re producing training videos, customer walkthroughs, interviews, or product launch content on a schedule.
The trade-off in plain terms
Here’s the honest comparison:
| Approach | Strength | Trade-off |
| **QuickTime + BlackHole** | Free and capable | Technical setup, more failure points |
| **Dedicated app** | Faster, easier to repeat, cleaner workflow | Paid software |
That’s why teams often move off the free workaround once recording becomes part of real production work. They don’t switch because the old method is impossible. They switch because reliability starts to matter more than saving license cost. If you want to see the type of workflow this category is built around, take a look at Smooth Capture for Mac. The core appeal is straightforward: it turns recording from a routing exercise back into a content task.
Worth remembering: The more often you record, the less “free” the workaround feels.
If you record FaceTime audio once a year, use the free method. If you record regularly and need clean handoff into editing, the efficient route is usually the smarter professional choice.
Post-Production Tips for Syncing and Troubleshooting
Getting the file is only half the job. The next challenge is making sure the recording is usable. Most cleanup work falls into two buckets: sync issues and routing mistakes you only discover after the call.
How to fix sync drift
If your voice and the remote voice slowly drift apart over time, line up the beginning of the clip first. Use a visible cue like a wave shape spike, a laugh, or the moment someone starts a sentence. Then check the middle and end of the recording. If the gap gets worse over time, your editor may need a slight speed adjustment on one audio layer or a cut-and-realign approach in sections. A practical workflow looks like this:
- Align the first obvious transient.
- Jump to the middle and compare lip movement or speech timing.
- If the sync is off, split the audio and nudge the later section.
- Repeat at the end if needed.
- Export a short sample before rendering the full project. If you’re polishing the audio after capture, Contesimal's podcast software recommendations can help you pick an editor that’s better suited for speech cleanup than a basic video app.
Troubleshooting the most common failures
When a FaceTime recording doesn’t sound right, use a symptom-first approach:
- No audio at all: check whether the recorder was pointed at the right input source.
- Only your voice is present: the Mac captured the mic, but FaceTime audio never entered the recording path.
- Only the other side is present: your mic wasn’t selected or wasn’t permitted in macOS.
- You couldn’t hear the call while recording: your monitor output and record output weren’t set up together.
- The file sounds echoey: speakers and mic were feeding each other. Headphones usually help.
If you have one usable track and one broken track, don’t scrap the session immediately. Duplicate the good section, patch gaps, and salvage the notes value even if the final media isn’t publish-ready.
Clean-up habits that save time
The most useful post-production habits are boring, and that’s why they work:
- Name files immediately: include date, participants, and topic.
- Trim dead air early: it makes sync checks easier.
- Keep a raw copy untouched: never edit your only original.
- Listen on headphones before export: laptop speakers hide problems. For spoken-content recordings, clarity matters more than polish. A slightly plain file that is intelligible and in sync beats a fancy edit with missing phrases every time.
Frequently Asked Questions About FaceTime Recording
Is it legal to record a FaceTime call
It depends on where you and the other participant are located. The safest rule is to always tell the other person before you record and get explicit consent. If there’s any doubt, treat recording without permission as off-limits.
Will the other person know if I record my screen on Mac
Not automatically. A Mac screen recording workflow is not the same thing as Apple’s native iPhone call recording flow. If you use a manual Mac method, the other participant may not receive any built-in recording notice from the system. That’s one more reason disclosure has to come from you.
Can these methods work for group FaceTime calls
The Mac workaround can still be used for group calls because it’s based on audio routing, not on Apple’s newer iPhone-only call recording feature. What changes is complexity. Group calls are harder to monitor, harder to edit, and more likely to expose sync or level issues.
Should I record audio only or video too
If the conversation itself is what matters, audio-only is easier to manage and edit. Record video when facial reactions, on-screen demos, or participant layout add value.
What’s the best method for repeated use
For occasional recordings, the free route is fine if you test it first. For repeat work, the better choice is the one that removes setup friction and gives you consistent files every time. If recording FaceTime calls is part of your job, not a one-off workaround, Smooth Capture is worth a look. It gives Mac teams a cleaner way to record system audio, microphone input, screens, and device workflows without the usual routing gymnastics, then move straight into editing and export.
Ready to create stunning app demos?
SmoothCapture makes it easy to record your screen with 3D device frames, cinematic cursor effects, and professional editing tools.