How to Screen Record FaceTime on Mac & iPhone (2026)
You've probably done this already. A teammate runs a FaceTime walkthrough of a new feature, a customer shares a bug live on their iPhone, or a founder gives a product demo that's too good to lose. You hit the built-in recorder, finish the call, and open the file expecting something you can publish, send to sales, or drop into a training library.
Instead, you get a rough artifact. The screen is there. Your side may be audible. The other person's voice may be weak or missing. The framing looks accidental, not intentional. What seemed like a simple way to screen record FaceTime turns into a file that needs rescuing.
That gap matters for business teams. A casual recording is fine for personal reference. A launch asset, onboarding clip, support tutorial, or internal enablement video needs different standards. It needs clean dialogue, predictable framing, and an output that won't fall apart the moment someone tries to reuse it.
Table of Contents
- Beyond Just Hitting Record
- Understanding FaceTime Recording Legality
- How to Use Apple's Built-in Recording Tools
- Why Native Recordings Often Fall Short
- Achieving Professional Results with Smooth Capture
- Essential Post-Recording Tips and FAQs
Beyond Just Hitting Record
A product marketer at a SaaS company records a FaceTime demo with an engineer. The goal is simple: turn the call into a short feature announcement for customers and a longer internal walkthrough for support. The engineer shares the product clearly. Questions are answered in real time. Everyone leaves the call thinking the hard part is done.
Playback says otherwise.
The file has screen motion, but the conversation doesn't land. One voice is louder than the other. The framing isn't designed for reuse. If the team wants a polished asset, they now have to patch around the recording instead of building from it.
That's the difference between capturing a call and producing a usable video asset. The first is mechanical. The second is a workflow decision.
Practical rule: If the recording needs to be watched by anyone other than the people who were on the call, treat it like production, not note-taking.
For simple documentation, Apple's built-in tools are often enough. They're native, free, and easy to reach on both iPhone and Mac. But teams usually hit the same wall once the recording moves beyond personal recall and into customer-facing work.
A business-ready FaceTime recording usually needs a few things the free path doesn't guarantee:
- Clean two-way audio so the conversation makes sense without repair work
- Predictable composition so webcam, screen, and device content don't feel accidental
- Editability so you can cut pauses, remove mistakes, and reuse clips in multiple formats
- Shareable output that works for training, launch videos, support docs, or social cut-downs
That's why the right question isn't only how to screen record FaceTime. It's whether the method you choose will leave you with something your team can ship.
Understanding FaceTime Recording Legality
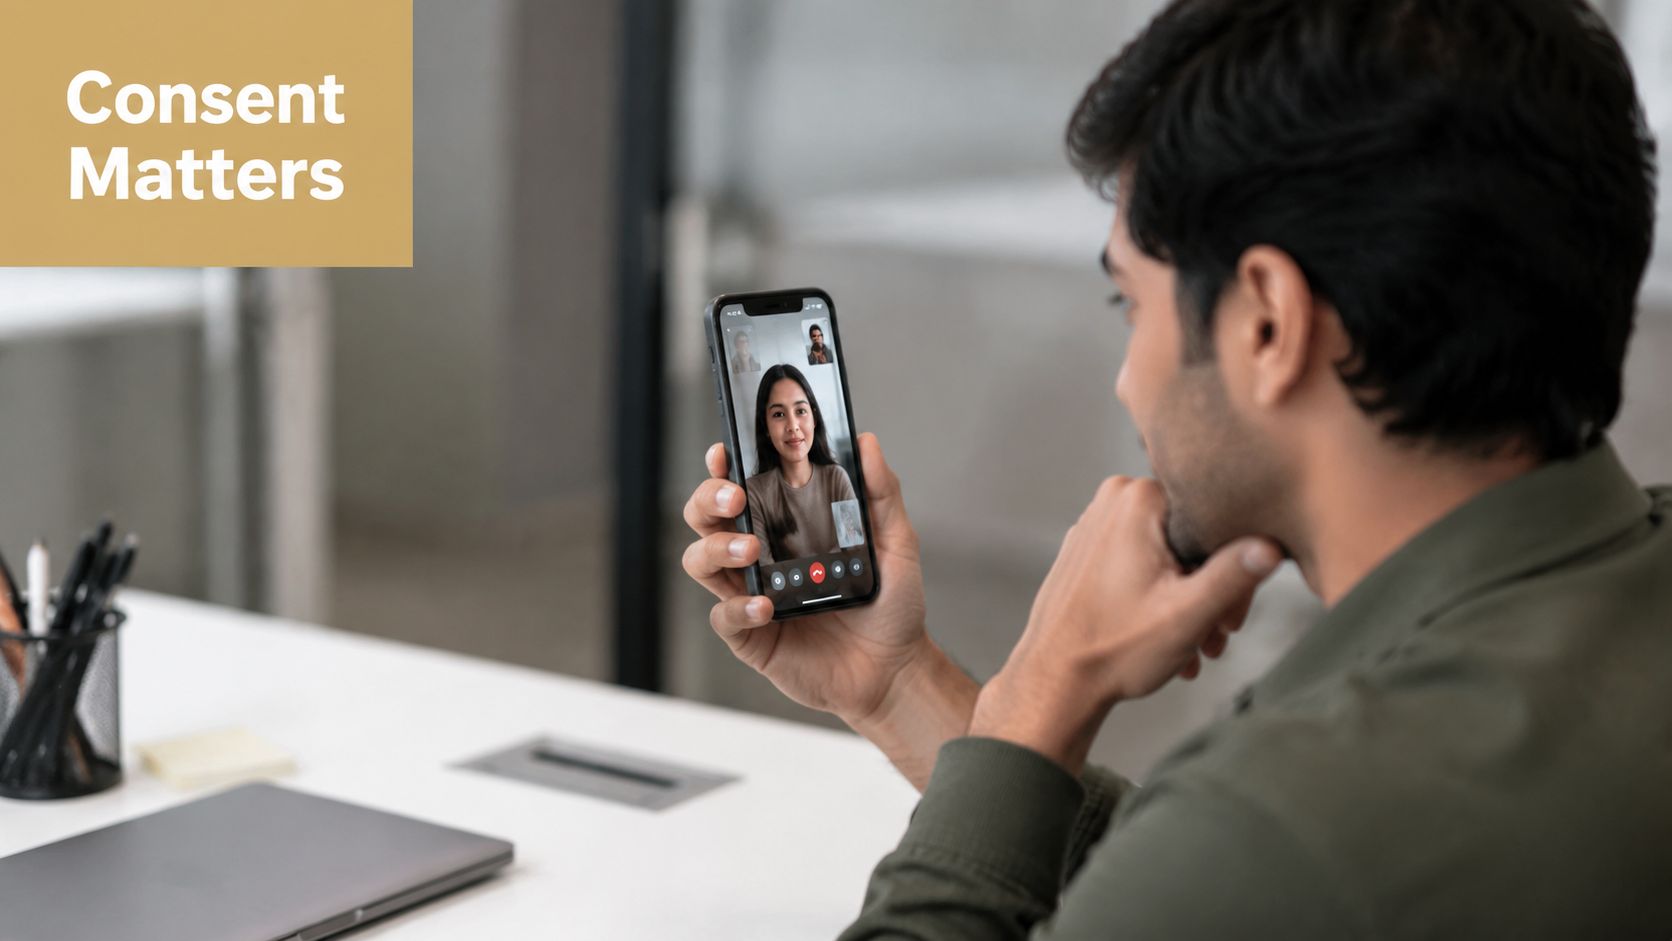
A recorded FaceTime call can become a training asset, customer proof point, or internal reference. It can also become a compliance problem if consent is handled casually.
Consent comes before capture
For business use, the working standard is straightforward. Tell participants the call will be recorded, explain why, and get a clear yes before you create the file.
That matters beyond legal caution. If marketing, support, sales, or product teams plan to reuse a FaceTime conversation outside the original meeting, consent needs to be part of the production workflow, not an afterthought. A clip that cannot be shared confidently is not a usable asset.
A practical process looks like this:
State the intended use
Say whether the recording is for internal review, training, documentation, customer education, or edited external content.Get verbal confirmation at the start
A recorded verbal agreement is easier to verify later than an assumption in chat or calendar notes.Check jurisdiction before broader distribution
Recording laws can vary based on where participants are located. Trade.com.au's guide to recording calls is a useful reminder that consent rules are not uniform across regions.Handle the file according to sensitivity
A product walkthrough for public reuse does not need the same controls as a support conversation that includes account details or personal information.
If your team is still sorting out the technical side of audio capture, this explanation of whether screen recording records calls helps clarify what a screen recording may and may not save.
Apple is signaling the right standard
Apple's own product direction points the same way. In FaceTime on iPhone, Apple says its FaceTime audio call tools can announce recording to both participants when call recording is started during a one-to-one audio call, according to Apple's FaceTime audio call tools documentation.
That matters because older advice about recording FaceTime often focuses only on the mechanic of capturing the screen. Professional teams need a stricter standard. Disclosure, consent, retention, and intended use should be decided before anyone presses record.
My rule for business content is simple. If the clip might be edited, shared, or published later, get explicit permission every time.
That approach reduces legal risk, but it also improves production quality. People speak differently when expectations are clear. They know whether the conversation is private reference material or something that may be turned into a polished asset later.
How to Use Apple's Built-in Recording Tools
A quick FaceTime capture is easy. A FaceTime recording you can hand to a client, repurpose for training, or cut into a polished asset takes more care.
Apple's built-in tools are the starting point. They are free, already installed, and fine for low-risk use cases. They also require more setup discipline than many step-by-step guides admit, especially if the recording needs clear speech, clean framing, and predictable file handling.
Here's the visual version of the core setup first.
Record FaceTime on iPhone and iPad
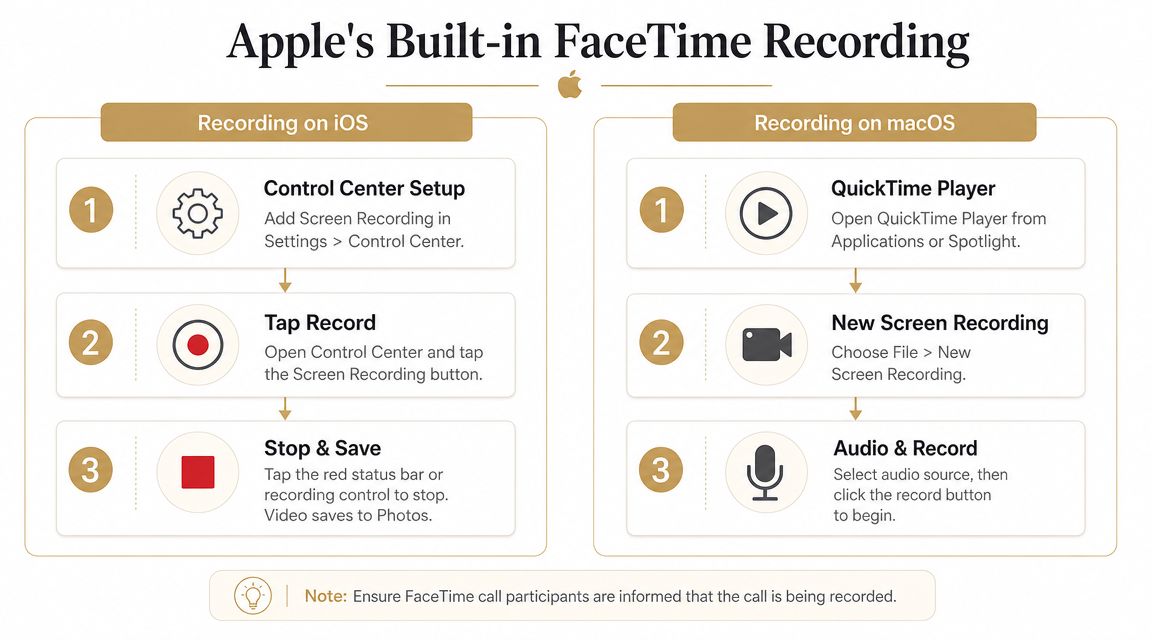
On iPhone and iPad, you record FaceTime through Screen Recording. There is no dedicated FaceTime export feature. In practice, that means the video capture is simple, but the production outcome depends on whether your audio setup matches the job.
Apple users commonly follow this sequence, reflected in an Apple Discussions thread about FaceTime recording: add Screen Recording in Settings > Control Center if needed, start the call, open Control Center, press the record control, and wait through the countdown before returning to FaceTime.
On iPhone or iPad
Open Settings > Control Center and add Screen Recording if it isn't already available. Start the FaceTime call. Open Control Center, press and hold the record button if you need to enable the microphone, then start recording and wait through the countdown. Stop the recording from the red status indicator or Control Center when the call ends.
The file usually saves to Photos, often in Recents. Retrieval is not the hard part. Usability is.
For internal notes, a basic capture may be enough. For customer education, testimonial clips, product walkthroughs, or training libraries, run a short test call first and review the file before the main session. Check whether your own voice is present, whether the other person is intelligible, and whether speaker output is bleeding back into the mic. This breakdown of whether screen recording records audio is a useful reference if you need to understand what Apple's recorder is picking up.
I also recommend setting expectations for the person on the other end. Ask them to use headphones if possible, speak in a quiet room, and avoid switching between devices mid-call. Those small controls do more for the final asset than the record button itself.
If you want a second reference point for audio expectations across Apple devices, Trade.com.au's guide to recording calls is useful because it frames recording as a workflow issue, not just a button-clicking exercise.
Record FaceTime on Mac
Mac gives you more control over framing and file management. It still uses general screen capture tools rather than a FaceTime-specific recording mode.
The standard method is the built-in screenshot and recording toolbar, opened with Command + Shift + 5. Before you start, choose whether to record the full screen or a selected area, then open Options and confirm your microphone input. That microphone choice matters because it affects whether you capture local narration cleanly or end up with weak, inconsistent speech.
On Mac
Press Command + Shift + 5. Choose whether to record the full screen or a selected portion. Open Options and select your microphone input before you start. Record the FaceTime session, then stop from the menu bar control.
QuickTime Player offers a similar path and can feel simpler if you already use it for screen captures.
QuickTime sequence
Open QuickTime Player, choose File > New Screen Recording, select your recording area, choose your microphone input, and start recording.
For business use, the better Mac workflow is usually selective capture rather than full-screen recording. Frame only the FaceTime window if possible. Close notifications, hide unrelated apps, and check the desktop background before the call starts. Those steps reduce cleanup later and make the file easier to edit into something client-safe.
This walkthrough is useful if you prefer to see the native process before trying it yourself:
When the native workflow is enough
Built-in recording works for reference material with a short shelf life. Examples include bug reports, internal reviews, and quick notes for a teammate.
Use it with the right standard. Native tools are good at getting a file. They are less dependable when the file needs to sound balanced, hold up in editing, and represent your brand well after the call is over.
Why Native Recordings Often Fall Short
The most common failure in a FaceTime recording isn't visual. It's audio.
You finish the call, open the file, and realize the conversation is incomplete. Your voice may be there because the recorder captured your microphone. The remote participant may not be, or may only be faintly audible through speaker bleed. That turns a useful live exchange into a one-sided video.
The audio problem is the real problem
A widely reported issue is that macOS screen capture with Command + Shift + 5 often records only the local mic, not system audio from the call, so capturing both sides properly often requires external tools or audio-routing workarounds for clean dialogue, as noted in CapCut's guide to recording FaceTime.
That limitation shows up in several ways:
- Missing remote voice because the recorder isn't taking true call audio
- Uneven volume when one side comes through a mic pickup instead of direct capture
- Echo and room sound when speaker output gets re-recorded by the microphone
- Silent clips that look fine visually but can't be used as-is
Native screen recording can produce a file that looks finished and still fails the basic test of being understandable.
Casual recording and production recording diverge. If the file is only for your own notes, you can tolerate imperfections. If someone else needs to watch it without context, the audio has to stand on its own.
Native capture is built for convenience, not production
Apple's built-in tools are good at being available. They aren't built around editorial control.
You don't get the kind of workflow that product marketing, customer education, or agencies usually need when a recording is headed toward reuse. There's limited control over composition, no built-in production framing for webcam presence, and no natural path to separate, cleanly managed tracks for later editing.
That creates downstream work:
| Native recording issue | Why it hurts business use |
|---|---|
| One-sided or weak audio | Reviewers miss context and key statements |
| Basic screen-only framing | The asset looks improvised instead of intentional |
| Limited capture flexibility | Teams end up re-recording instead of repurposing |
| Minimal post-production control | Small problems become bigger editing jobs |
The native path is still valuable. It just needs to be recognized for what it is: a convenient first step, not a polished production system.
Achieving Professional Results with Smooth Capture
Once the recording needs to be client-safe, team-ready, or public-facing, the workflow has to change. A production workflow doesn't start from “how do I capture this?” It starts from “how do I avoid rework later?”
What a business-ready workflow needs
The biggest shift is audio reliability. Native macOS screen recording is fast for simple captures, but capturing remote call audio reliably often requires audio-routing tools. Dedicated recording workflows that preserve both audio and video are the safer choice when dialogue accuracy is critical, as explained in Castmagic's article on screen recording FaceTime.
For business use, the recording method should support four things at minimum:
- Direct audio capture so both sides of the conversation are usable
- Device flexibility so Mac, iPhone, and iPad workflows don't require awkward improvisation
- Editorial control so the recording can be trimmed, reframed, and repurposed
- Presentation tools so the final asset looks intentional, not accidental
That's where tools built for regular video production make more sense than native utilities. For example, Smooth Capture is a macOS recording and editing app that supports screen recording, iPhone and iPad capture over USB, timeline editing, multiple audio tracks, webcam overlays, device frames, cursor effects, and subtitle generation on-device. If internal audio on Mac is your sticking point, its guide to a Mac internal audio recorder workflow is directly relevant.
A practical benefit of this kind of setup is that your team can stop treating every FaceTime recording like a fragile one-off. The same capture can feed an internal walkthrough, a trimmed customer clip, and a social cut-down without forcing a restart from scratch.
FaceTime Recording Method Comparison
| Feature | Built-in iOS/macOS Recorder | Smooth Capture |
|---|---|---|
| Screen capture | Yes | Yes |
| iPhone and iPad capture for production use | Basic native screen recording on device | Supports iOS device capture over USB |
| Remote audio reliability | Often inconsistent without workarounds | Designed for workflows that need usable audio in the final asset |
| Webcam presentation control | Limited | Webcam overlays with positioning and resizing |
| Editing after capture | Minimal native trimming | Timeline editing with trim, split, rearrange, and keyframing |
| Multiple audio tracks | Not a native strength | Supported |
| Device framing and visual polish | Limited | Device frames, perspective treatments, and presets |
| Output flexibility | Good for quick saves | Better suited for reusable business assets |
A practical production setup
For a FaceTime-based asset that needs to survive stakeholder review, use a workflow like this:
Decide the deliverable before the call
A support archive, launch teaser, and onboarding tutorial should not be captured the same way.Test audio on the exact machine and device
Don't assume yesterday's setup still works after OS changes, microphone changes, or routing changes.Capture with editing in mind
Leave a little buffer before the demo starts and after it ends. That makes trimming cleaner.Frame for reuse
If you'll need vertical and horizontal versions later, avoid cluttered compositions that only work in one aspect ratio.Record once, publish many times
A solid source file should support internal docs, customer success snippets, release notes, and social edits.
The cheapest recording workflow often becomes the most expensive one after the call, because the team spends time fixing what the recorder failed to capture.
For business teams, that's the essential trade-off. Native tools are free at the moment of capture. Professional workflows save time after capture, which is where most of the cost usually shows up.
Essential Post-Recording Tips and FAQs
A clean recording is only half the job. The other half is deciding whether the file is ready for viewing, whether it's safe to share, and how many versions you need.
What to do right after the call
Teams often move too fast here. They export, send, and only later realize the first few seconds were clipped or the remote speaker was too quiet.
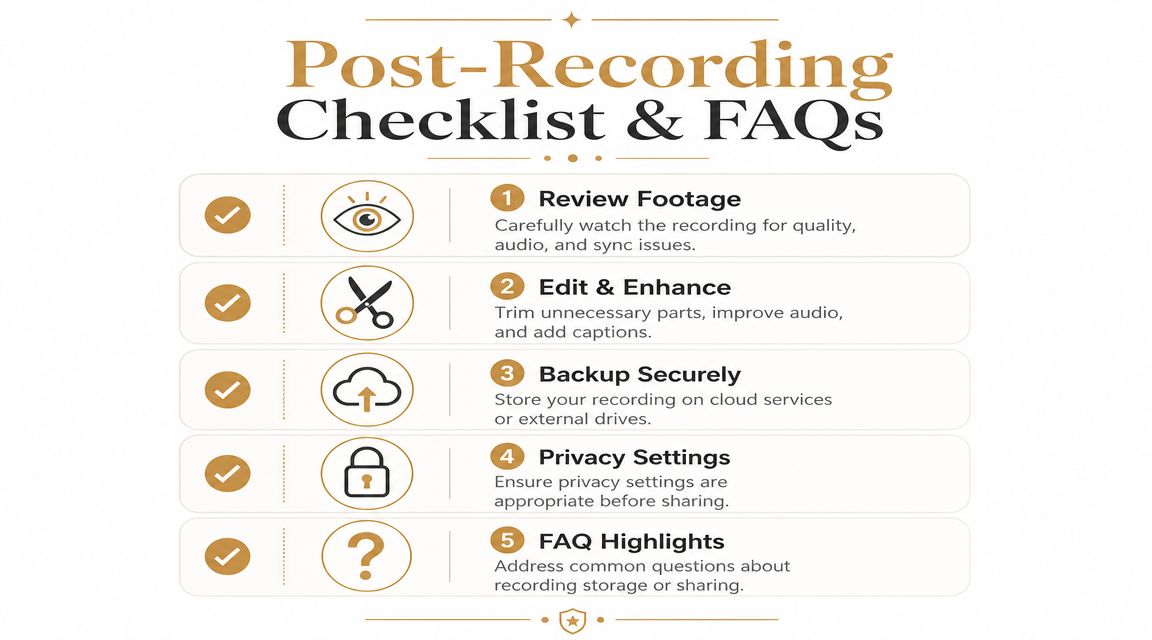
Use a short review checklist:
Watch the opening minute
Confirm that the screen is sharp, the right window was captured, and the audio starts cleanly.Check the weakest section
If someone spoke softly or moved through a complex workflow, inspect that section before you distribute anything.Trim dead air
Remove pre-call setup, awkward pauses, and off-topic chatter that makes the asset feel unedited.Create the right version for the job
Internal knowledge base clips can be longer. Customer-facing assets usually need a tighter cut.Store the source safely
Keep the original recording before exporting compressed variants for sharing.
Review standard: Never share the first export until someone has watched it all the way through with headphones.
If you want the recording to feel branded rather than merely documented, add captions, a simple intro card, and a clean ending. Those touches do more than make the video look better. They also signal that the asset is meant to be reused.
FAQ
Will the other person know I'm screen recording FaceTime?
Not necessarily with generic screen recording workflows. That's why explicit disclosure matters. Apple's newer one-to-one FaceTime audio call recording tools include participant notice, but teams shouldn't rely on assumptions about what the other person can or can't see.
What's the easiest way to screen record FaceTime on iPhone?
Use the built-in Screen Recording control in Control Center. It's the simplest native path for quick capture.
What's the easiest way to screen record FaceTime on Mac?
Use the built-in macOS recording toolbar with Command + Shift + 5, or QuickTime Player if you prefer that interface.
Why is my FaceTime recording missing the other person's audio?
Because native capture often records your microphone more reliably than the remote call audio. That's the most common reason a FaceTime recording sounds incomplete.
When should I use a professional recording workflow instead of native tools?
Use one when the recording needs to be polished, reviewed by others, archived for training, or repurposed into multiple assets.
What's the best way to share the final file?
Share a compressed viewing version for stakeholders and keep the original source file stored separately for future edits.
If your team records customer calls, product walkthroughs, onboarding sessions, or launch demos regularly, Smooth Capture is worth evaluating as a production workflow rather than a one-off recorder. It's built for macOS teams that need to capture screens and connected iOS devices, edit quickly, manage multiple audio tracks, add polished visual treatments, and export video assets that are ready for review and reuse.
Ready to create stunning app demos?
SmoothCapture makes it easy to record your screen with 3D device frames, cinematic cursor effects, and professional editing tools.